
[ad_1]

你想创建一个博客吗?我们知道发布博客的想法可能会让人感到害怕,特别是如果你不是一个技术娴熟的人。但是,好消息是:无论你的技能如何,创建博客都比你想象的容易。
像WordPress这样的博客平台让任何人都可以在不知道单行代码的情况下创建博客。设置博客后,您可以在后期编辑器中创建与Microsoft Word非常相似的内容。您可以使用易于使用的拖放界面自定义博客的设计,外观和感觉。
换句话说,在2019年创建一个博客比10年前开始更容易。
所以,你想创建一个博客…但为什么要听我们说话?
与其他崇拜专家和假先知不同,我们只传播我们的实践。
我们在我们的职业生涯中建立了几个大型博客,包括这个博客。帮助成千上万的WordPress用户开始使用博客,我们确切地知道如何从头开始构建一个令人惊叹的博客。
无论您是初学者还是仅需要复习,在本指南中,您都可以找到使您的博客正常运行所需的一切。
我们将本指南分为12个不同的章节:
目录
- 第1章:为什么要启动博客?
- 第2章:选择博客平台
- 第3章:创建博客 – 技术指南(逐步)
- 第4章:配置博客设置
- 第5章:基本的WordPress插件和教程
- 第6章:使用WordPress编辑器
- 第7章:创建WordPress页面
- 第8章:编写您的第一篇博文
- 第9章:推广你的博客
- 第10章:WordPress SEO:入门
- 第11章:通过博客获利
- 第12章:学习和掌握WordPress的资源
在本分步指南中,我们将指导您在不到一小时的时间内从头开始创建博客。
如果你宁愿直接切入追逐并潜入 分步技术教程,然后去吧。
第1章:为什么要启动博客?

自成立以来,博客已经走过了漫长的道路。最初,个人使用它来分享他们的个人想法和意见。现在甚至 全球各地的企业 利用博客扩大影响范围并产生新的潜在客户。
谈到博客,有目的是至关重要的,或者随着时间的推移你会失去方向和灵感。当你的博客有目的时,你的读者会联系它,因为这个目的在你的写作中闪耀。
以下是人们博客的一些原因:
期刊/个人博客
有些人在博客上记录他们正在进行的所有事情,因此他们可以跟踪他们的进度。它可以帮助您与社区中志同道合的人建立联系,并与他们建立长期的关系。
赚钱博客
许多人创建一个只有一个目标的博客:在线赚钱。
您的博客可以是您的半被动收入来源,这意味着即使您没有积极更新它,您也可以赚钱。您可以通过以下方式从博客中获利:
- 广告:在您的博客上销售广告空间,并从中获得稳定的收入来源。
- 联属网络营销:将产品推荐给您的受众群体,并在使用您的推荐链接进行购买时获得收入。
- 销售产品:创建一个您知道您的受众喜欢并在您的博客上销售的产品。
建立自己的权威
在这个拥挤的数字时代,博客可以帮助您展示您的专业知识,并建立您作为权威。为了做到这一点,你必须密切关注你的利基趋势,并不断博客。
请务必定期向您的受众提供建议和建议,这样他们就会发现您的博客是与您的利基相关的所有内容的首选资源。
1.1。为您的博客选择正确的利基
在创建博客时,必须意识到博客并不总是成为彩虹和独角兽。博客是一场马拉松,而不是冲刺。
要长期运营博客,您需要坚持不懈。要坚持不懈,在为博客选择主题时,您需要考虑几个不同的事情:
- 激情:对于持久的博客,你需要选择一个你真正热衷的话题。你不能连续写一篇不会让你兴奋的话题。
- 交通量:仅仅因为你喜欢一个主题并不总是意味着它是创建博客的最佳选择。如果没有其他人想要阅读您将要选择的主题的博客,那么在进入之前您需要重新考虑该主题。
- 目的:在决定主题时考虑博客的目的。例如,如果您想通过广告谋生,但利基率过低而流量较低,那么您可能希望扩大自己的利基市场或改变您的货币化策略。
1.2。忘掉常规写作课
博客与传统写作有点不同。如果你是一个有抱负的博主,那么你可能不得不忘记你在英语课上教过的一些东西。
例如,当您在网上写博客或写作时,建议您制作短句甚至更短的段落,以便读者可以快速使用您的文章。这主要是因为人们对网络的关注时间较短。
另一个区别是,印刷编辑经常建议作家写第三人称。但是,博主们应该用第一人称的声音写作。通过以第一人称语音书写,您就像与朋友一样直接与读者交谈。
除了直接与您的读者交谈外,您还必须针对搜索引擎优化您的博客帖子。这将有助于搜索引擎发现您的网站并将其编入索引,这样您就可以吸引更多搜索引擎流量,也称为自然流量。
第2章:选择博客平台

您选择的博客平台可以创建或破坏您的博客。
并非每个博客平台都是平等的。很容易被所有不同的博客平台所淹没。所以,在你进入之前,值得花点时间研究几个不同的因素:
- 您的博客目的:在选择平台时,您必须检查它是否与您的博客目标保持一致。
- 可用性:显然,您需要选择一个易于使用的平台。通过直观的平台,您可以轻松完成任务,并且学习曲线极小。
- 获利:仔细检查您选择的博客平台是否允许您通过广告从博客中获利。例如,某些平台,如免费的WordPress.com,不允许您通过博客获利。这意味着如果你的目标是这样一个平台不适合你 赚钱博客。
2.1。最佳博客平台摊牌
既然您已经知道需要考虑哪些因素,那么让我们来看看现有的不同博客平台。
WordPress.org

毫无疑问,WordPress是最受欢迎的博客平台。最初,WordPress是作为一个博客平台开始的,但它现在已经转变为一个成熟的内容管理系统。
使用WordPress,您可以构建任何类型的网站,例如电子商务商店,论坛,利基社交网络等。
我们强烈建议您从WordPress开始,因为它可以让您完全控制您的博客。
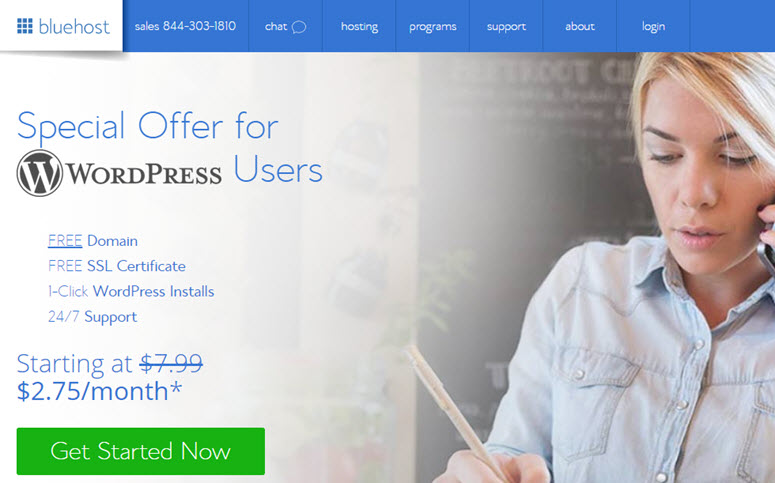
定价:要建立博客,您需要购买域名和网络托管帐户。域名每年的成本约为14.99美元,网络托管成本每月约为7.99美元。我们已经 与Bluehost达成协议 对于IsItWP用户,所以您每月只需支付2.65美元。
这意味着WordPress托管和免费域名60%的折扣。
![]()
维克斯 是一个免费的网站建设平台,也允许您从头开始创建一个全新的博客。要使用Wix创建博客,您需要将Blog应用程序集成到Wix网站中。免费的Wix计划允许您使用500 MB存储空间和1 GB带宽。
要删除Wix品牌并增强内置功能,您可以购买高级计划,每月17美元起。

WordPress.com是一个免费的博客平台,由与WordPress.org相同的人管理。使用WordPress.com,您可以创建免费博客,而无需购买域名。您可以升级订阅以获取增强功能,例如自定义域,获利功能,其他存储空间等。
一定要看看 WordPress.com和WordPress.org之间的差异。
定价:您可以免费开始基本博客。每年48美元,您可以连接自定义域名并删除WordPress.com广告。要通过博客获利,您必须以每年96美元的价格获得高级计划。
![]()
Blogger是Google提供的免费博客平台。 Blogger允许您创建博客并通过广告从中获利,而无需花费一分钱。虽然它具有运行博客所需的所有功能,但您无法添加电子商务店面等增强功能。
定价:Blogger是一个100%免费的博客平台。
2.2。我们为什么推荐WordPress.org?
我们建议每个人使用自托管的WordPress.org平台,因为它是一个真正优秀的博客平台。我们在所有网站上使用它,包括这个!
 WordPress.com与WordPress.org之间的差异。
现在我们已经选择了这个平台,让我们来看看你需要什么才能启动WordPress博客。
第3章:创建博客 – 技术指南(逐步)

创建博客不是火箭科学。使用正确的工具集,您可以轻松地启动并运行您的博客。
无论您想要创建什么类型的博客,您都需要掌握一些内容,例如域名,博客平台和虚拟主机。
设置博客后,您需要自定义其外观,添加基本功能等。
在本章中,我们将解释:
- 如何选择域名
- 如何设置域名和虚拟主机
- 如何在主机上安装WordPress
- 如何安装WordPress主题来自定义博客的外观
- 如何安装WordPress插件来添加功能
3.1。如何选择域名
注册域名既简单又便宜,但为您的网站选择合适的域名非常重要,这些域名易于输入和记忆。
您的域名是您在互联网上的博客地址,例如Google.com或IsItWP.com。这是您的客户在浏览器中键入的内容,以访问您的网站。域名通常每年花费14.99美元左右。
让我们来看看为博客选择域名时可以遵循的几种不同方法。
寻找一个可品牌的域名
您可以使用关键字填充域名来提升博客搜索排名的日子已经一去不复返了。虽然在您的域名中包含关键字仍然可以产生积极影响,但填充关键字可能会对您的SEO工作产生负面影响。
在选择域名时,建议使用关键字填充的品牌域名,如ProBlogger.com或OptinMonster.com,如copywritingtweaks.com或killercopywriting.com。
它们不仅容易记住,而且从长远来看它可以帮助您获得积极的SEO影响。
选择正确的域扩展名
.com域名非常受欢迎,以至于人们更有可能在浏览器上输入(yourblog).com来访问您的网站。事实上,如果你选择不同的扩展名,那么你可能想做额外的工作让人们记住它。
当然,我们始终建议为您的博客选择.com域名。但是,如果.com不可用,您可以使用.net或.org。
使用域名生成器

为您的博客选择一个完美的域名可能会令人生畏,因为您的第一个域名很可能已经被选中。这意味着您需要集体讨论域名思想并逐个检查其可用性。
域名生成器只需输入一个或两个关键字,即可自动生成大量域名提示,从而帮助您节省时间。
你可以选择 IsItWP的域名生成器 寻找完美的域名。
3.2。如何设置域名和虚拟主机
既然您已经找到了域名,那么您需要做的下一件事就是注册并设置网络托管。
如果您是网络空间的新手,下面是域名的定义和 虚拟主机。
域名:您的域名是您在互联网上的博客地址,如Google.com或IsItWP.com。这是您的客户在浏览器中键入的内容,以访问您的网站。域名通常每年花费14.99美元左右,但我们将在本文后面向您展示如何免费获取域名。
网络托管:您的网络托管帐户是您的博客内容和文件的存储位置。把它想象成你网站的房子。当访问者通过键入您的网址(域名)尝试访问您的博客时,他们将被定向到存储在您的网络托管服务器中的网站文件。网络托管通常每月收费7.99美元。
当您第一次启动博客时,域名和托管的总成本似乎相当多。
这就是我们与之达成协议的原因 BlueHost的 为我们的用户提供免费域名,免费SSL,以及WordPress主机超过60%的折扣。
BlueHost的 是世界上最大的托管公司之一。自2005年以来,他们一直参与WordPress社区,他们是WordPress.org官方推荐的托管服务提供商。
注意:我们相信完全透明。如果您使用我们的推荐链接购买主机,那么我们将免费获得一笔小额佣金。您实际上可以获得托管+免费域名+免费SSL的折扣。我们可以从任何托管公司获得佣金,但我们只推荐我们真正相信会给我们的读者带来价值的产品。
要开始使用WordPress博客,请访问 Bluehost的网站 然后单击立即开始按钮。
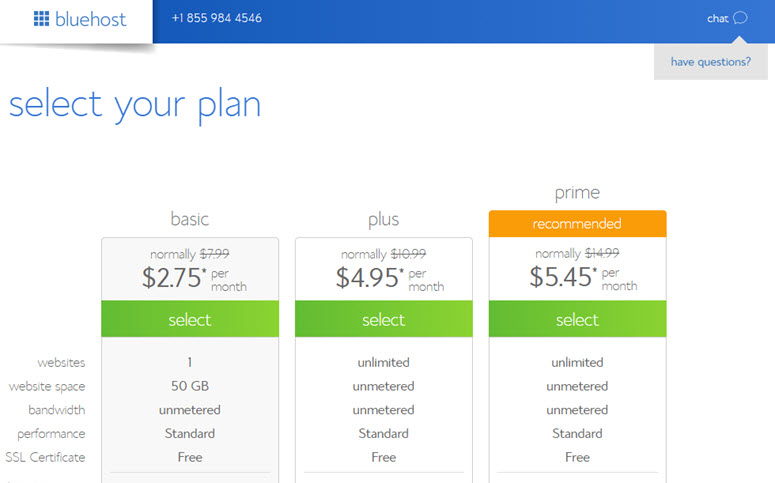
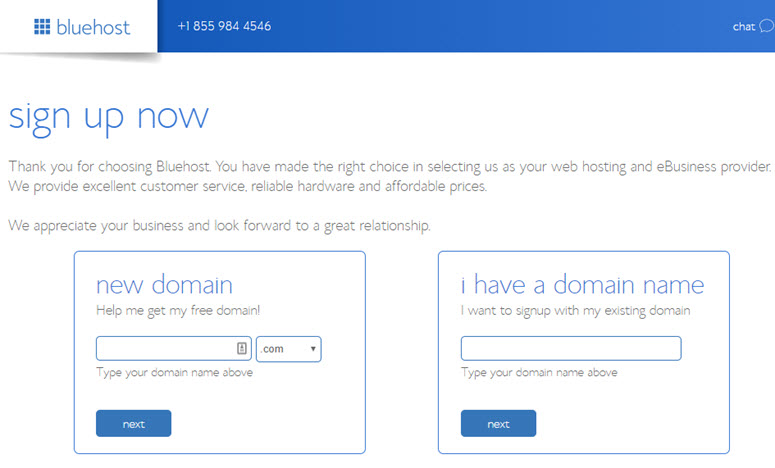
在下一页,您将被要求选择一个计划。由于您刚刚开始,您可以选择基本计划,其中还包括免费域名和免费SSL证书免费的SSL证书。随着网站的增长,您随时可以升级帐户。
您现在可以选择现有的域名或免费购买新域名。我们建议您使用新域名,因为它是免费的。
系统会提示您输入帐户信息。只需点击几下,即可轻松注册。

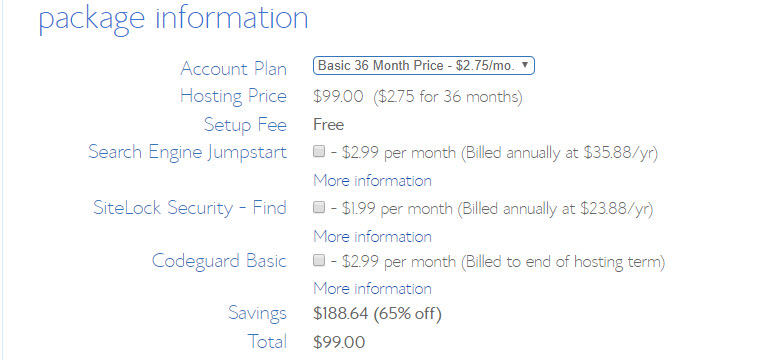
输入您的详细信息后,向下滚动页面,直到找到包裹信息框。您可以选择12个月,24个月或36个月的基本计划。您还会看到预选了一些插件会增加总价。您可以取消选中这些插件,因为您不会立即需要它们。如果需要,您可以随后添加它们。
注意:选择36个月计划将为您带来最物超所值!
配置完计划后,请进一步向下滚动页面以输入付款详细信息。您需要同意他们的服务条款,然后单击“提交”。
而已!
您已成功订阅托管计划。系统会要求您为帐户创建密码。之后,您将收到一封电子邮件,其中包含有关如何登录Web托管控制面板(cPanel)的详细信息,您可以在其中管理从托管文件到电子邮件和支持的所有内容。
3.3。如何在Web主机上安装WordPress
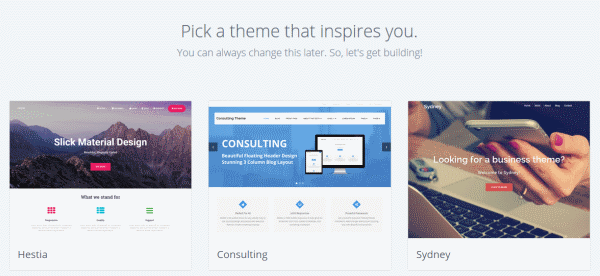
使用Bluehost,您不必经历单独的WordPress安装过程,因为Bluehost现在默认执行此操作。您所要做的就是选择您的WordPress主题,然后指定您的博客的名称和标语,您就可以开始使用WordPress了。
订阅您的主机方案后,现在将提示您选择WordPress主题。您可以在此步骤中选择任何内容,因为您以后可以随时更改主题(我们将在本教程的后续步骤中向您展示如何执行此操作)。最重要的部分是开始构建您的博客,所以请继续选择任何吸引您眼球的主题,以吸引您的兴趣。
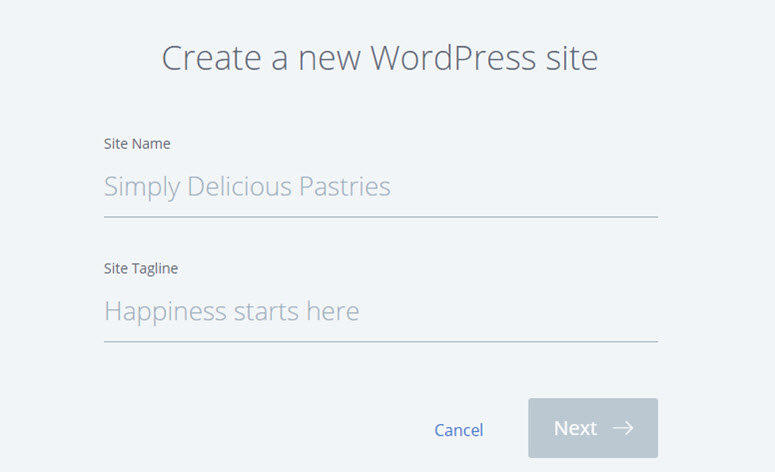
然后,系统会要求您为博客选择名称和标语。
指定详细信息后,单击“下一步”。 Bluehost现在将自动为您安装WordPress。一旦完成,它会显示一个这样的屏幕:
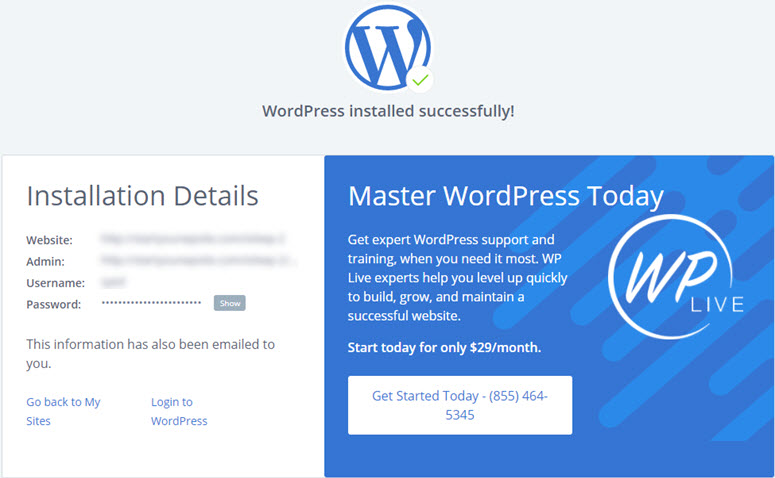
您可以通过将wp-admin附加到您的网址来登录您的网站。以下是您的WordPress登录URL应如下所示:
http://example.com/wp-admin
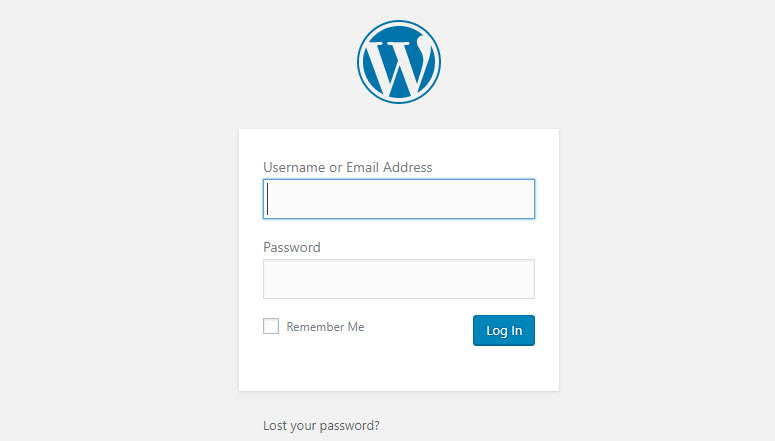
您现在可以使用发送到您的电子邮件地址的凭据登录您的WordPress博客。
3.4。如何安装WordPress主题
现在您已登录WordPress,更改博客的视觉外观很容易。您所要做的就是找到合适的WordPress主题并将其安装在您的WordPress博客上。
默认的WordPress主题很好,但如果您想为您的网站提供不同的外观,那么您可以从官方主题目录中找到另一个主题并将其安装在您的网站上。
但在为博客选择随机免费主题之前,请先查看我们的列表 顶级WordPress主题 并决定哪一个是最佳选择。
如果您选择高级主题,则必须从主题供应商的网站下载并上传到您的WordPress。
如果您决定使用官方主题存储库中的免费WordPress主题,则可以直接从WordPress仪表板进行搜索和安装,而无需将其下载到您的计算机。
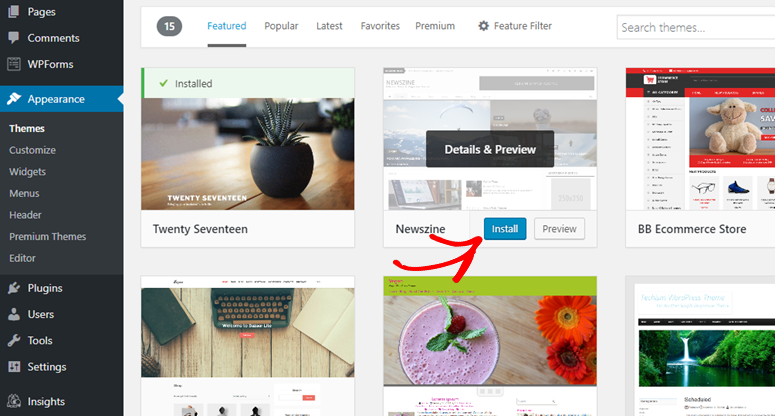
要安装免费主题,请导航到WordPress仪表板中的外观»主题。然后单击“添加新主题”框。
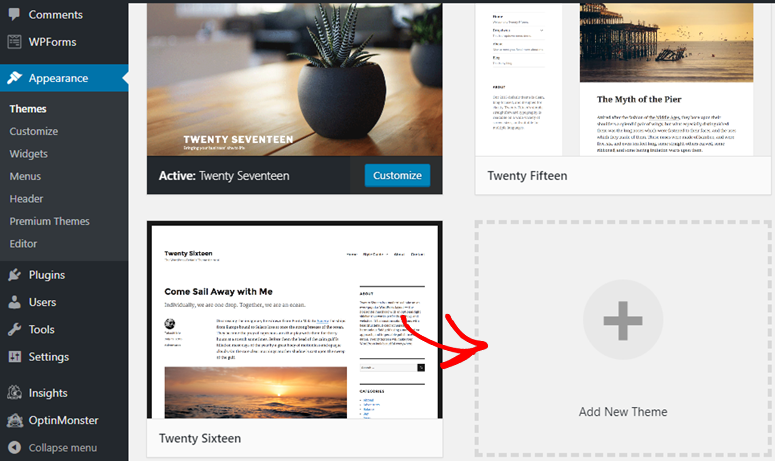
您将在仪表板中看到一些精选主题。在安装主题之前,您可以通过单击显示的缩略图进行预览。
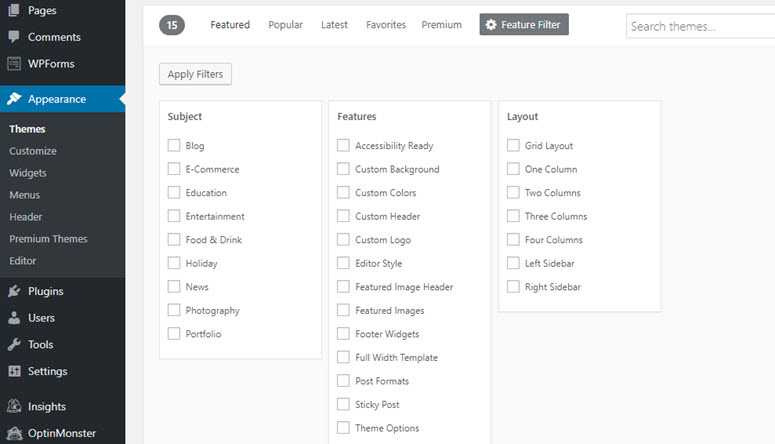
您还可以通过单击“特征过滤器”按钮,根据布局,功能和博客位置过滤主题。
在右侧角,在搜索栏中键入主题名称。找到正确的主题后,将鼠标悬停在其图像上,然后单击“安装”按钮。接下来,您需要单击“激活”以更改博客的外观。
3.5。如何安装WordPress插件
现在您已经安装了WordPress主题,您可能想知道如何通过添加联系表单,照片库等功能来增强您的博客。
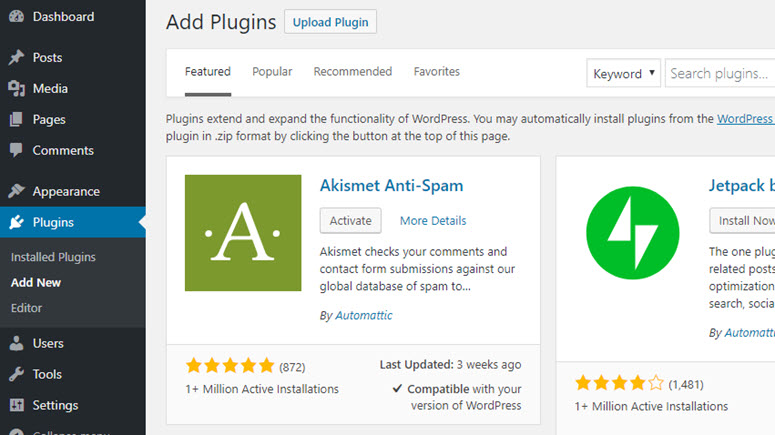
使用WordPress,您可以找到数以千计的免费插件(应用程序),让您轻松地为博客添加其他功能,而无需触及任何一行代码。就像WordPress主题一样,您可以在WordPress仪表板中轻松找到并安装WordPress插件存储库中的免费插件。
您所要做的就是访问插件»添加新页面并使用右侧角落的搜索框查找插件。找到要查找的插件后,单击“立即安装”按钮,然后单击“激活”。
第4章:配置博客设置
到目前为止,您已经拥有了基本的博客设置。
您已经知道如何更改WordPress主题并安装插件。到现在为止还挺好。
在您开始在博客上发布文章之前,您需要更改一些默认博客设置并根据您的偏好进行调整。让我们来看看…
4.1。选择您的永久链接结构
在WordPress中,永久链接是您在网站上发布的内容的网址/网址。这是人们进入浏览器地址栏访问您网站的网页的内容。
错误的永久链接选择可能会损害您的搜索引擎流量和引荐流量,因此在设置网站时选择正确的链接非常重要。
名为Plain的默认永久链接结构在您的URL中包含一些随机数字,它不会告诉您的内容,因此几乎任何其他选择都更好。选择最适合您需求的产品。
要选择正确的永久链接结构,请转到WordPress仪表板中的设置»永久链接。
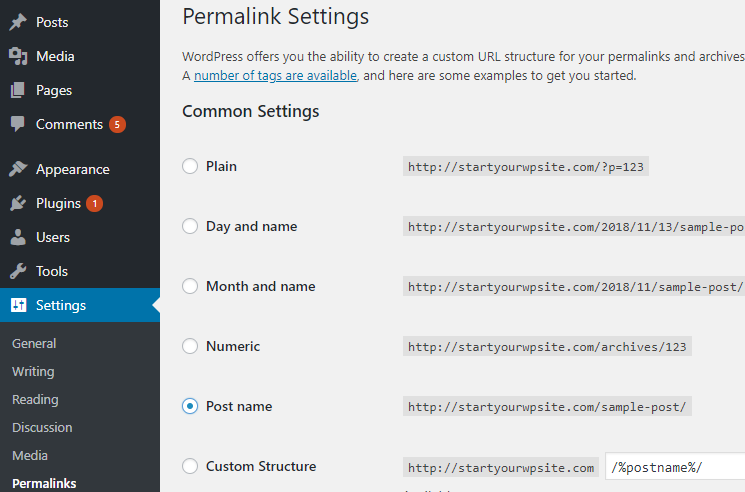
如果您没有任何首选项,只需从列表中选择“帖子名称”选项即可。
4.2。选择搜索引擎可见性
WordPress附带一个选项,允许您轻松阻止搜索引擎单击索引您的网站。更不用说,如果您正在运行公开的网站或博客,则不应选中此选项。
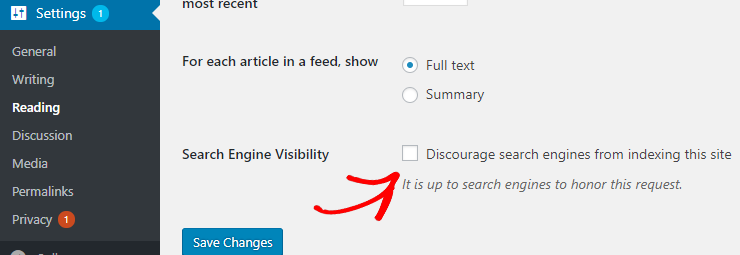
但是,如果您想考虑阻止搜索引擎索引您的网站,以下是一些用例。
- 私人内容:您可能不希望将私人内容编入索引,例如会员网站,这是专门为您的会员创建的。
- 测试/开发/演示站点:为避免生产站点的重复内容损失,您可能希望从搜索引擎中取消索引您的开发站点。
- 动态内容:同样,如果您创建的动态内容过于频繁,您可能希望阻止搜索引擎将您的网站编入索引。
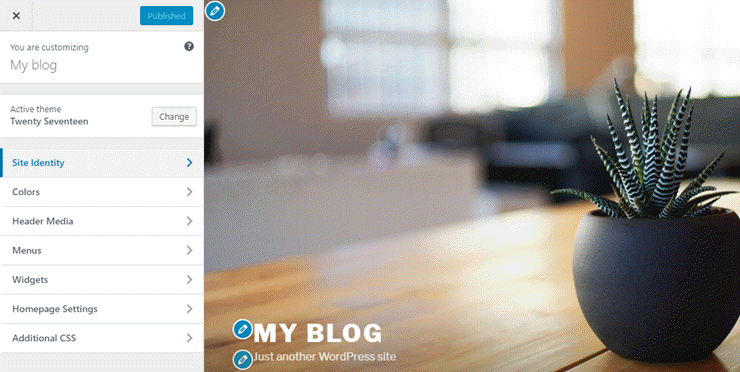
4.3。配置WordPress定制程序
想要在预览网站外观时立即更新主题设置吗?
现在可以使用WordPress Customizer。 WordPress定制程序允许您使用不同的主题,不同的主题设置等预览您的网站内容。
例如,您可以轻松设置站点标题,标语和Favicon。
要更改设置,您只需导航到外观»自定义。
4.4。创建导航菜单
导航菜单提供了一些指向您网站最重要页面的快速链接。在WordPress中,导航菜单是一个主题功能。
它的外观和显示由您的WordPress主题控制。创建了一些重要页面后,您可以继续设置导航菜单。
要添加,编辑或管理导航菜单,请转至外观»菜单。然后,单击“创建新菜单”。
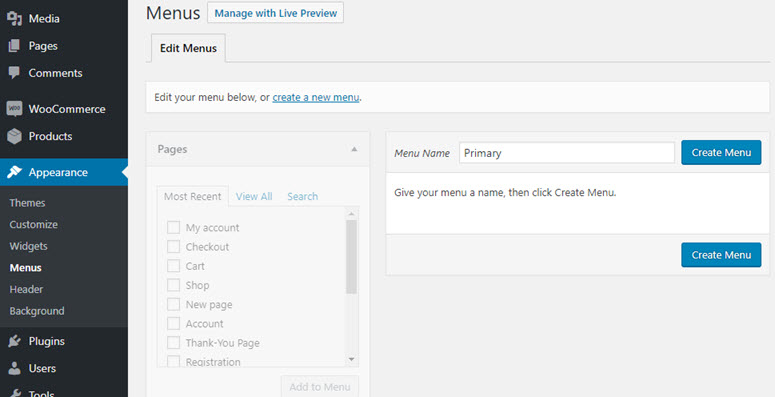
现在将提示您指定菜单名称。
正如您在屏幕截图中看到的,我们的主题支持2个不同的菜单位置:顶级菜单和社交链接菜单。请记住,菜单位置及其名称因主题而异。
接下来,选择要添加到菜单的页面,然后单击“添加到菜单”。
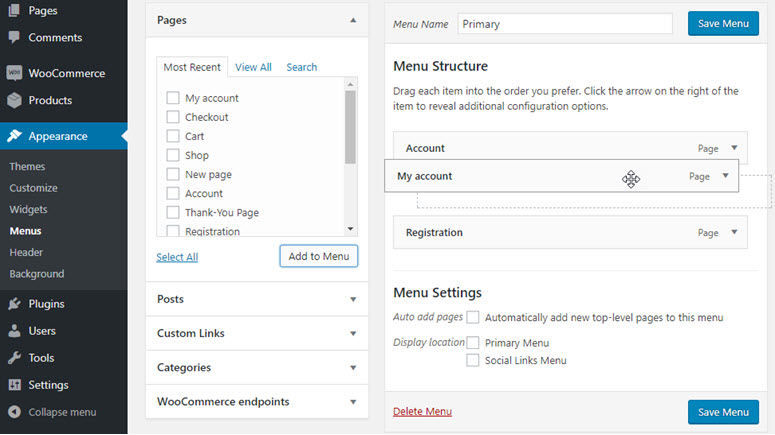
您可以通过拖放重新定位菜单。然后,您可以选择菜单位置,然后单击“保存菜单”按钮。
4.5。设置边栏/页脚小部件
WordPress小部件是简单的可移动元素,可让您轻松自定义您的网站。您可以使用小部件执行各种操作,例如显示最近的帖子,热门评论,电子邮件注册框等。
您可以将小部件添加到网站的小部件就绪区域。通常,这意味着您的博客侧边栏,但许多主题支持将小部件添加到页脚以及主页中的其他部分。
要将小部件添加到小部件就绪区域(例如侧边栏和页脚),请按照以下步骤操作。
导航到外观»窗口小部件。
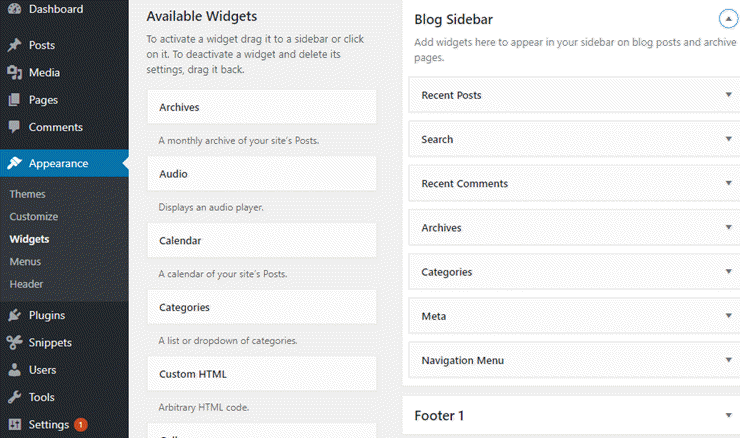
在左侧面板中,您可以找到可用小部件的列表。您可以在右侧找到几个不同的框,这些框是您的主题支持的小部件就绪区域。
在我们的示例中,我们的小部件支持3个不同的小部件就绪区域:侧边栏,页脚1和页脚2。
要添加小部件,您只需将其拖动到任何小部件就绪区域即可。
4.6。决定接受评论
评论是任何博客或在线出版物的命脉。博客不是独白。它们是为了通过评论与读者进行双向对话而构建的。
通过博客评论,您可以鼓励您的读者与您和其他读者互动。但是你总是需要在评论上线之前调整你的评论。这样您就可以确保只发布合法的评论。
默认情况下,WordPress允许用户对您的博客发表评论。如果您不想接受评论,可以转到设置»讨论,然后取消选中允许其他人发布新文章评论旁边的框。
 ↑返回目录
↑返回目录
第5章:基本的WordPress插件和教程
在工具箱中使用正确的插件集是扩展WordPress博客核心功能所必需的。
每个博客在受众,内容,设计和功能方面都是独一无二的。但是,有一些常见的插件几乎每个博客都必须安装。由于很容易被WordPress可用的所有不同插件所淹没,几乎完全相同,我们精心挑选下面最好的插件。
我们在自己的网站上使用这些插件,并建议我们的用户也安装它们。为了您的方便,以及插件的名称,我们还解释了它们的用途,并提供了专业版和免费版的链接。
- 使用WPForms构建联系表单 – 临 | 自由
- 使用MonsterInsights将您的网站与Google Analytics相关联 – 临 | 自由
- 使用Yoast SEO改善您的SEO – 临 | 自由
- 添加额外的安全层 Sucuri
- 使用Updraft Plus定期备份 – 临 | 自由
- 用。提高WordPress的性能 W3总缓存
- 使用Akismet阻止垃圾评论 – 临 | 自由
- 通过增加您的订阅者和销售 OptinMonster
由于关于所有插件的详细解释将是压倒性的,我们将解释如何使用上面列出的插件为您的博客添加3个最重要的功能。
- 如何使用WPForms添加联系表单
- 如何使用MonsterInsights将您的博客与Google Analytics相关联
- 如何通过Yoast SEO提高您的SEO
5.1。如何使用WPForms添加联系表单
无论您的博客主题如何,都必须在您的博客上包含联系表单。在您的博客中添加联系表单可让访问者轻松与您联系。
WPForms 是WordPress初学者最好的联系表单插件。它允许您使用拖放构建器创建联系表单,并允许您轻松地将其发布到站点上的任何位置。
使用WPForms的一些好处是:
- 创建任何类型的在线表格无忧无虑,如联系表格,捐赠表格,注册表格,注册表格等……
- 您使用WPForms创建的所有表单都将100%响应,这意味着它适用于移动设备,平板电脑和台式机。
- 将您的表单与您的收藏无缝集成 电子邮件营销工具 或第三方网络应用程序。
- 和更多…
阅读 完成WPForms审核。
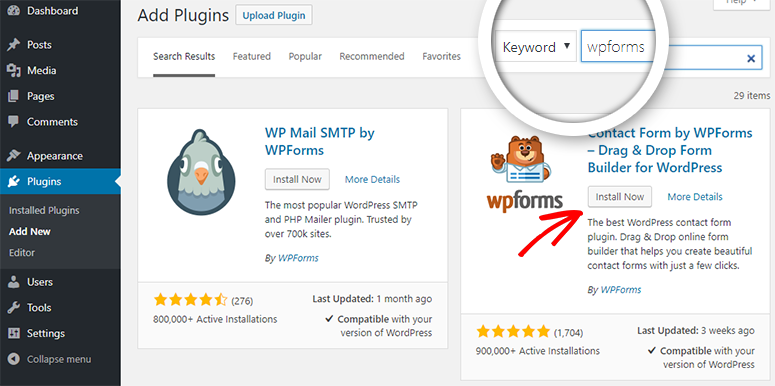
要在博客上创建表单,首先,您必须通过导航到插件»添加新项来安装WPForms。搜索WPForms插件,当它出现时,单击立即安装,然后单击激活。
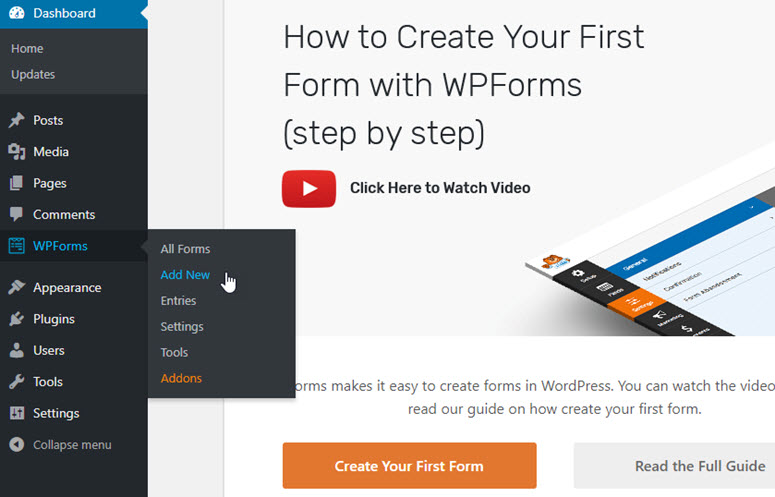
然后,您将被引导到WPForms的漂亮欢迎页面。您可以单击“创建第一个表单”按钮或单击“WP表”»“新建”以创建第一个表单。
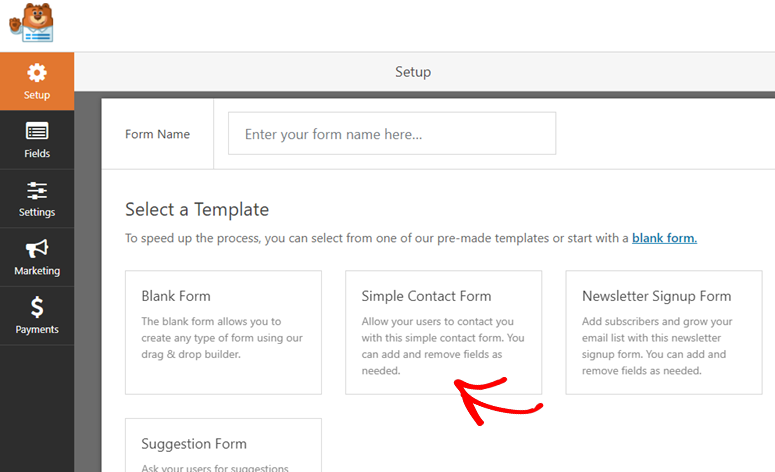
接下来,系统将提示您选择模板。您可以选择其中一个预制模板,也可以从空白表单开始。如果需要,您可以为您的第一个联系表单提供自定义名称。
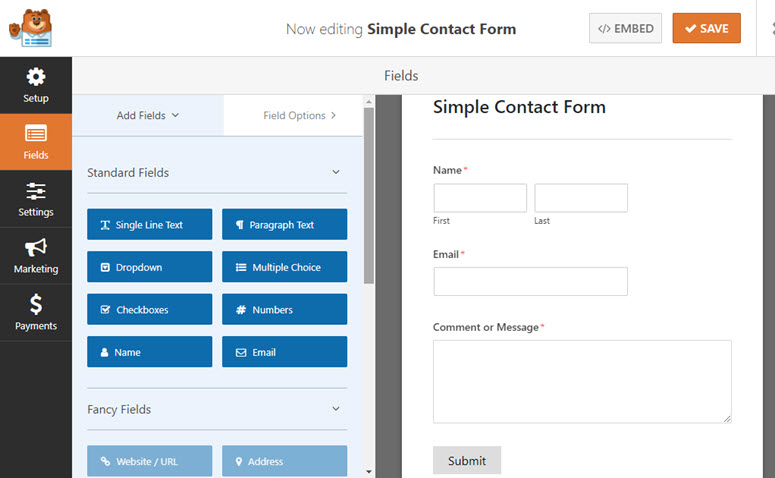
WPForms可以轻松地使用拖放功能构建表单。单击左侧面板中相应的表单域以将其添加到表单中。 You can also easily re-arrange them and even remove any unnecessary fields with ease. After making the necessary changes, click Save.
Next, go to your post or page editor and click the Add Form button above the text editor.
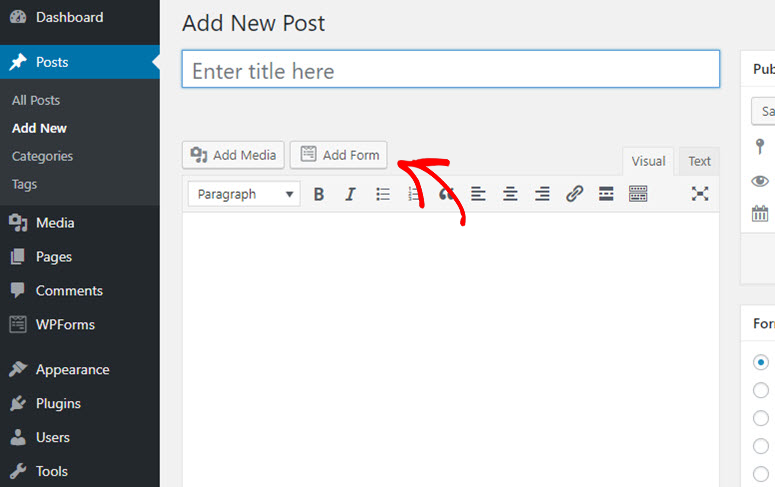
You will need to select the right form you want to publish and then click Add Form and then click Publish.
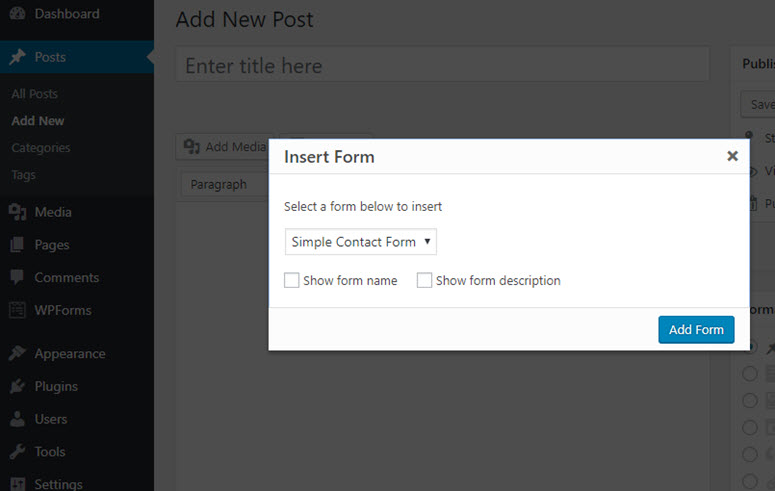
而已! You’ve successfully published a contact form.
Want to create a contact form the easy way?然后, get started with WPForms today。
Want to start with the free version instead? Try WPForms Lite。
5.2。 How to Connect Your Blog to Google Analytics With MonsterInsights
If you want to grow your blog traffic, then you need to understand how people are finding your blog and what they do once they’re on your blog.
The easiest way to track user interaction on your site is using Google Analytics. Google Analytics is the best tracking solution for websites, and it’s free to use.
The MonsterInsights plugin makes it easy for you to set up Google Analytics on your WordPress blog. Plus, it allows you to make use of the full potential of Google Analytics tracking, like file downloads tracking, ads tracking, form submissions tracking, eCommerce transactions tracking, etc. without having to touch a single line of code.
Read the complete MonsterInsights review。
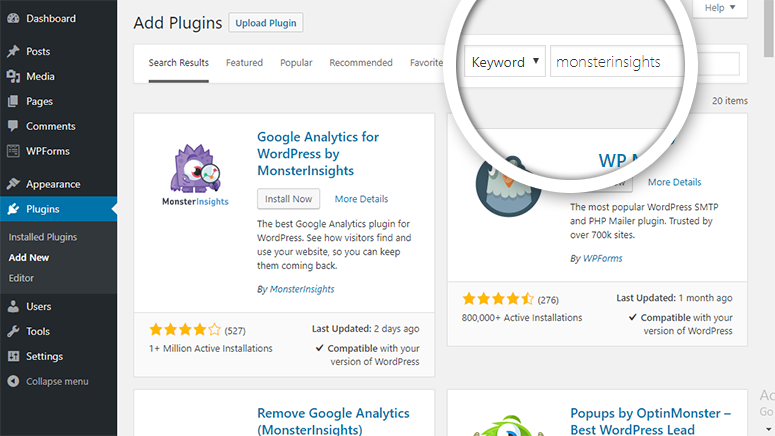
To set up Google Analytics on your blog, head over to Plugins » Add New. Search for MonsterInsights and, when the plugin shows up, click Install Now and then, activate.
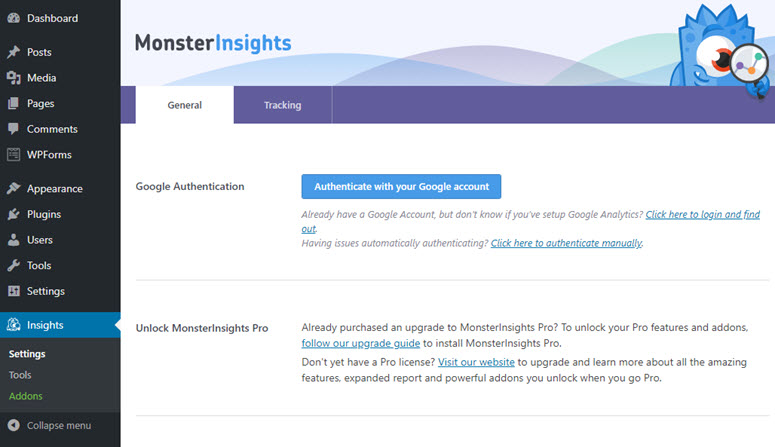
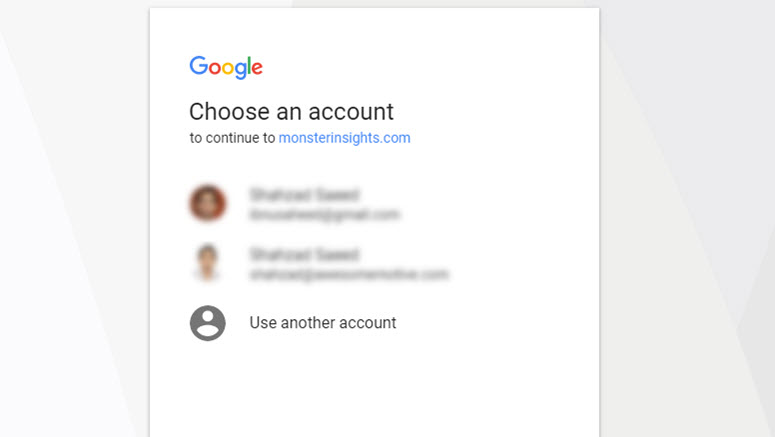
Head over to Insights » Settings to authenticate your blog with Google Analytics. Click Authenticate with your Google account.
On the next screen, select your Google account.
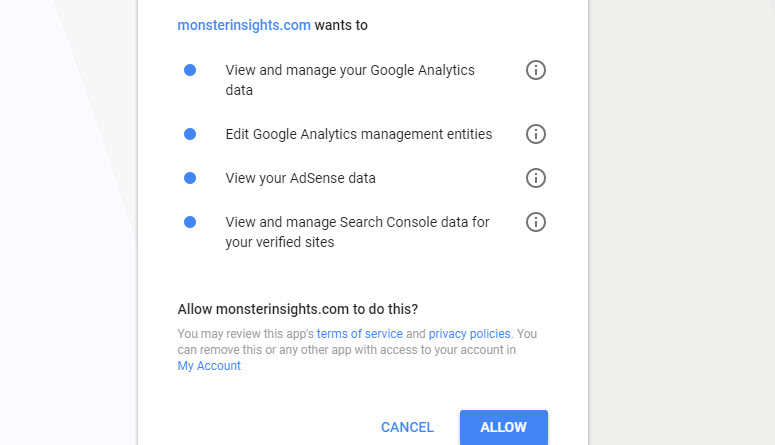
Next, allow MonsterInsights to manage your account.
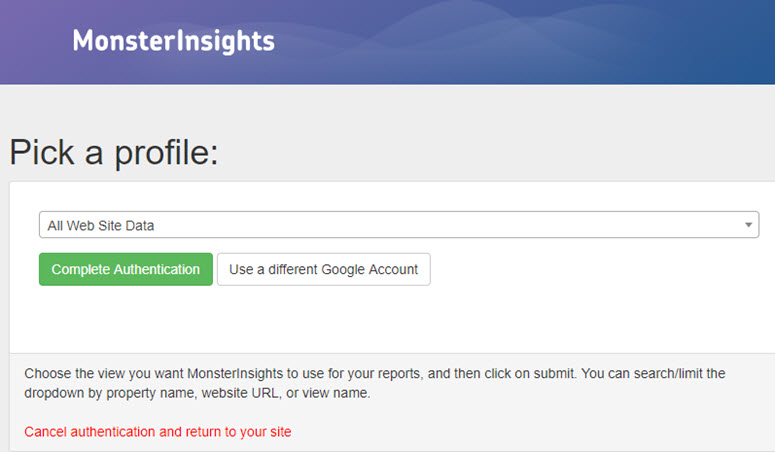
Finally, select the correct website profile for your blog and click Complete Authentication.
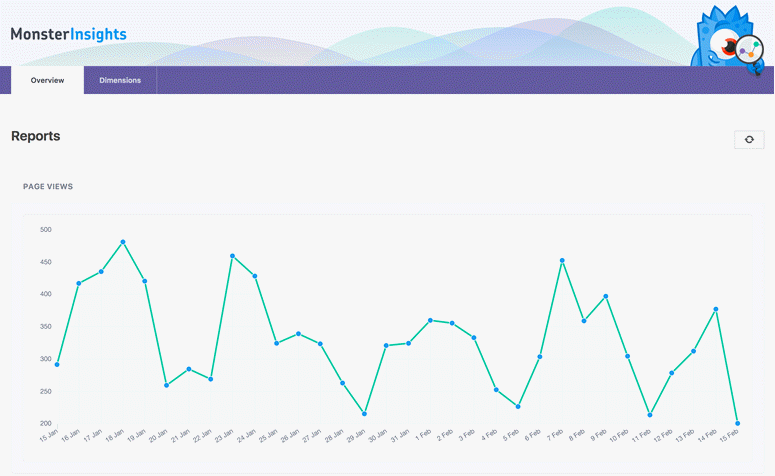
After authentication, you can easily find out how your website is doing by visiting Insights » Reports.
Get started with MonsterInsights today to easily set up Google Analytics on your site.
Want to start with the free version instead? Try MonsterInsights Lite。
5.3。 How to Improve Your SEO With Yoast SEO
Want to attract a targeted audience to your blog? The best way to attract targeted visitors is to drive more search engine traffic, also known as organic traffic, by improving your website’s SEO.
According to OptinMonster, SEO is the practice of increasing your website traffic by getting your web pages to rank higher in search engine results. Visitors who arrive at your site via search engines are referred to as organic traffic.
SEO can get technical and complicated but thanks to free SEO plugins and WordPress SEO guides, it has gotten quite easy, even for beginners.
While you can find tons of different SEO plugins out there, we use and recommend Yoast SEO。 It’s the most popular SEO plugin on the market.
With Yoast SEO, you can easily add meta tags and titles to your WordPress blog posts / pages. It also forces you to choose a focus keyword for your blog posts and pages to make sure you’re using the keyword appropriately on that page.
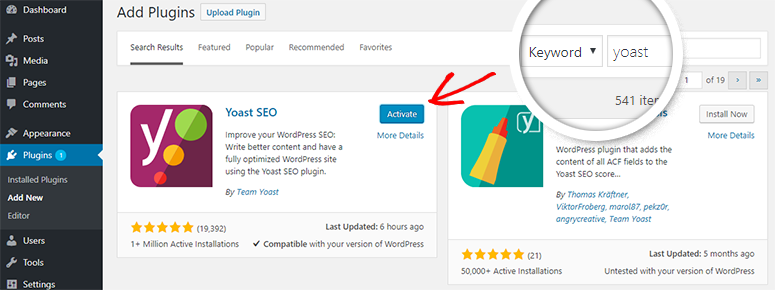
From your WordPress dashboard, go to Plugins » Add New. Search for Yoast in the search bar that you can find in the top right-hand corner. The Yoast SEO plugin will appear on your page. Click Install and then Activate.
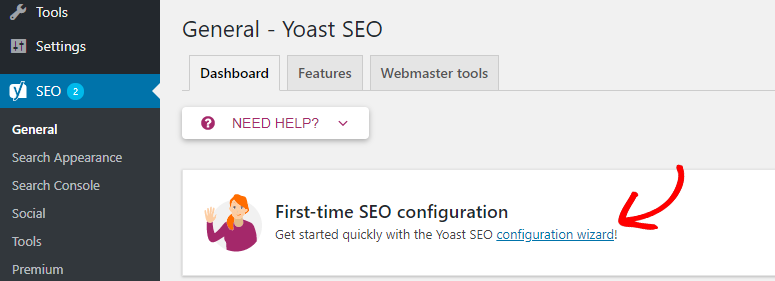
In your WordPress dashboard, you can now find the SEO menu in the left-hand taskbar. Simply click on it. If the plugin detects any SEO errors, you can fix them by following the suggestions provided.
Setting up Yoast SEO is easy using the configuration wizard. Simply click on configuration wizard to get started.
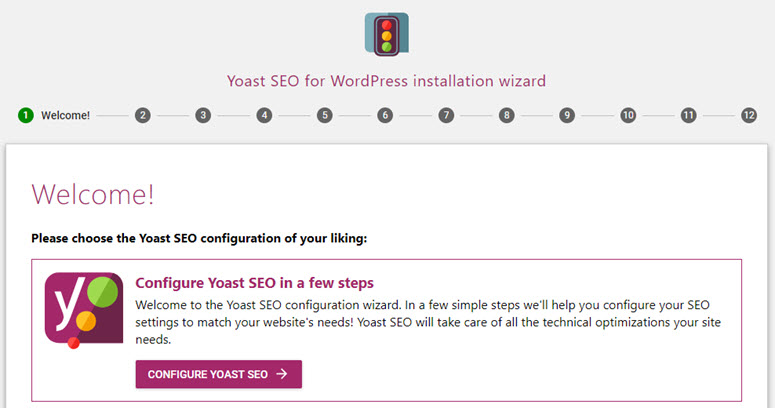
In the first step, you’ll be asked whether you want to configure Yoast SEO yourself or hire an expert to do it for you. Select CONFIGURE YOAST SEO to do it yourself.
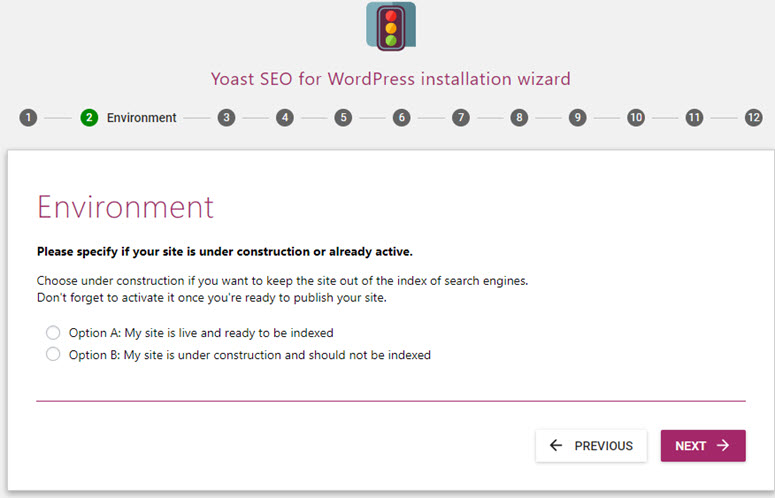
In the next step, you’ll be asked whether your site is ready to be indexed. You can choose option A. Then, click Next.
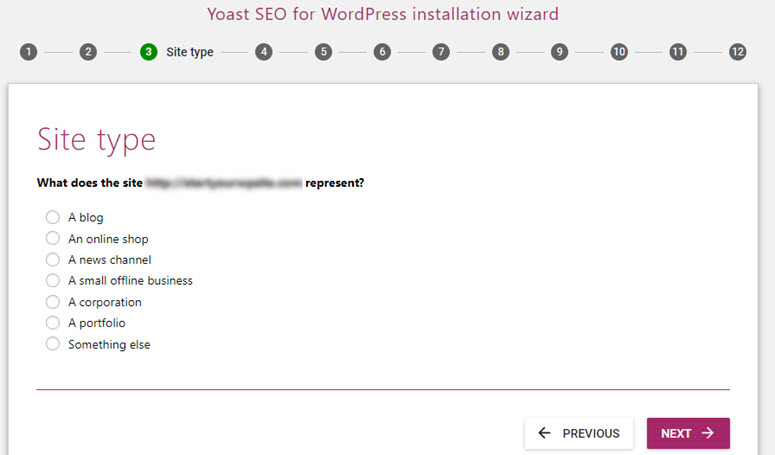
You need to choose the website type in the next step. For you, it’s blog. Then, click Next.
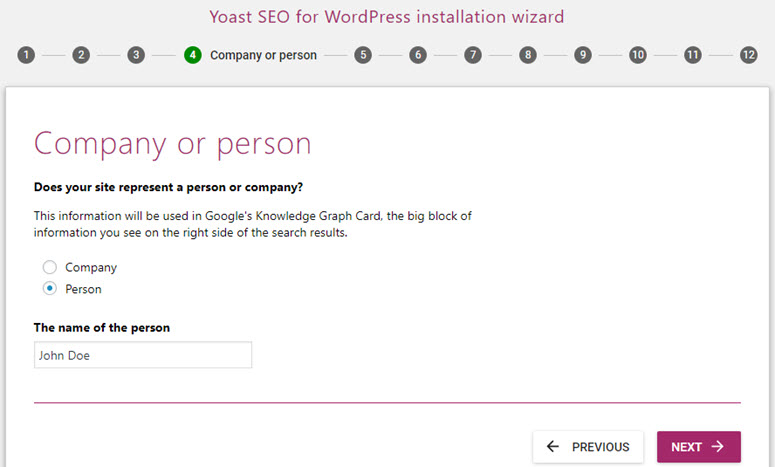
For Google’s knowledge graph card, you’ll be asked whether the blog is run by a person or a brand. If Person is selected, you’ll have to specify the name of the person. If Company is selected, you’ll have to add the logo as well. Then, click Next.
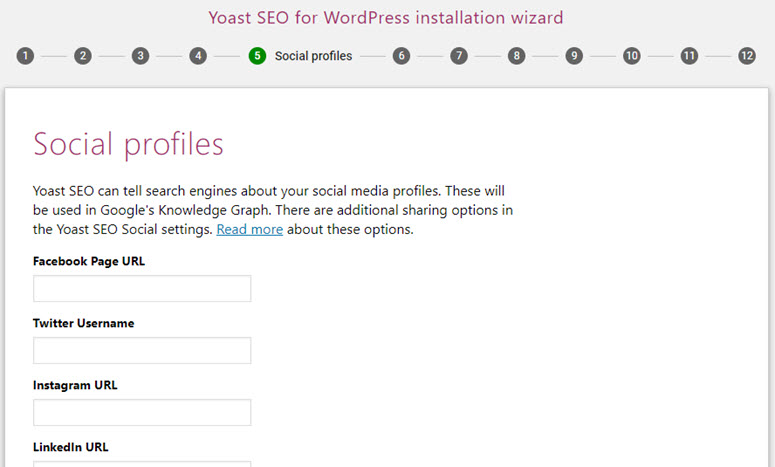
You can now enter your social media profile URL in its appropriate field. Then, click Next.
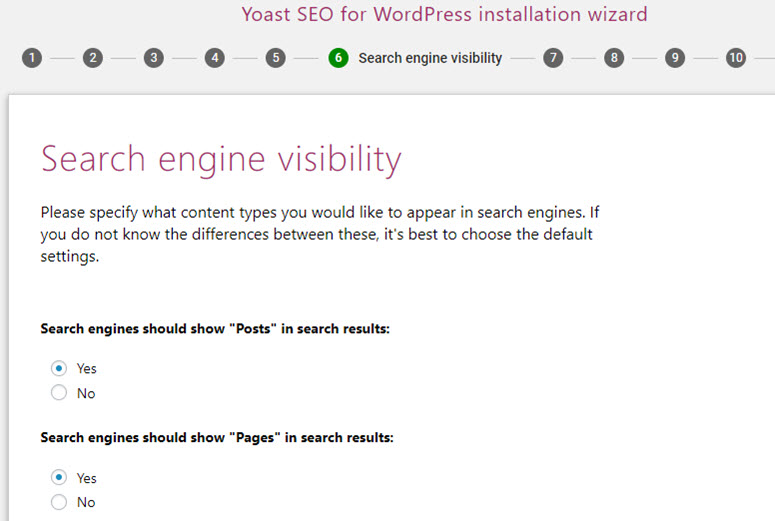
In the Search engine visibility step, you don’t have to change the default settings because they’re set up to index your posts and pages. Simply click Next.
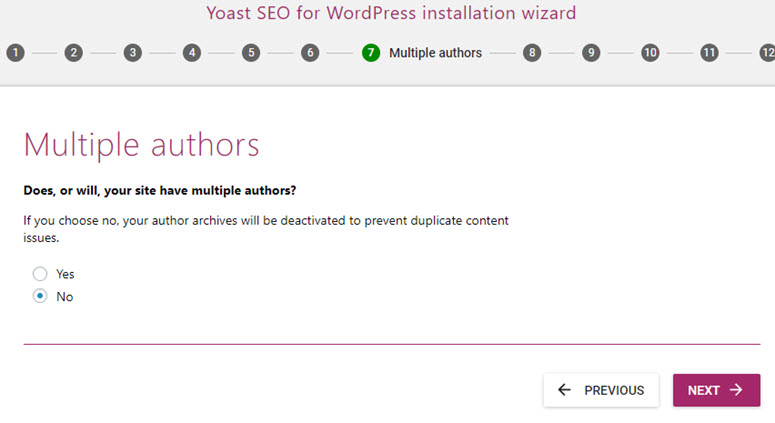
Author archives might create duplicate content issues for search engines. To prevent it, you can disable it if your blog doesn’t have multiple authors.
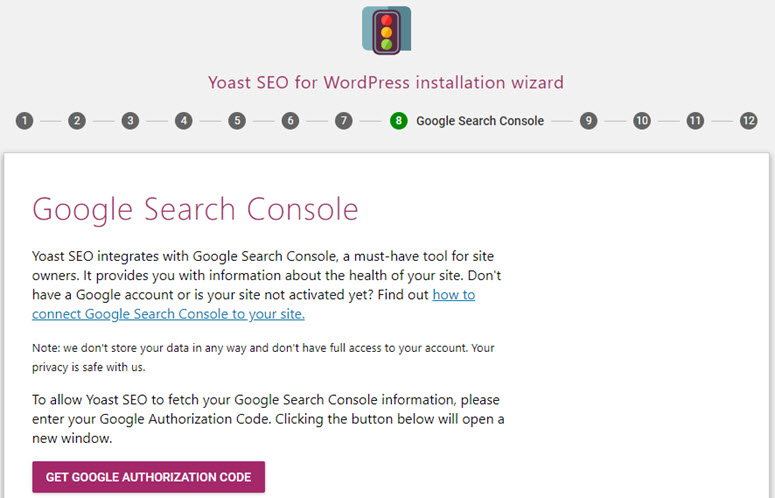
Next, you’ll be prompted to connect your website to Google Search Console, which is a free tool that gives you detailed insights into how your blog content is being perceived by Google.
Next, you can set up a title for your blog, and then, click Next.

You can now exit the configuration wizard because the other steps were created for promotional purposes such as signing up for the Yoast’s newsletter.
Get started with Yoast SEO today to improve your blog’s SEO.
↑ Go back to Table of Contents
« Previous: Chapter 4 – Configuring Your Blog Settings
Chapter 6: Working with WordPress Editor
WordPress boasts about being the best publishing platform in existence, in terms of popularity and flexibility. Of course, with a whopping 60% market share, WordPress beats the pants off all their competition.
However, the main downside is that the post and page editors aren’t as sleek as other blogging platforms. The default WordPress editor, which now known as Classic Editor, has a word processor style interface. It allows users to input text in either Text or Visual modes. Since it had been a part of WordPress for over a decade, existing users are accustomed to this interface.
However, editors of other publishing platforms, such as Medium or Ghost are way more intuitive than that of WordPress.
To make adding rich content to WordPress easier and enjoyable, with the 5.0 release, WordPress will be shipped with a brand new editor, known as Gutenberg.
In this chapter, let’s take a look at the differences between Gutenberg and Classic Editor.
6.1。 Writing Content – Classic Editor vs. Gutenberg
By default, WordPress is shipped with Classic Editor, which allows users to input text in either Text or Visual modes.

With Classic Editor, users can’t preview the finished page instantly while writing the content. Editing and moving different elements can also be a hassle. Users will have to switch back and forth between Text and Visual modes. They can also create spacing and sizing problems. This is where the Gutenberg editor comes in.
The Gutenberg editor lets you see how a finished page looks like while in the editor. That way you can adjust sizing and spacing in real time without having to switch to the preview panel. The entire editing experience has been rebuilt for media-rich content.
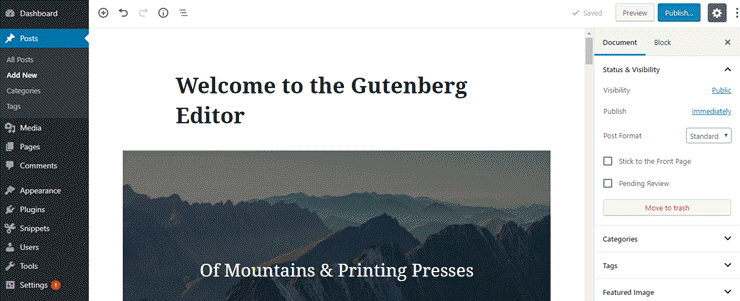
Gutenberg separates all the elements on your content into individual units called blocks. Unlike the Classic Editor, Blocks in Gutenberg help you easily customize the style and appearance of your multimedia content without the need of using custom code.
6.2。 Deciding on Choosing a Page Builder
Without a doubt, Gutenberg’s built for providing unmatched writing and editing experience on WordPress. Its goal is to make adding rich content to WordPress simpler and enjoyable. However, it doesn’t mean to replace the page builder plugins for WordPress.
The built-in WordPress editors come with all the essential tools out of the box to create a basic page on your site. However, if you want to build an eye-catching page, then you might want to use a page builder on your site.
Not only does it help you create a custom layout for your web page, but you can also create a stunning page without changing your existing WordPress themes.
我们建议使用 Beaver Builder for building a custom page. You can also check out the best page builders for WordPress。
We hope now you have a basic idea about WordPress editors. In the next 2 chapters, we’ll explain how to create WordPress pages and posts.
↑ Go back to Table of Contents
« Previous: Chapter 5 – Essential WordPress Plugins & Tutorials
Chapter 7: Creating WordPress Pages
In WordPress, you can publish content either as a post or page. When you want to publish a regular blog article, you write a post and when you want to publish a standalone web page, like About, Contact pages, you write a page.
Another difference is that Posts allow you to organize the content using categories and tags, whereas pages allow you to apply custom templates and reorder them based on your needs.
7.1. Essential Pages You’ll Need
主页
Your homepage is probably the first page your visitors see on your blog. To warmly welcome your first-time visitors, you might want to customize your homepage. Just take a look at an example of IsItWP’s homepage for inspiration.
By default, WordPress sets your blog page as the homepage. However, you can create a page and choose it as your homepage. Before you dive in and create a homepage, below are a few things to consider.
- Built-in template: Check if your theme supports a homepage template. In that case, you can make use of it rather than creating a brand new homepage unless you want a different one.
- Full-width layout: If you want to set up a homepage on your own, you might want to choose a full-width / no-sidebar layout for the page. That way you can avoid sidebar elements from your homepage and easily create a highly customized page.
- Choose a page builder: You can find dozens of different page builders that help you create a stunning customized page on your own.
Once you’ve a page set up for the homepage, you can go to Settings » Reading.
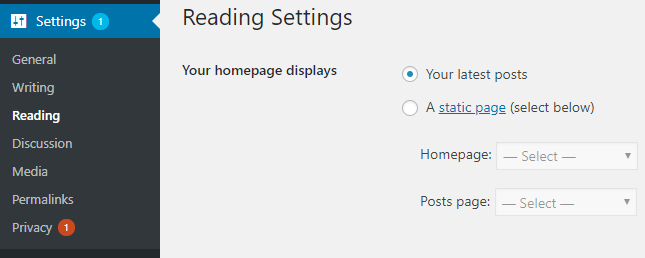
Then select static page as your homepage and then choose your preferred homepage and posts page.
About Page
Creating an about page is a great way to build an emotional connection with your audience. On your about page, you can explain how you started, why and what values your blog stands for.
It’s essential for you to understand the motivations and fears of your audience before creating an about page. That way, you can create a compelling story of yourself that your audience can easily relate to. You’ll also need to figure out the right emotional ties to link your blog with your readers’ problems.
If you’re looking for inspiration, take a look at the about page of SyedBalkhi.com.

In the about page, Syed reveals the struggles he encountered throughout his journey as an entrepreneur. Since the blog’s targeted at aspiring entrepreneurs and marketers, readers can easily forge a connection with their daily lives.
Contact Page
Your contact page plays an important role in turning your website visitors into customers. If you want to encourage your audience to connect with you, then make sure to add a contact form to your contact page.
Compared to displaying an email address, having a contact form in your contact page makes it easier for your audience to connect with you. That way, your audience can get in touch with you without leaving your site.
您可以使用 WPForms to build a contact form on your site, which is one of the best form builder plugins for WordPress.
7.2。 How to Create a Page with Classic Editor
To create a new page, head over to Pages » Add New.
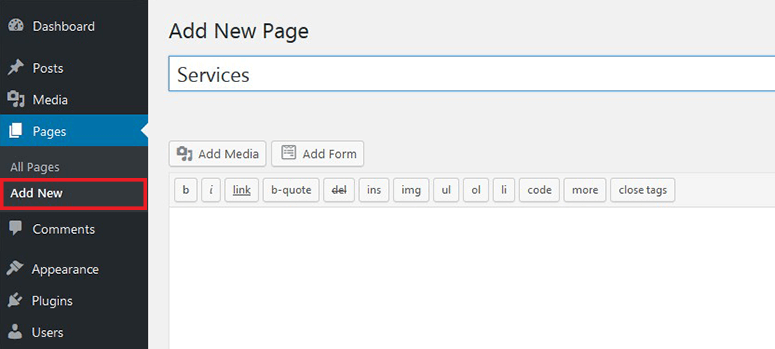
You can now specify title for your new page and add some content in the text area.
The Page Attributes section allows you to choose a parent page. You can also nest pages based on your needs.
Some WordPress themes provide you with custom page templates. Choosing a template helps you easily add structural variations to your web pages.
After adding content, preview your page and then click Publish. You’ve successfully published a new page.
7.3。 How to Create a Page with Gutenberg
Now let’s take a look at how to create a page using Gutenberg editor.
The first thing you’ll need to do is install and activate the Gutenberg plugin。 This will replace the Classic Editor with Gutenberg.
To create a page, head over to Pages » Add New. You’ll be prompted to add a title for the post. You can then start writing content, just like the Classic Editor.
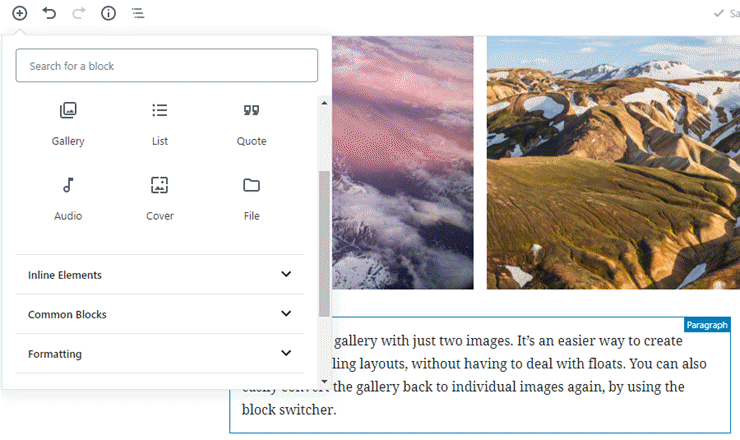
Gutenberg allows you to easily add any content block you’d like such as text, images, galleries, hero images, buttons, etc. To add a block, all you have to do is click on the Inserter tool (+).
To find the Page Attributes section, click the gear button on the top right-hand corner and then, click on the Document tab. In Page Attributes, you can choose a parent page and nest pages based on your needs.
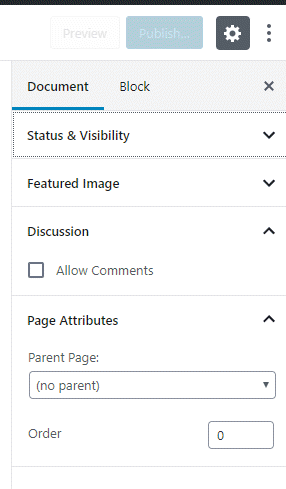
In the Document tab, you can change your page template to add structural variation to your pages.
To customize any Block, you can navigate to the Block tab and change the configurations of your selected Block.
↑ Go back to Table of Contents
« Previous: Chapter 6 – Working with WordPress Editor
Chapter 8: Writing Your First Blog Post

Now that you’ve created static WordPress pages and filled sidebar and footer with appropriate information, it’s time to start publishing your first blog post.
By this point, you might have already figured out the purpose and niche of your blog. If you don’t, you can go back to Chapter 1 to learn it.
8.1. How to Create a Post with Classic Editor
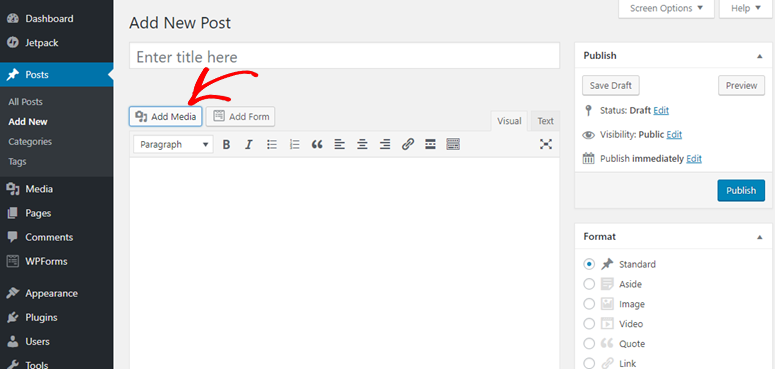
To create your first blog post, head over to your post editor by clicking Posts » Add New.
You will need to add a title to your post and start writing content in your post editor. To upload images to your blog, all you have to do is drag and drop your images into the text editor from your computer. Alternatively, you can use the Add Media button to upload your images and videos.
8.2. How to Create a Post with Gutenberg
The first thing you’ll need to do is install and activate the Gutenberg plugin.
To create a post, head over to Posts » Add New. You’ll be prompted to add a title for the post. You can then start writing content, just like the Classic Editor.
Gutenberg allows you to easily add any content block you’d like such as text, images, galleries, hero images, buttons, etc. To add a block, all you have to do is click on the Inserter tool (+).
8.3. Adding Categories and Tags
The content of your WordPress blog is organized by categories and tags.
Categories are basically a broad grouping of your blog posts. Think of it as general topics you cover or a table of contents for your blog. As they’re hierarchical, you can have as many as subcategories for each one.
Tags are meant to describe specific details of your post. They can be used to micro-categorize your content and they’re not hierarchical.
Here’s how to add categories and tags with Classic Editor:
In your post editor screen, scroll down to the categories meta box on the right side. You can click Add New Category or simply choose from the existing categories.
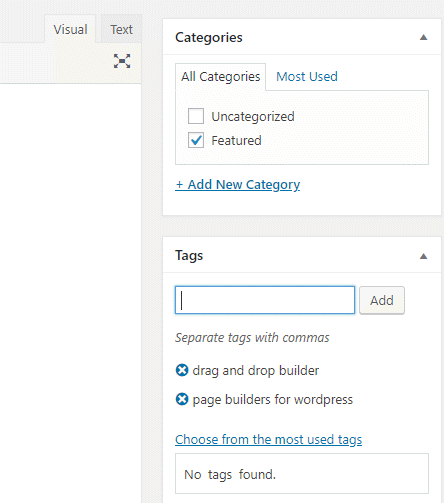
Similarly, using the Tags meta box, you can create new tags or choose from the existing tags.
With Gutenberg, to add a category and add tags to your blog post, you can click on the gear icon on top right-hand corner of your editor. Within the Document tab, you can add categories and tags to your blog post. You can also change your featured image, excerpt, and even change the Status and Visibility options.
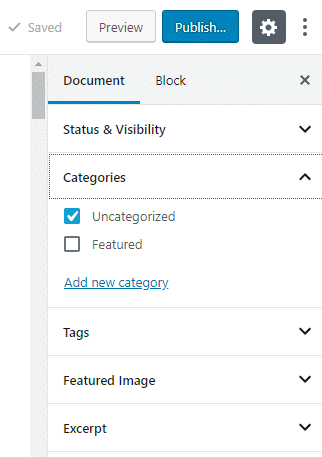
To customize any Block, you can navigate to the Block tab and change the configurations of your selected Block.
You can click on the 3 dots for changing the view of your editor. You can also switch to code editor if you’d like.
Finally, you can click the Publish button on the right-hand corner.
↑ Go back to Table of Contents
« Previous: Chapter 7 – Creating WordPress Pages
Chapter 9: Promote Your Blog

A blog without readers and engagement is a dead blog. There’s no value in maintaining a blog if no one wants to consume your content.
Just because you published some great content on your blog, doesn’t always mean that it could bring in loads of traffic. In fact, you’ll need to to attract the right segment of readers who will love the type of content you publish. Otherwise, they won’t stick around, which won’t be profitable for you in the long run.
In this chapter, we’ll explain a few different ways to promote your blog.
- Create pillar content
- Email outreach
- Email marketing
- Social media
- 其他方法
9.1. Create Pillar Content
Before you dive in and start promoting your blog, it’s essential for you to publish some pillar content on your site. In fact, no one wants to stick to a site that doesn’t provide value. That means, if you’re driving traffic to a blog that doesn’t have a solid foundation, like pillar content, then you’re losing some of your most valuable assets: time, money, and other resources.
Pillar content is the founding stone of your blog. Usually, it’s a series of blog posts that represent your best work, but it can also be infographics, videos, or any other type of content.
The main benefit of pillar content is that it brings in a rush of new visitors and backlinks. Since it provides some sort of value, your audience is more likely to stick to your blog and promote it. Best of all, it continues to attract more traffic – long after they’re initially posted.
Not sure what type of blog posts you should write?
Don’t worry! We’ll explain a few different types of blog posts that are proven to work.
- Tutorials and how-to guides: Explain how to do a tedious task step-by-step, in an easy-to-follow style. This particular guide that you’re reading right now is a perfect example of a tutorial.
- Listicles: List posts are always among the most-shared content on the internet because they’re easy to digest.
- Latest industry news: Keep an eye on the latest industry news and blog about it. You can even explain what each trend means to an average reader, and how they can embrace the changes in your industry.
- Controversial subjects: Talking about controversy can bring some readers to your blog but be cautious! Controversies can be highly emotional. Be aware of the language you use, and try not to be purposely malicious when expressing your thoughts.
Looking for more blog post ideas?读 73 types of blog posts that are proven to work。
Bear in mind that blogging is a constant process. Just because you’ve created a series of posts, doesn’t mean that you’ve done with content. Remember, blogging is a marathon, not a sprint.
The success of your blog lies in how persistent you’re in terms of producing quality content. Now, you don’t have to produce one blog post every day. Have a publishing schedule and stick to it.
9.2. Email Outreach
Once you’ve laid a solid foundation for your blog by creating a series of pillar content, it’s time to step up and start promoting your blog.
Email outreach helps you promote your blog in a few different ways: You can drive traffic and backlinks, get press mentions, offer guest posts on popular blogs, and more.
Without a doubt, email outreach is the easiest way to develop a personal connection with influencers in your niche. Here’s how to do email outreach, the right way.
Step 1: Understand your purpose.
For example, you can start an outreach campaign to offer guest articles on popular blogs. Or if you want to build backlinks, you might want to pitch influencers and let them know you’ve produced valuable content on your blog that are worth linking to.
Step 2: Find email addresses based on your purpose.
If you’re looking to guest post, then create a list of email addresses of popular bloggers.
Step 3: Use an email outreach tool, like OutreachPlus to create an outreach campaign.
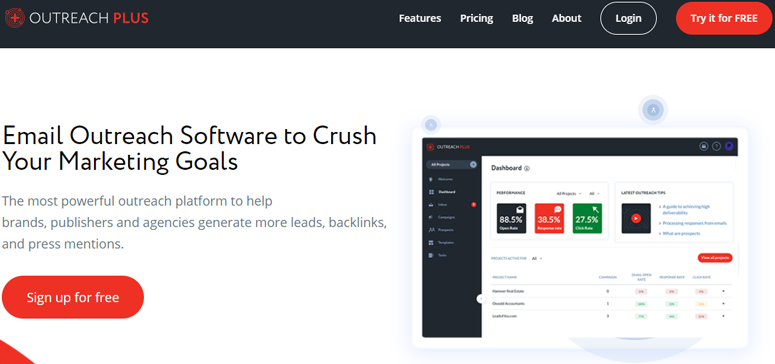
OutreachPlus helps you personalize your campaign, for higher deliverability, reply and engagement. It streamlines your outreach effort and helps you produce the best results.
With the right strategies, email outreach can be very effective in building backlinks and driving traffic.
9.3.电子邮件营销
Did you know that 95% of your first-time visitors will never return to your site? That means if you’re not building a connection with your first-time visitors and making them visit repeatedly, they’ll be gone forever.
Creating an email newsletter is the best way to build connection with your audience and encourage them to return to your site.
To create an email newsletter, you can choose an email marketing software like Constant Contact 要么 MailChimp。 You can occasionally send them useful emails to build a longlasting relationship. Once in a while, you can promote your recent blog posts in your newsletter and encourage your subscribers to visit your site.
9.4.社交媒体
Social media is one of the most reliable traffic sources for your blog. If you’re struggling to crack the code on driving social traffic to your blog, below are a few tips that might help.
Set Up the Basics
Create a profile for your blog on various social networking sites. You can showcase those profiles on your blog and encourage your users to connect with you. Additionally, install a social sharing plugin like Shared Counts and make it easier for your users to share the content on social media.
Focus on One or Two Social Media Platforms
Focusing on every social network out there can spread yourself too thin. If you’re under a limited budget and resources, it’s in your best interest to focus only on one or two social platforms initially.
If you’re looking for inspiration on driving social media traffic, you can check out how to increase Facebook traffic by 332%。
Optimize Your Content
If you’ve ever shared a blog post on social media, you might have noticed that the social network automatically pulls out the image, title and description of your content. This info gives a basic outline about the content you’re sharing, which entices other users to click on it.
If you can’t find a beautiful preview of your post while sharing it on social media, chances are your theme doesn’t support OG (Open Graph) tags. OG tags help social networks pull the right info from your link. If you’re having the same issue for the links you share, then you might want to check out how to fix Facebook incorrect thumbnail issue。
9.5. Other Ways to Promote Your Blog
Below are a couple more ways to promote your blog.
Blog commenting: Actively comment on popular blogs in your niche and get involved in the conversations. When users click on your name, they’ll be directed to your blog (provided that the blog you commented on allows backlinks from a commenter’s name).
Search engine optimization (SEO): SEO enables you to grow your website traffic by getting your blog posts to rank higher in search engines. With onsite and offsite SEO tactics, you can drive more targeted organic traffic to your site. You can find more on this in the next chapter.
↑ Go back to Table of Contents
« Previous: Chapter 8 – Writing Your First Blog Post
Chapter 10: WordPress SEO: Getting Started
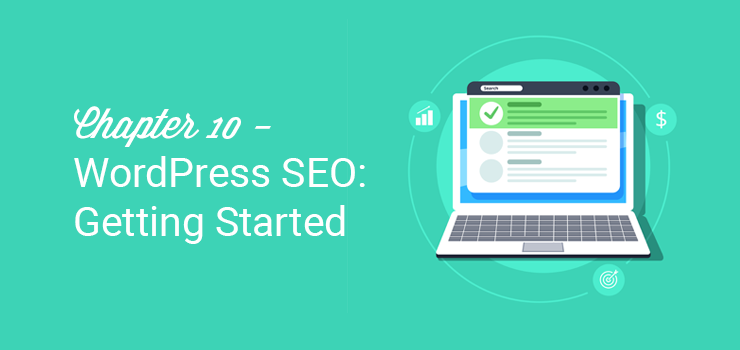
Want to drive targeted traffic to your site from search engines? Search engine optimization (SEO) can be tricky due to the ever changing search algorithms.
However, with the right strategy, you can grow your organic traffic despite the constant algorithm changes. By following the best SEO tactics, you’re allowing search engines to easily scan and index your website.
In this chapter, we’ll discuss the following:
- Keyword research
- On-page SEO
- Link building
10.1. Keyword Research
Keyword research is one of the most important aspects of SEO. Keyword researching helps you understand what your audience is looking for on Google.
Ideally, you’ll need to find every possible combination of keywords that your potential audience use on Google to find your content.
Below are a few keyword research tools that you may find helpful.
- Google Keyword Planner: Keyword planner is a free tool that helps you find the right keywords for your AdWords campaigns. You can use the same tool for brainstorming your content ideas.
- Google Search: Google Search helps you find a lot of related keywords for your blog. You can find the related keywords at the bottom of your search results page.
- SEMRush: SEMRush is a paid tool that helps you find a list of potential keywords for your blog. It helps you find out what works for your competition, what site visitors in your industry are searching for, and what keywords you should focus on.
Once you have a list of potential keywords, it’s time to create an editorial calendar to streamline your content creation process.
10.2。 On-page SEO
In order to rank higher on Google and position your web pages on top of search results, you’ll need to optimize your web pages for search engine.
With WordPress, it’s easy to optimize your website for search engines. Here’s how to do it.
Install an SEO plugin
An SEO plugin helps you make your website search engine friendly. We recommend installing the Yoast plugin on your site. Upon installing the plugin, you’ll find a meta box on every post and page editor to add SEO title, description and focus keyword.
Yoast SEO forces you to choose a focus keyword when you’re publishing content, and then ensures you’re using it properly on that page.
Add alt Tags for Images
Alt tags help describes what’s on the image. Google places a relatively high value on alt text to identify what is on the image and the topic of the surrounding text.
Internal Linking
Add 2-3 internal links to every single post.
Internal links allow users to navigate to other pages. It keeps your visitors longer on your site and more importantly, increases your link juice, which improves your SEO.
10.3. Link Building
Link building is a major factor in how Google ranks web pages. You can improve the ranking of your blog by increasing the number of high-quality links that link to your pages.
There are lots of different ways to legitimately build backlinks to your site. Let’s take a look at a few of them below.
Create pillar content:
We’ve mentioned it already but we’re saying it again. Before you dive in and trying to build backlinks, make sure you already have published a handful of content that is worth linking to. Some examples of pillar content are how-to guides, listicles, and case studies.
Create shareable infographics:
You can either hire a graphic designer or create it by yourself using an infographics creator tool such as Canva, Piktochart 要么 Visme。 After creating it, make it shareable by providing an embed code that your users can easily use.
Reach out to likely linkers:
Create a list of blogs that are likely to provide a link back to your blog. For instance, you can find blogs that publish weekly recap about your niche and ask them to feature your article in their upcoming post.
Publish interviews:
Create a list of influencers and publish a one-question interview with them. Chances are they’ll likely add a link to the interview you’ve published.
Guest blogging:
Publish high-quality guest articles on reputed sites in your niche. While it’s an effective strategy to gain links, keep in mind that Google has cracked down on marketers who abuse this tactic with low-quality articles and links.
↑ Go back to Table of Contents
« Previous: Chapter 9 – Promote Your Blog
Chapter 11: Monetize Your Blog

Do you want to quit your 9 to 5 job? Wondering how to start a blog and make money? Then you’re not alone!
While blog monetization isn’t a quick rich scheme, with the right strategies, it’s totally possible to make a solid income.
In this chapter, we’ll be explaining 4 different methods to make money blogging.
- 广告
- Affiliate marketing
- Freelancing
- 销售产品
11.1.广告
Advertising is probably the easiest way to make money blogging.
You can start by displaying ads by 谷歌的AdSense, which is an advertising network by Google. The best thing is that it doesn’t require you to have a huge traffic volume to join the program.
Alternatively, you can sell direct ads on your site. It’s effective for your blog if it attracts a significant traffic base. Since it doesn’t depend on any ad networks, you can keep the full ad revenue profits.
For monetizing your site with any kind of ads, we recommend using the AdSanity plugin. It simplifies ad management helps you generate more ad revenue with minimal effort.
11.2. Affiliate Marketing
Affiliate marketing helps you generate revenue from your blog when someone purchases a product through your referrals. Basically, you choose a product you like, insert an affiliate link to that product and whenever someone purchases it by clicking your link, you can earn commissions.
If you think ads are annoying, affiliate marketing is the best way to earn solid revenue from your blog. You can even use it in conjunction with advertising and other monetization methods.
We use and recommend ThirstyAffiliates for managing and cloaking affiliate links.
11.3. Freelancing
Offering your skills and expertise on your blog as a freelancer is the best way to make a living you’re your blog. Not only will you be able to showcase your portfolio on the blog, but also you can attract the right segment of paying clients.
Make sure to create a hire me page on your blog and promote that page extensively.
11.4. Selling Products
If you’re looking to make a steady flow of passive income, then you might want to consider selling products from your blog. With the right strategies, it’s totally possible to make a full-time income from your blog by selling products.
Below are a couple of ideas:
Sell eBooks: Creating a product can be a tedious and intimidating task. If you already have published some great pillar content, you can easily repurpose them into an eBook and sell it to your audience.
Integrate an eCommerce store: Integrate an eCommerce storefront into your existing blog with an eCommerce plugin such as WooCommerce. If you sell merchandize that mirrors the type of content they love on your blog, then you can piggyback your existing user base to sell your eCommerce products.
↑ Go back to Table of Contents
« Previous: Chapter 10 – WordPress SEO: Getting Started
Chapter 12: Resources to Learn and Master WordPress
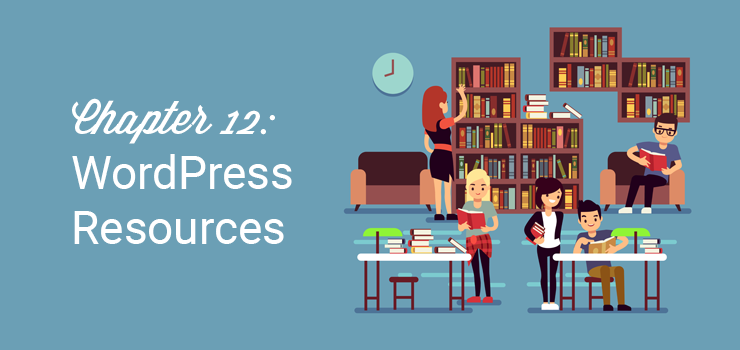
The WordPress community is huge, so you can find tons of different resources on the web that will help you learn and master WordPress.
Some of the best and free WordPress resources you can find on the web are:
- IsItWP: At IsItWP, we regularly publish WordPress tutorials, WordPress theme and plugin roundups, reviews, WordPress deals, and a lot more.
- WPBeginner: WPBeginner is the largest free WordPress resource on the web for WordPress beginners. They regularly publish useful tutorials, videos, coupon codes for WordPress products, and a lot more.
- WPForms blog: If you want to read tutorials that help you grow your business using the WordPress platform, you need to follow the WPForms blog. You can also find tips and recommended practices to build any types of online WordPress forms.
- MonsterInsights blog: The MonsterInsights blog is an excellent resource you can follow to get a handle on Google Analytics best practices and recommendations.
FAQs
Having helped thousands of users start a blog, we’ve found that people ask the same sort of questions again and again. This is why we’ve compiled a list of frequently asked questions, so you can easily start your blog.
How does a blog differ from a website?
A blog is just a type of website that publishes articles in reverse chronological order. Blog articles are usually published using a blogging platform like WordPress, so anyone who can’t code can start a blog with ease. Once the blog is set up, you can easily start creating content in your post editor and publish it with the click of a button.
Can I create a blog without WordPress?
是! There are dozens of blogging platforms such as Blogger, WordPress.com, and TypePad. But we always recommend you to start a blog on self-hosted WordPress because it gives you full freedom to build a blog the way you want with no restrictions.
What’s the difference between WordPress.com and WordPress.org (self-hosted WordPress)?
WordPress.com is a free blogging platform that lets you kickstart a blog with ease, but it comes with a lot of restrictions such as limited theme availability and limited storage space. Plus, the free platform doesn’t allow you to monetize your website.
WordPress.org, also known as self-hosted WordPress, requires you to own a domain name and a hosting account to run a blog. With a self-hosted platform, you get full control over your blog, can monetize your blog the way you want, get unlimited theme and customization options, and enjoy unlimited storage space depending on your hosting provider.
How much does it cost to start a blog?
To start a blog on self-hosted WordPress, you’ll have to purchase a domain name for $14.99 per year and a hosting account, which costs around $7.99 per month. Altogether, starting a blog will cost as low as $110.87 annually.
You can find thousands of free themes and plugins for your blog. However, if you prefer premium themes and plugins, the running cost of your blog may go higher.
Can I start a blog anonymously?
If you want to publish a blog but remain anonymous, then you need to make sure to protect your domain with WHOIS privacy turned on. For anonymous blogs, people often use a pseudonym/nickname to write under. You can even create a unique email just for writing your blog.
What should I start a blog about?
While you can start a blog on any topic, it’s advised to start a blog on a topic that you’re really passionate about. Or you can even start a personal blog, documenting your data-to-day life and reach out to like-minded people on the web.
Can I run a multi-author blog?
是。 WordPress comes with 5 default user roles that will help you manage and control permissions for each author on your blog.
Can I add an eCommerce storefront to my blog?
是! Adding an eCommerce storefront allows you to easily start selling physical or digital products right from your blog. Just install a plugin like WooCommerce and integrate an eCommerce storefront into your blog so you can start selling your products.
How can I learn more about WordPress terminologies?
Refer to this WordPress Glossary Terms for Beginners whenever you’re puzzled by strange WordPress terms or abbreviations.
Can I start a blog in multiple languages?
With WordPress, you can easily start a multilingual blog with a multilingual plugin such as Polylang. You might also want to choose a WordPress theme that supports the multilingual plugin you want to use.
We hope this guide helped you start a WordPress blog. Have fun blogging!