
许多人想知道如何制作WordPress网站。 ?
他们已经听说过WordPress,WordPress令人难以置信的受欢迎程度,出色的功能和设计,现在他们希望加入其中,并建立自己的WordPress网站。 ?
那么,从哪里开始呢?无论您使用该平台有多先进,我们都会在这里为您量身定制资源。
接下来是如何制作WordPress网站的自选冒险指南。

从以下方案中进行选择,然后查看指南为您提供的功能:
初学者
?我是第一个网站上的初学者
中间
I️我知道制作WordPress网站的基础知识,但我想加快这一过程
高级
‘我是开发人员/高级用户,想改善我的工作流程,制作多个WordPress网站
☝️☝️☝️
什么是WordPress,为什么要使用它?
首先,让我先说服您,并告诉您为什么在构建您的网站时使用WordPress确实是正确的决定。
我想花点时间做这件事,因为尽管有无可否认的WordPress优势证据,但仍有人会告诉您WordPress对于某些类型的网站还不够好。
幸运的是,我们可以使用实际数据来完成此处的大部分讨论:
首先,WordPress是什么?
简而言之,WordPress是您网站的操作系统。
您的iPhone运行iOS,三星银河运行Android,您的网站可以选择运行WordPress。
在此处了解有关WordPress的更多信息
就是说,WordPress不是唯一可用的网站操作系统。但是,它是最受欢迎的一种。
WordPress运行着35%的网站。是的,您正在阅读的就是所有网站。
同样,这些网站中有许多都不是您所谓的简单博客网站。与诸如AMC,Mercedes,BBC,Walt Disney等品牌一样,许多其他公司也将WordPress视为其在线业务的操作系统。使用WordPress也可能没事!
下一步,WordPress具有极强的功能可作为您的在线(eCommerce)商店的操作系统。所有在线商店中近30%都使用WordPress。
然后,还有可定制性的话题。
- 从设计开始,您会发现WordPress提供了最多的可安装设计包(主题)选择,只需单击几下即可将其导入网站。
- 您还可以通过插件大量扩展网站功能。就像主题一样,它们也只需点击几下即可安装。
另外,如果您需要有关WordPress技术方面的帮助,您会发现围绕WordPress的社区众多。大多数时候,您可以免费获得帮助。
最重要的是,托管WordPress网站也非常容易,而且最重要的是便宜。 ((稍后我们将讨论网络托管。)
所有这些使WordPress成为所有网站中功能最广泛的操作系统。最后,通过使用WordPress,您将获得:
顶级品牌使用的平台+巨大的知名度+强大的社区+可安装的设计包+插件+廉价的托管+多功能=很棒的网站!
在接下来的步骤中,我将向您展示如何逐步创建WordPress网站:
选择域名和托管
作为WordPress世界的新用户,您基本上必须在冒险一开始就应对该过程中最令人生畏和令人困惑的步骤。
令人困惑的是您开始制作WordPress网站的地方。起点不是WordPress本身。实际的出发点是获取域名和虚拟主机。
只是为了确保我们在同一页面上:
- 域名是您网站在网络上的地址。例如,此站点的域是codeinwp.com。
- 虚拟主机是保存您的网站的服务器。人们普遍认为“网站生活在互联网上”是一种误解。它们实际生活的地方在由网络托管公司管理的网络服务器上。在后台,网络服务器只是经过优化以处理网站的一种计算机。
对于域名和托管而言,令人恐惧的是,目前尚不清楚从何处着手。
我建议您这样做:
首先,为您的网站选择一个名称。 ?
您可能已经有了一些想法,但是您也可以使用一些网络上可用的名称生成工具。
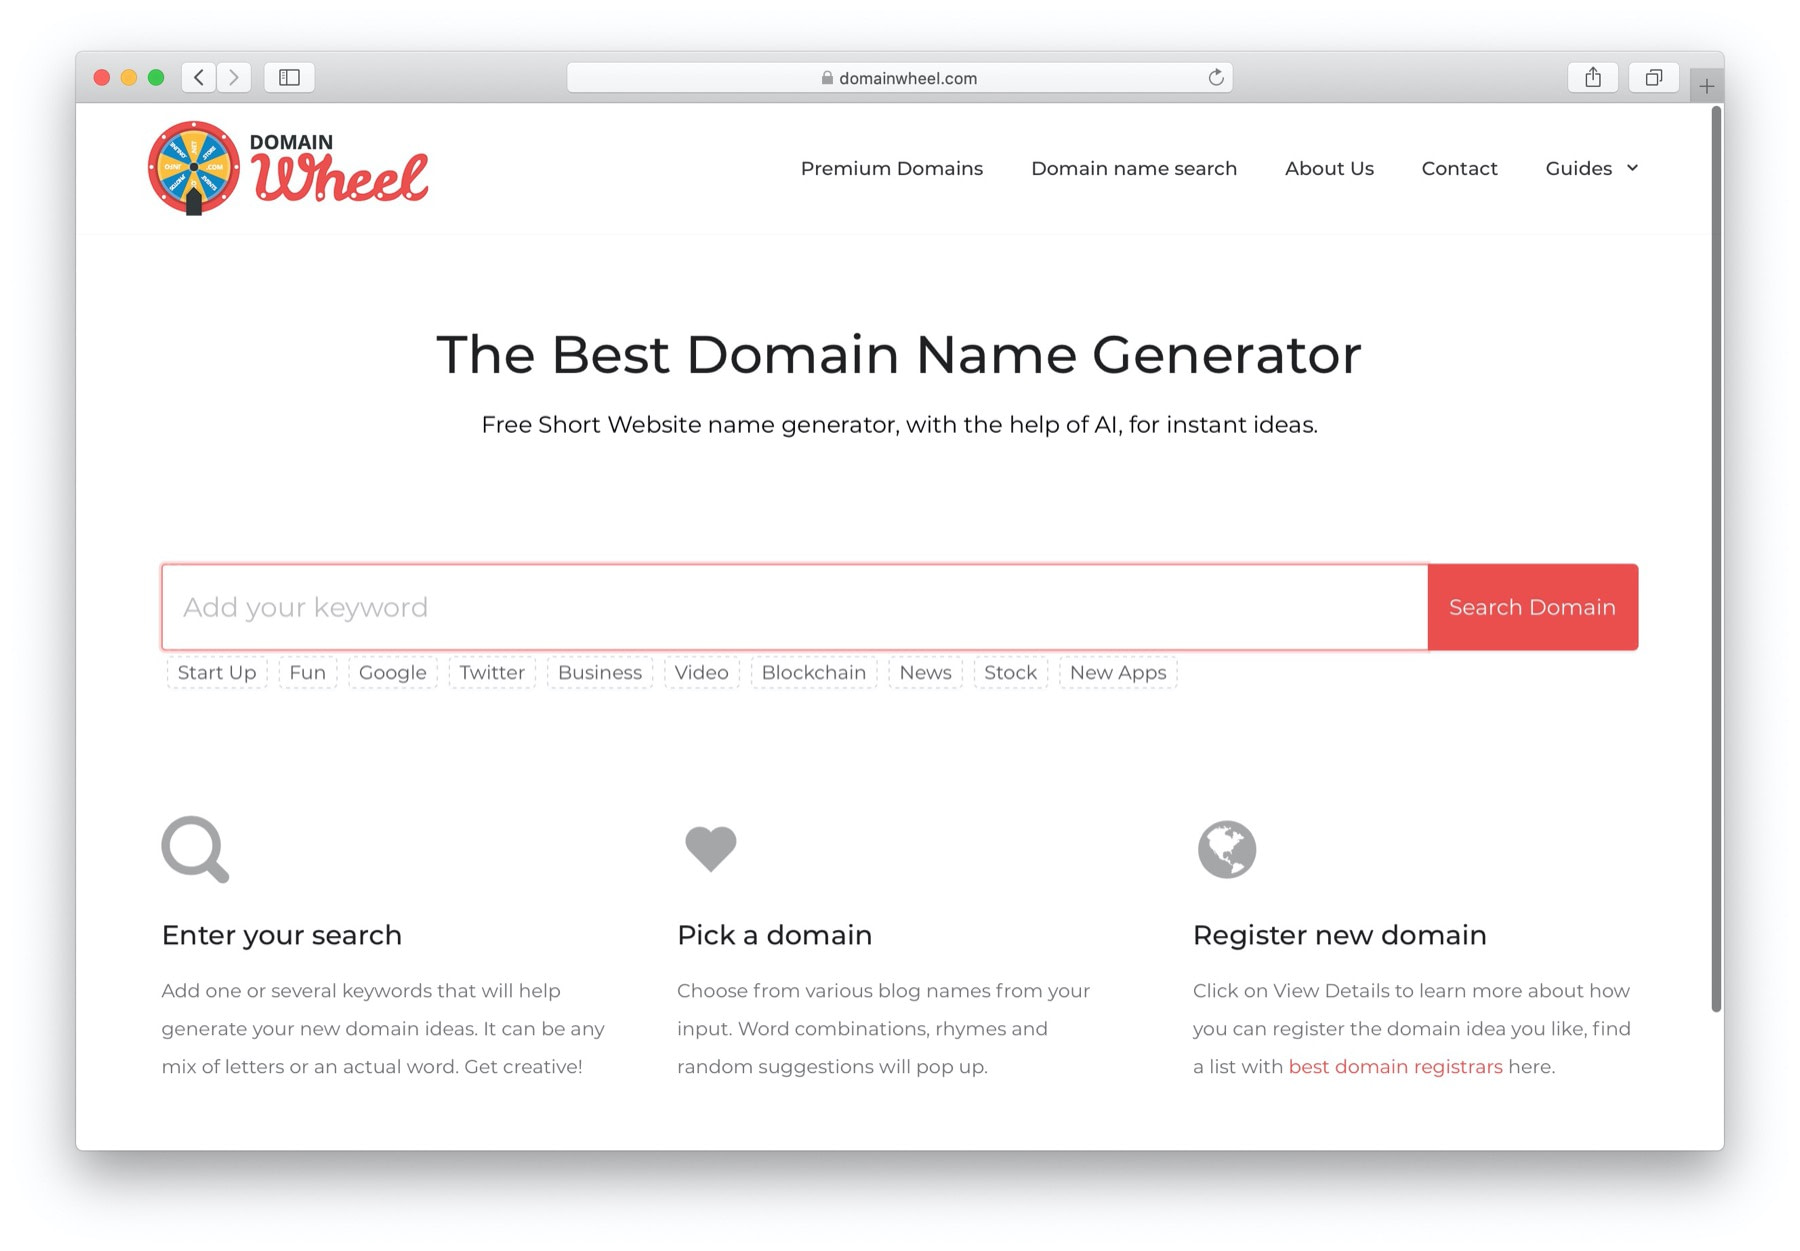
我喜欢DomainWheel,因为它是我们自己的工具,此外,我们付出了很多努力来使其尽可能发挥作用。
首先输入您的名称想法,甚至输入一些您想用来创建网站名称的种子词,然后查看DomainWheel对此有何评论。
在DomainWheel的建议中,您可能会找到一些有趣的选项。该工具还会告诉您哪些域名可以注册。
找到喜欢的域名后,只需将其写下来即可,以后再购买。
接下来,您将选择一个托管公司并注册一个托管帐户。 ?️
我们在此站点上提供了大量内容,包括各种托管服务,比较,评论以及有关如何选择理想的虚拟主机的一般建议。我强烈建议您阅读其中一些内容。
- 经过比较和测试的2020年最佳WordPress托管提供商
- 最便宜的WordPress托管:10个选项,每月$ 3.95以下
- WordPress托管调查:实际用户对托管的看法如何,6,500多个受访者认为最佳
也就是说,如果您现在没有时间使用这些资源,那么在托管方面,这是我的两个主要建议:
hostBluehost⭐SiteGround
蓝主机

这是WordPress团队自己官方推荐的为数不多的公司之一。
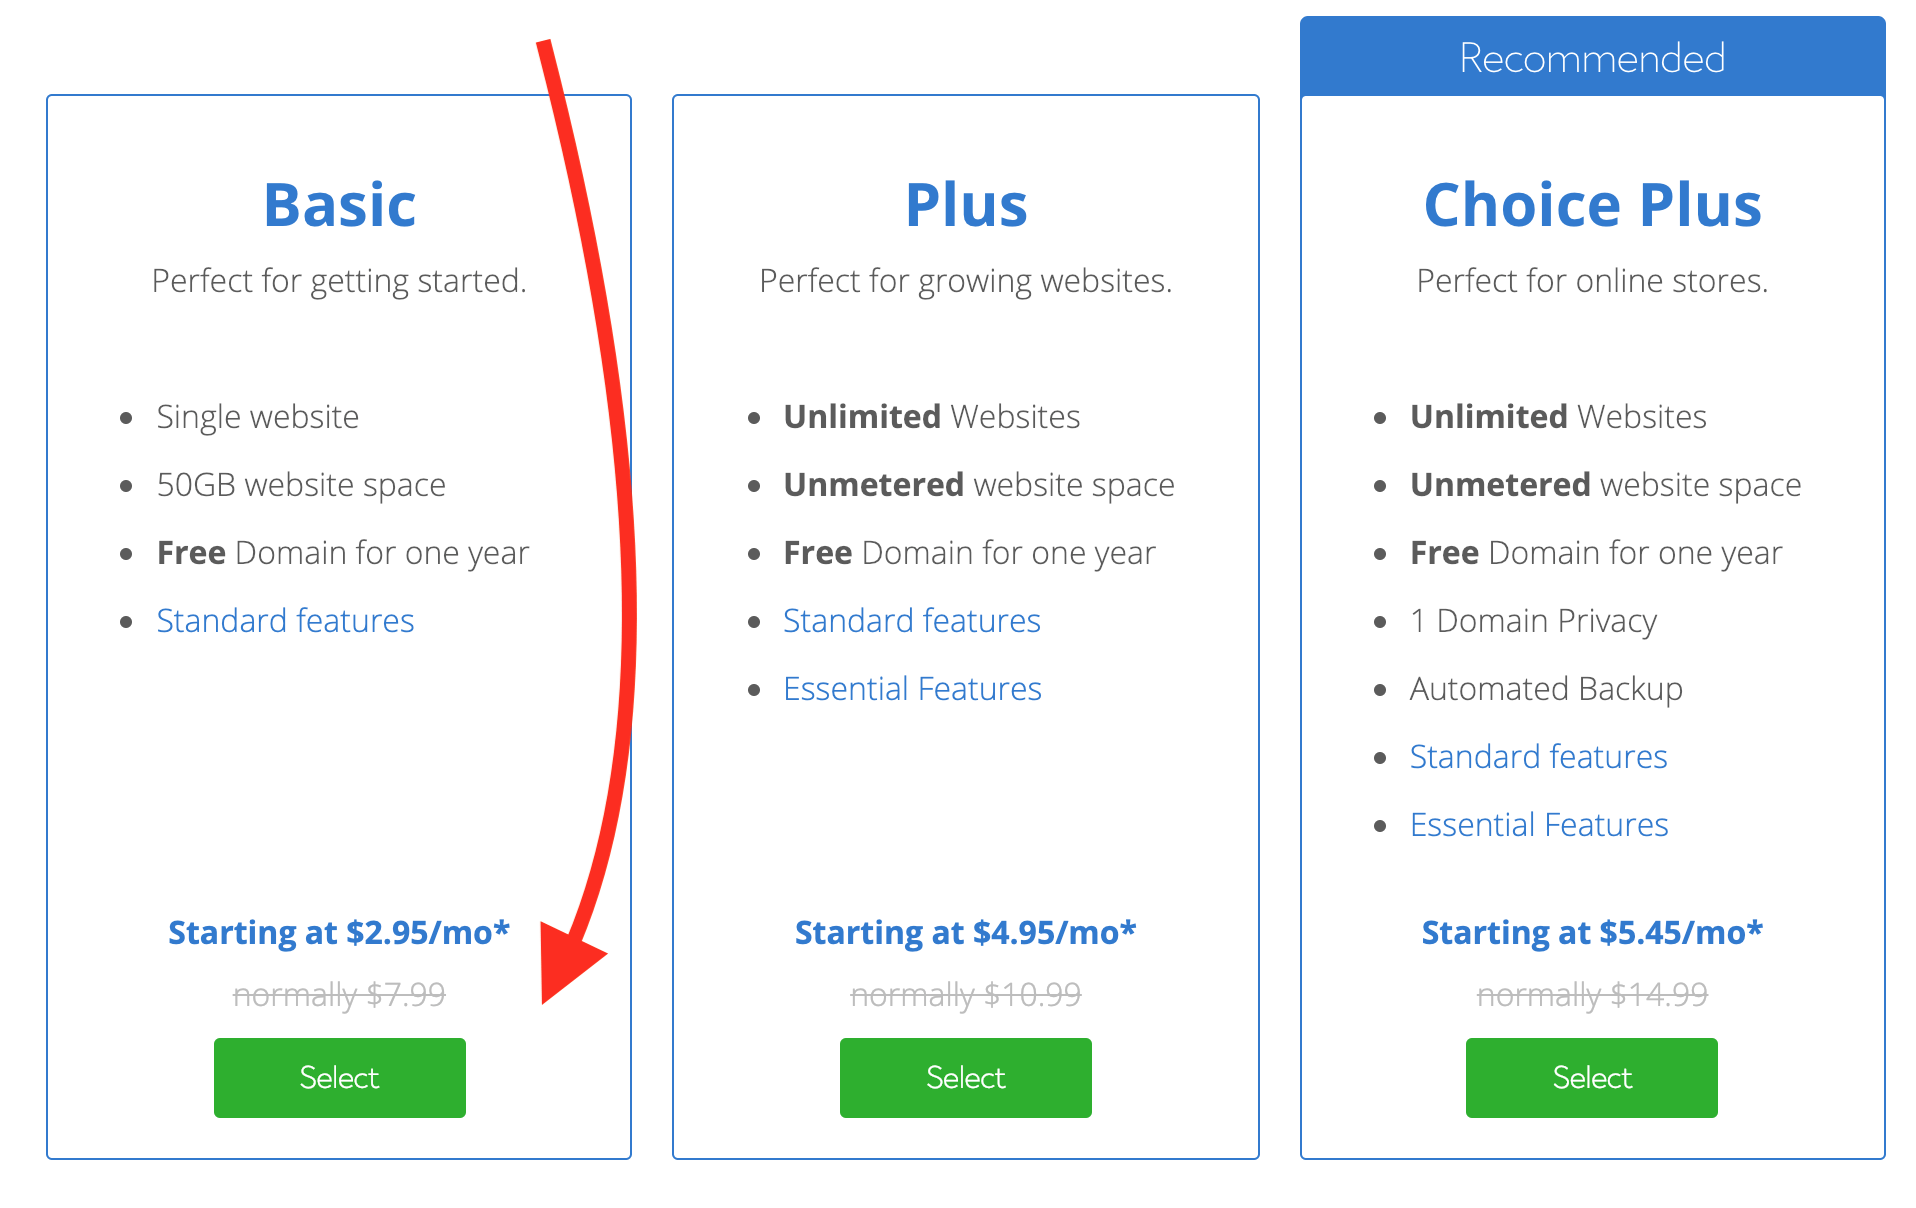
Bluehost也是那里最便宜的主机之一。该计划从每月2.95美元起。以这个价格,您还将获得第一年的免费域名。这意味着您甚至不必花更多的钱就能得到理想的域名。
Bluehost不会跟踪您的带宽使用情况(您的网站收到的流量),您会获得50 GB的磁盘空间。
前往Bluehost
SiteGround

SiteGround是WordPress团队推荐的第二家公司。
SiteGround价格稍贵,每月$ 3.95起。他们也不免费为您提供域名。但是,根据众多用户的评论,可以说,您所获得的是最佳的企业客户服务和更好的性能。
前往SiteGround
这个选择由你。大多数用户通常会对这两个托管公司感到满意。
与您选择的网络托管公司注册
与网络托管公司注册并注册域名是制作WordPress网站的第一步。
如果您对要使用的确切域不是100%肯定,请查看DomainWheel以获得一些建议。
在托管方面,由于它们易于使用且功能强大的平台,并且服务器参数与价格的比率也很高,因此我们通常建议您推荐SiteGround和Bluehost。
如果您不确定要选择哪个,请考虑以下事项:
- 如果您的预算有限,请使用Bluehost。您不仅可以以每月2.95美元的价格获得托管服务,还可以在第一年捆绑使用一个免费域名。
- 如果您更重视服务器性能和客户服务,请使用SiteGround –每月$ 3.95起。
在这一步中,我将向您展示如何使用任一主机设置WordPress:
Bluehost入门
转到Bluehost并单击“入门”按钮。选择一种可用的计划-最有可能的最便宜的一种,称为Basic-$ 2.95 /月。
接下来,输入要为您的网站注册的域名。

下一步是有关提供一些个人信息以完成设置的步骤。
最后,您还必须输入付款明细。要获得每月2.95美元的低价,您需要提前三年付款。选择较短的时间将增加每月的价格。
SiteGround入门
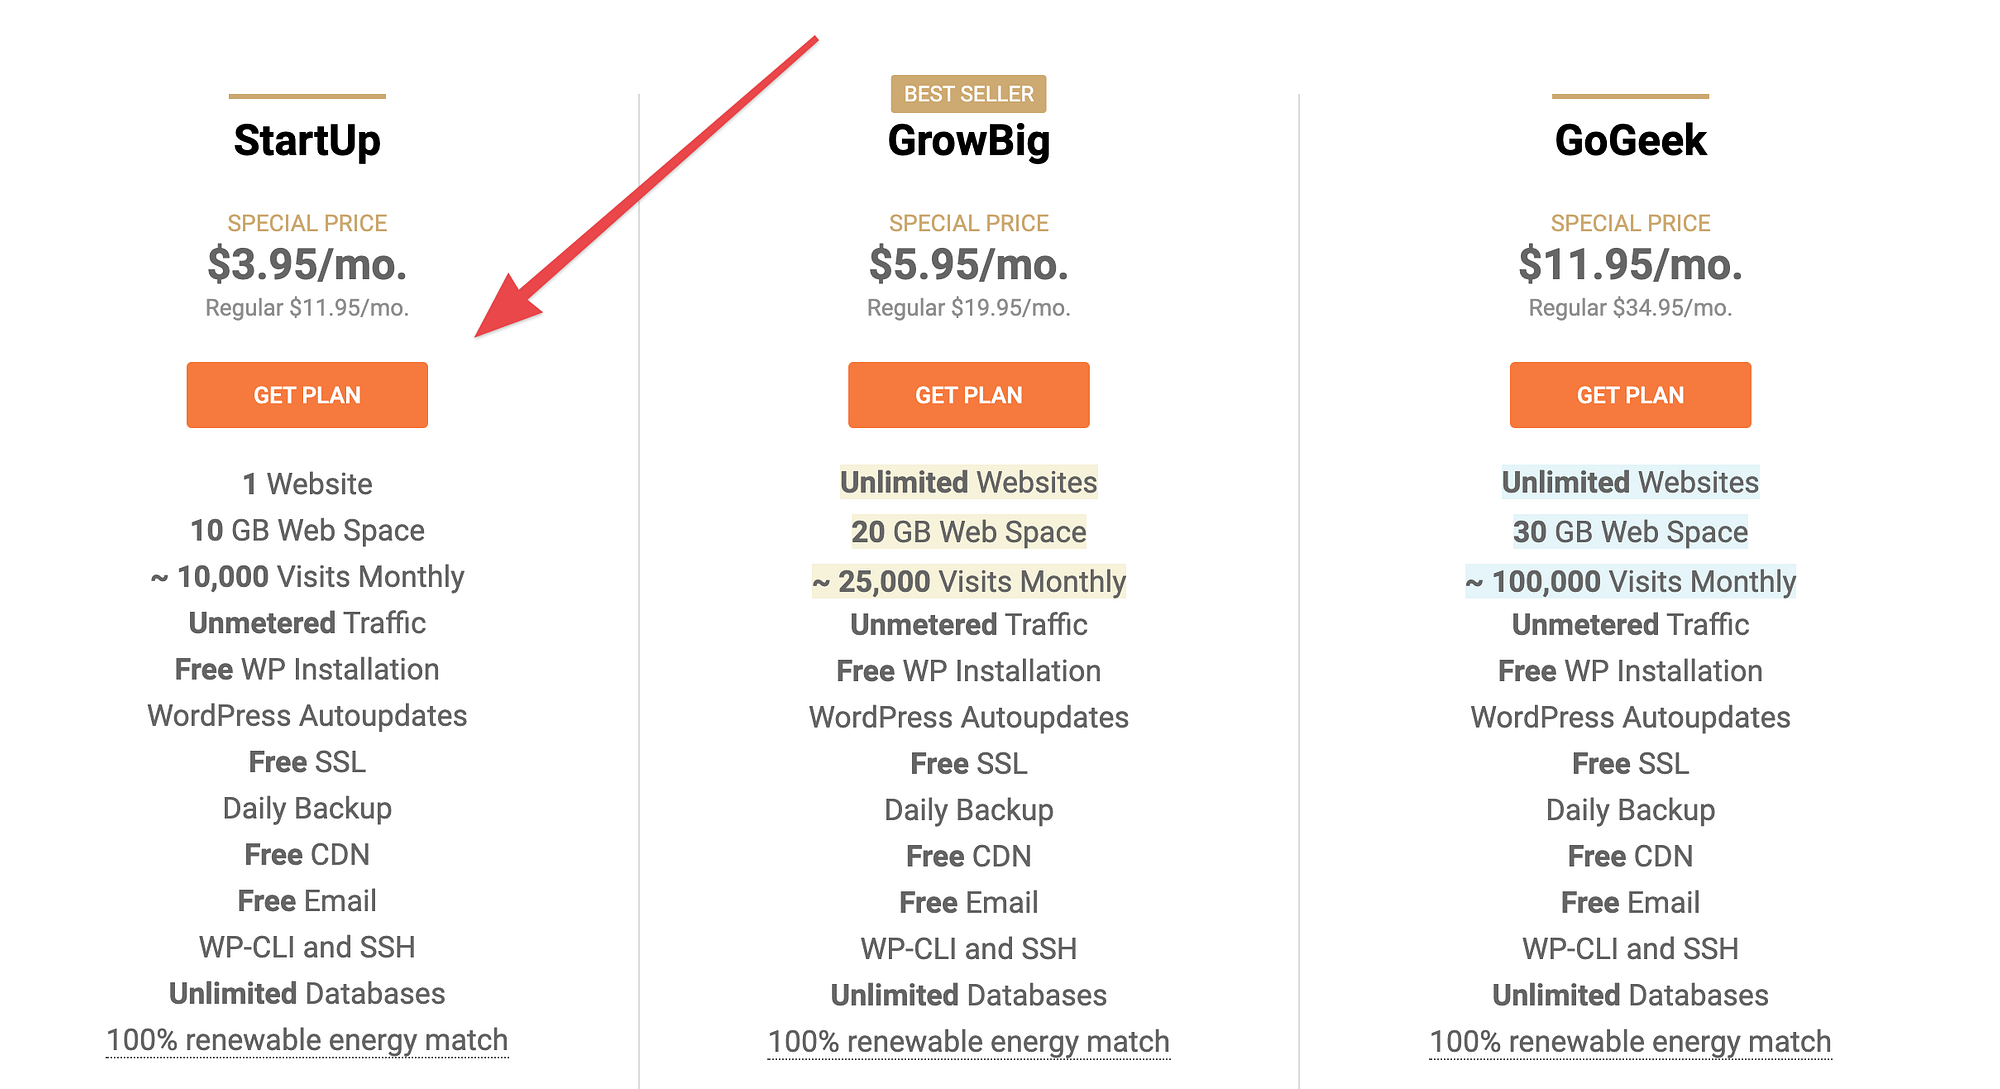
转到SiteGround,然后在您感兴趣的特定托管层下单击“获取计划”按钮。选择最便宜的选项StartUp(每月3.95美元)就足以满足大多数网站的需求。
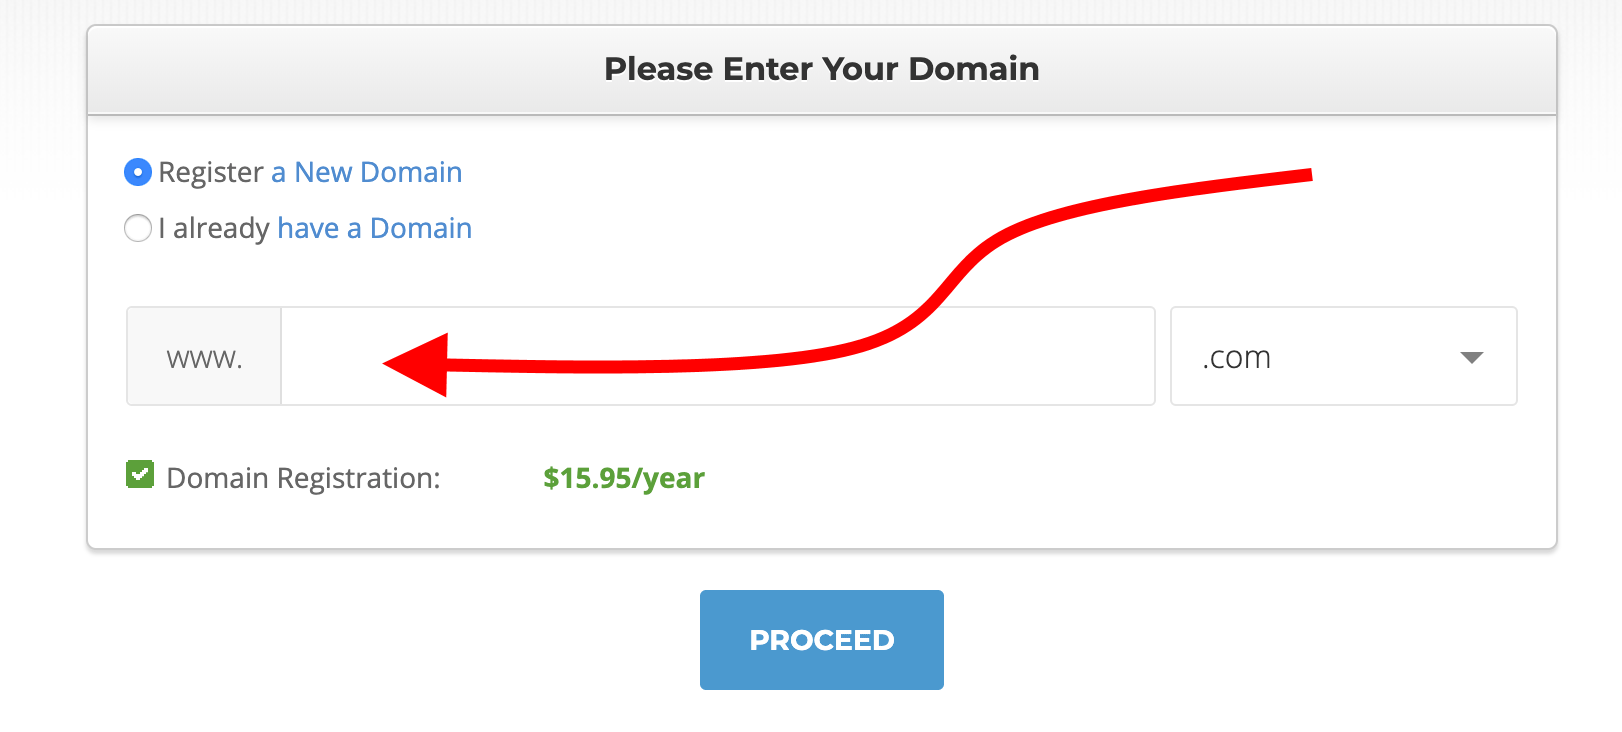
在下一步中,SiteGround允许您通过其系统注册域名。在框中输入所需的域名,然后单击继续。
接下来,您必须提供个人详细信息,并选择网络服务器的基本参数。
请特别注意注册表的这一部分:
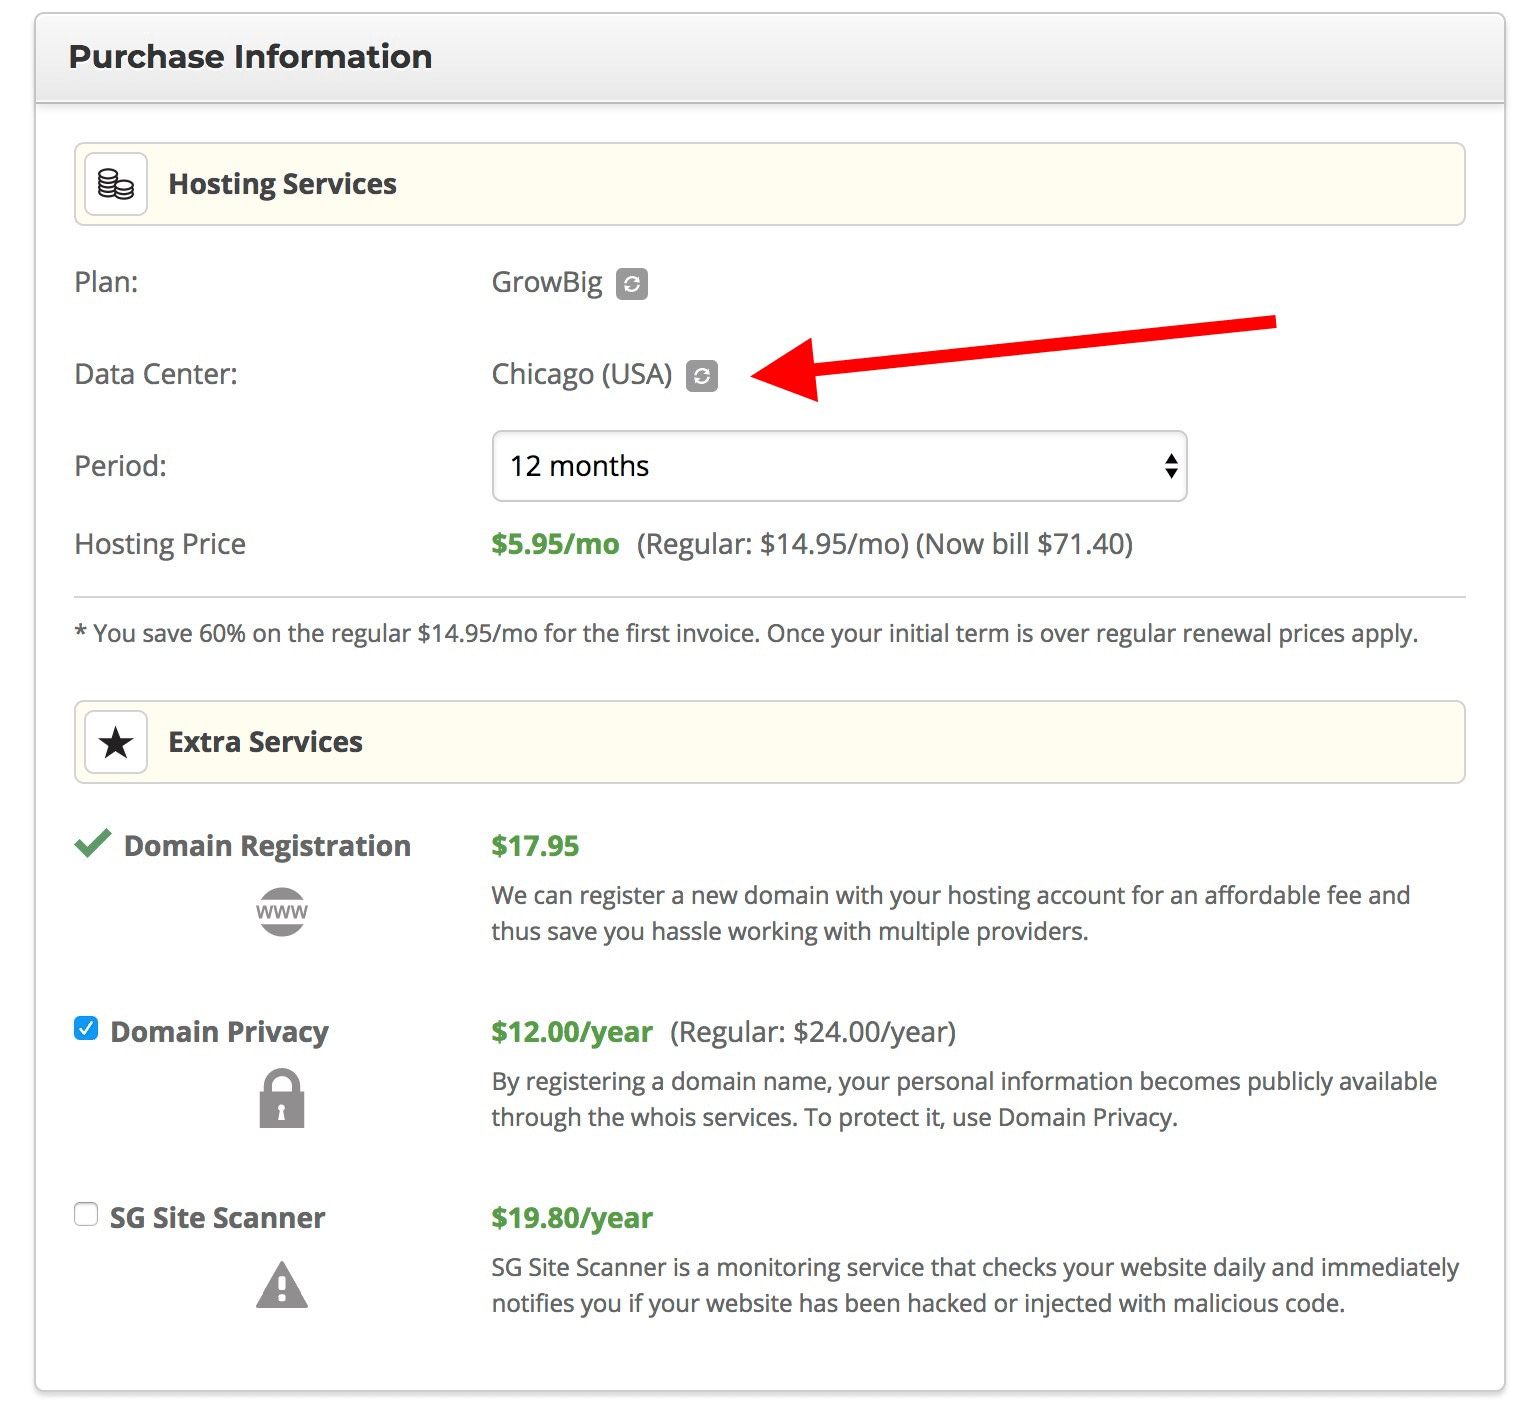
在这里,您可以选择服务器的数据中心位置以及托管计划的注册期限:
- 选择最接近目标受众的数据中心位置-最好在同一国家/地区。
- 选择您可以负担的最长期限。初始期后的续签价格将会增加,因此从长远来看,选择尽可能长的合同作为初始合同会节省您的钱。
完成表格并完成付款。
在您的虚拟主机上安装WordPress
是否选择了虚拟主机并创建了帐户?好!现在让我们在其之上安装WordPress。
有两种处理该过程的好方法。选择最适合您的选项:
在Bluehost上安装WordPress
首次登录Bluehost时,将显示一个设置向导,它将引导您完成WordPress的安装过程。
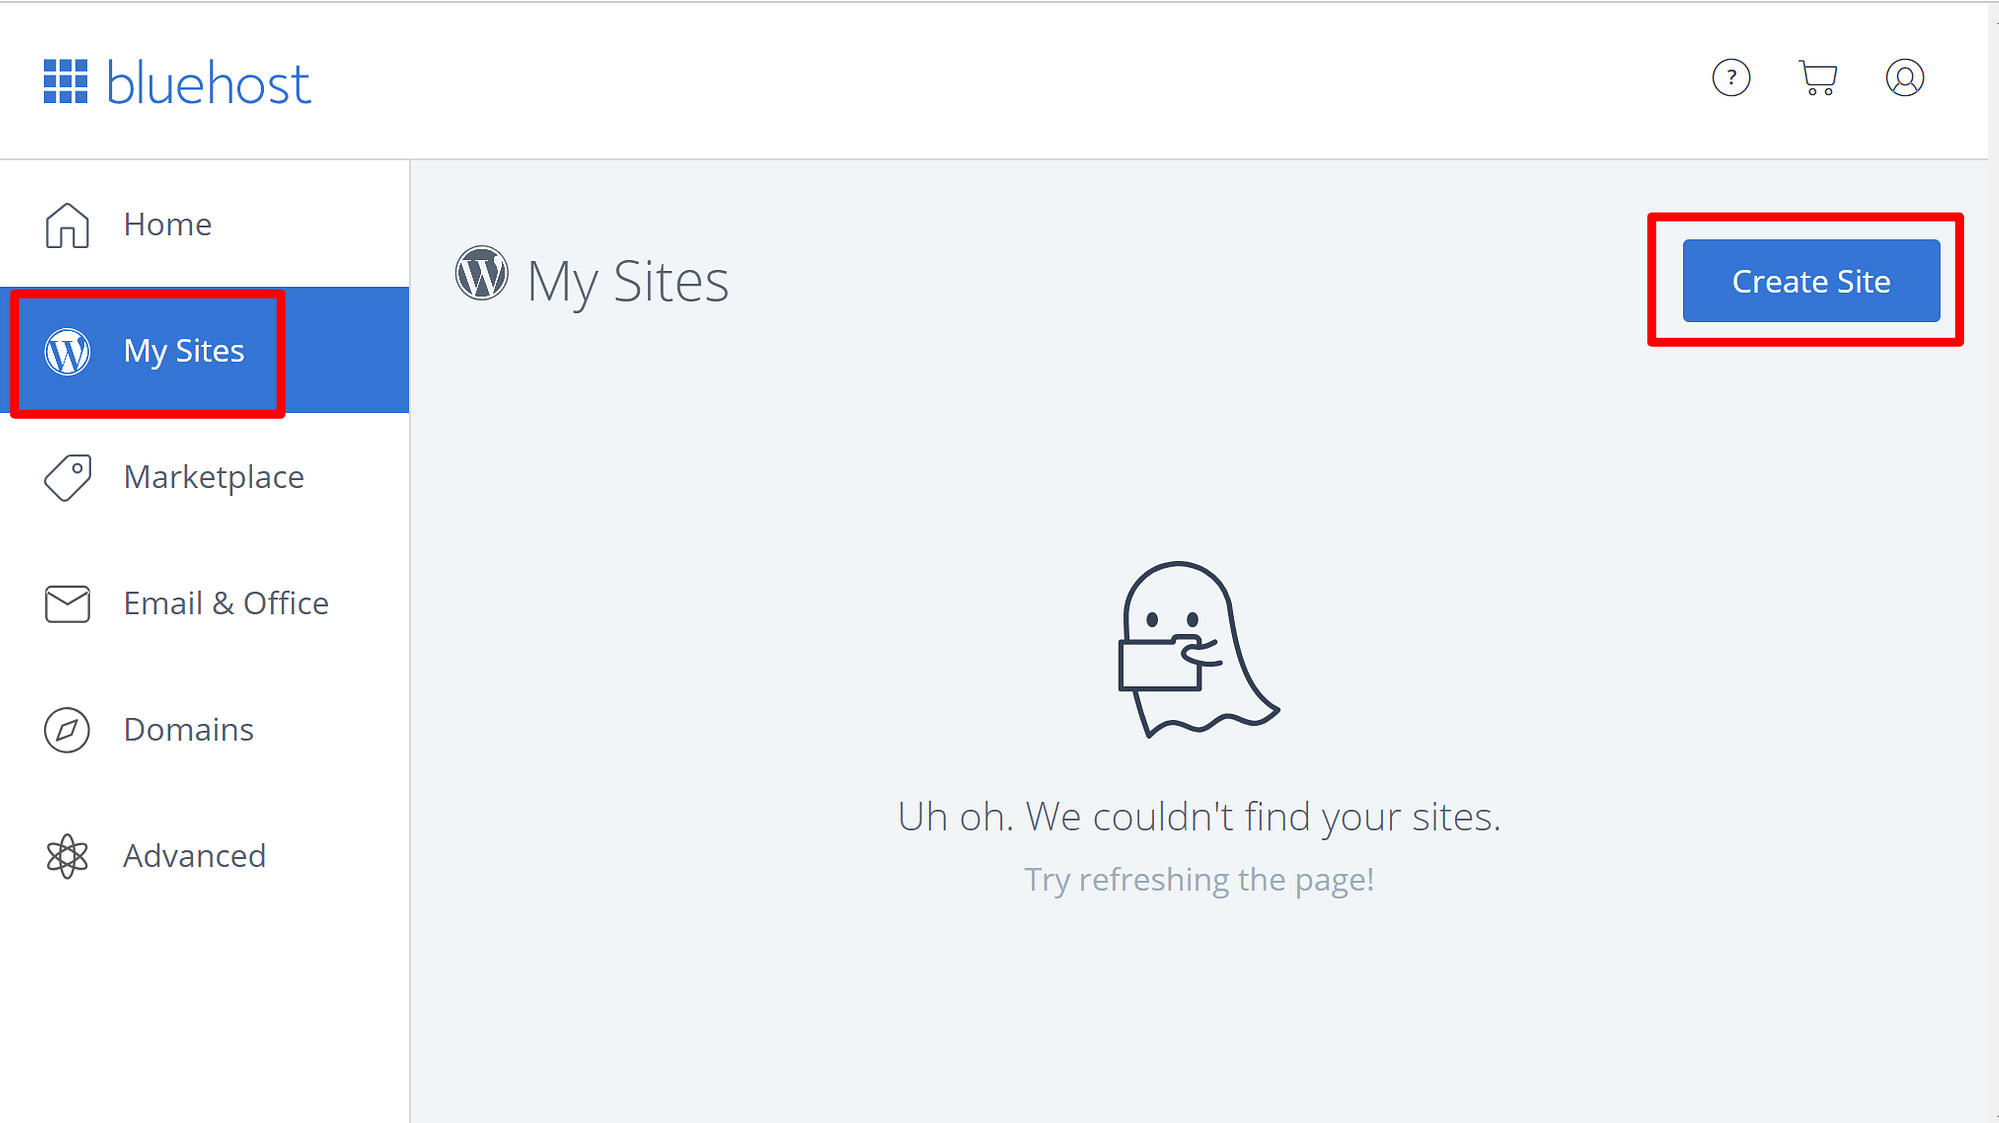
如果您错过了该向导或无意中将其禁用,则始终可以通过转到“我的网站”,然后单击“创建网站”按钮来安装新的WordPress网站。
其余的安装过程不需要任何技术知识。您只需填写一个表格,然后让Bluehost知道您要如何设置您的管理员帐户。
在SiteGround上安装WordPress
尽管这些情况有时会随着SiteGround的变化而改变,但通常来说,完成帐户设置后,您应该已经在运行WordPress实例。
要检查是否存在这种情况,请登录到用户面板并转到“我的帐户”,然后进入“安装”选项卡。您应该会在此处看到您的网站,以及旁边的转到管理面板按钮。您可以单击它以进入WordPress仪表板。
另外,SiteGround可能会向您显示一个站点设置向导,并逐步指导您完成所有操作。在此过程中,您将为网站设置管理员帐户。安装完成后,您将能够登录WordPress仪表板。
如果没有为您设置WordPress网站,最简单的方法就是通过实时聊天与他们的支持团队联系,并要求他们为您设置WordPress。
他们会很乐意这样做,而且您也避免了在途中发生任何错误的可能性。

通过WP-CLI安装WordPress
手动安装WordPress很好,但是我们可以聘请我们的老朋友WP-CLI来简化事情。
Bon️红利:在页面底部,您将找到本指南中使用的所有WP-CLI命令的摘要。您可以复制并粘贴到记录中的内容。
- 如果您不知道,WP-CLI是WordPress的命令行界面。它在标准Unix命令行中已经提供的功能之上添加了一系列WordPress命令。
通过WP-CLI安装WordPress有两个优点:
- 您可以制作自己独特的命令序列,然后多次重复使用以启动新站点。
- 这个过程也要快得多-不仅不会因WordPress UI速度变慢,而且shell命令到达目标位置并执行所需的时间也更少。
Note️注意;下面介绍的步骤从与主机建立SSH连接开始。
首先,请确保您的服务器上确实安装了WP-CLI。运行以下命令:
wp –info
您应该看到WP-CLI状态屏幕。
?注意;在我们推荐的WordPress,SiteGround,A2 Hosting和WP Engine的顶级Web托管选项中,默认情况下均安装了WP-CLI。
如果没有安装WP-CLI,您仍然可以将其自己添加到大多数服务器中。这样做的方法。
要通过WP-CLI安装WordPress,请先转到您要安装站点的目录路径。下一个:
wp core下载
- 下载WordPress
wp config create –dbname = YOUR_DATABASE_NAME –dbuser = YOUR_DATABASE_USER –prompt = YOUR_P4SS
- 创建一个新的wp-config.php文件
wp db创建
- 根据上一条命令设置的详细信息创建数据库
wp核心安装–url = YOUR_DOMAIN.com –title =“站点标题” –admin_user = ADMIN_USER –admin_password = ADMIN_P4SS –admin_email=YOUR@EMAIL.com
这就对了!一旦掌握了整个过程,整个过程只需几秒钟。建立SSH连接可能是最长的部分。
通过cPanel在任何主机上安装WordPress
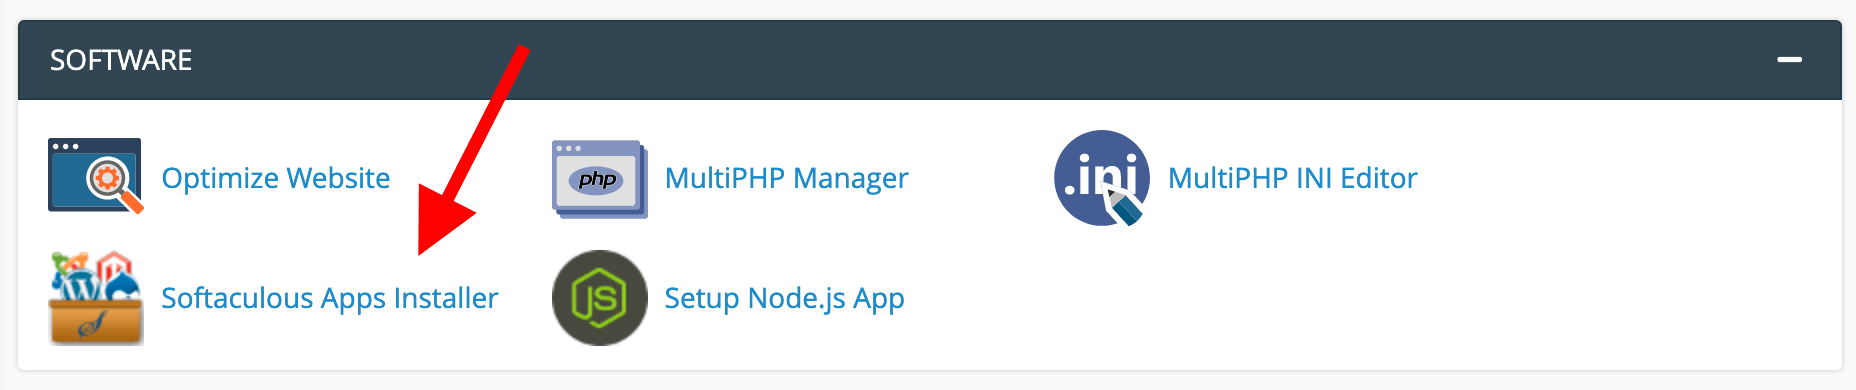
大多数网络托管公司使用名为cPanel的工具来让用户管理其托管设置。简单来说,cPanel是一个在线管理面板,使您能够配置Web服务器,添加新帐户,数据库,电子邮件以及诸如WordPress之类的网站脚本。
在大多数版本的cPanel中,都有一个名为Softaculous的脚本安装工具。您可以在“软件”部分中找到它。
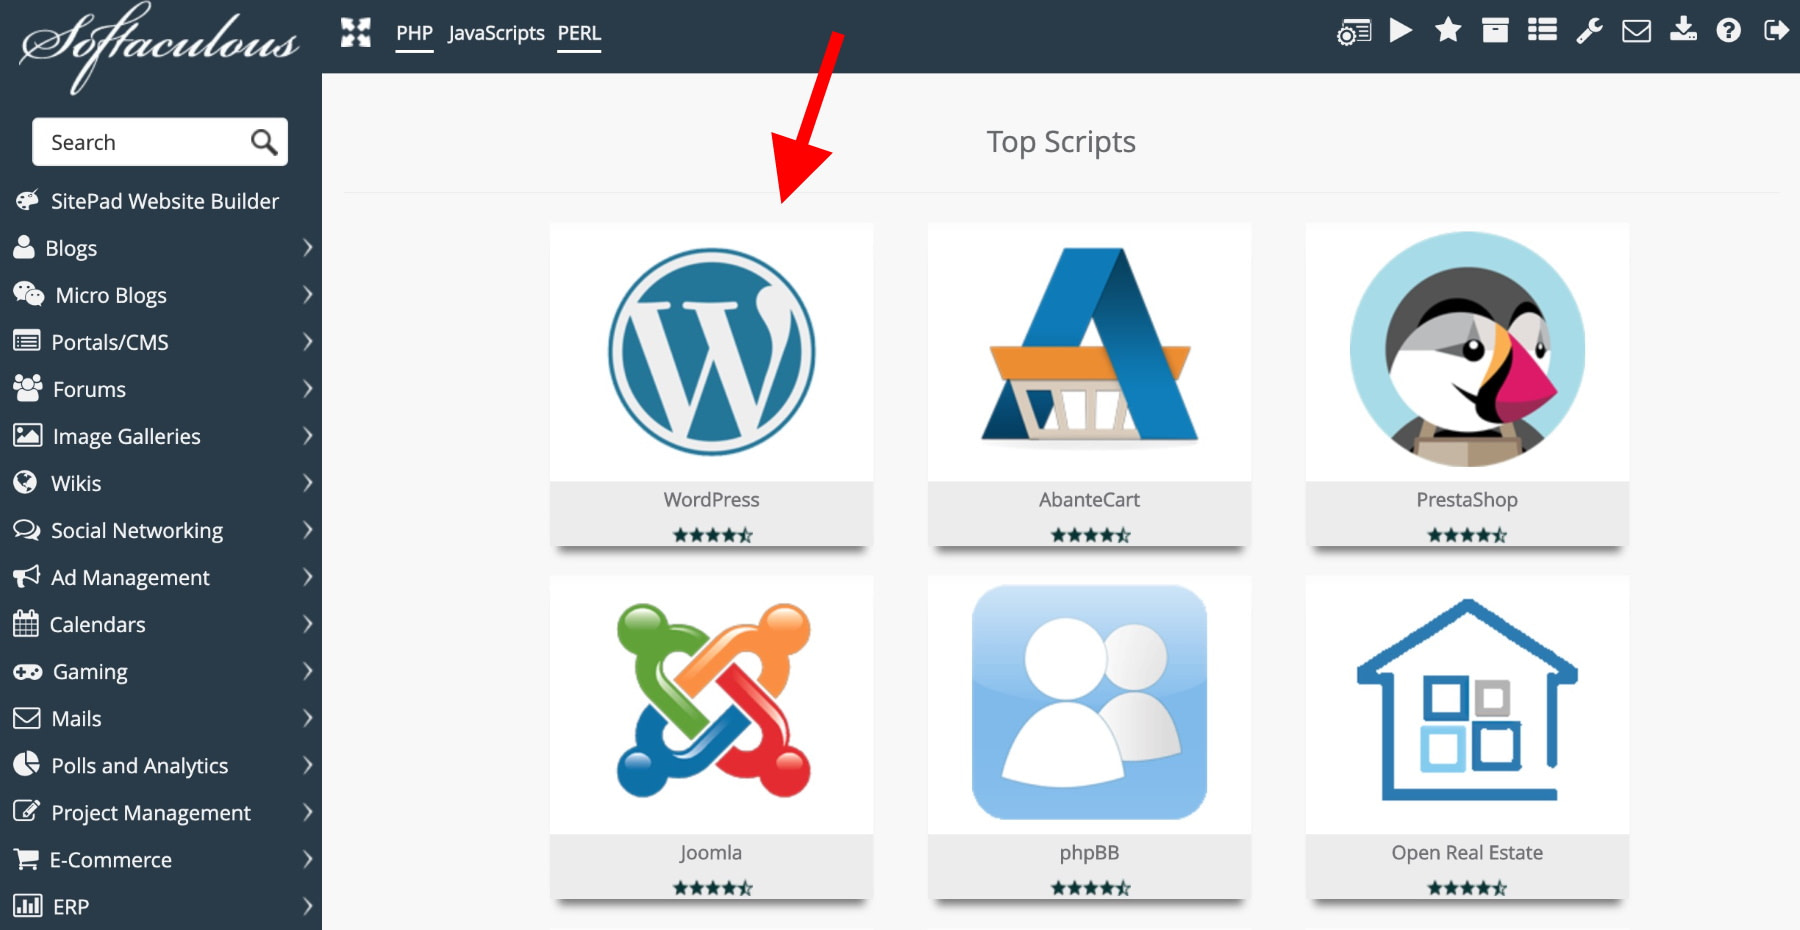
单击它后,您将很快意识到Softaculous提供了多少功能以及可以为您安装多少个不同的网站脚本。幸运的是,WordPress在列表的顶部。单击WordPress徽标开始。
单击立即安装以开始安装。
Softaculous将为您显示一个表格,您必须在其中输入网站的所有详细信息。即使表单较大,也容易掌握字段。
这是表格中最重要的部分:
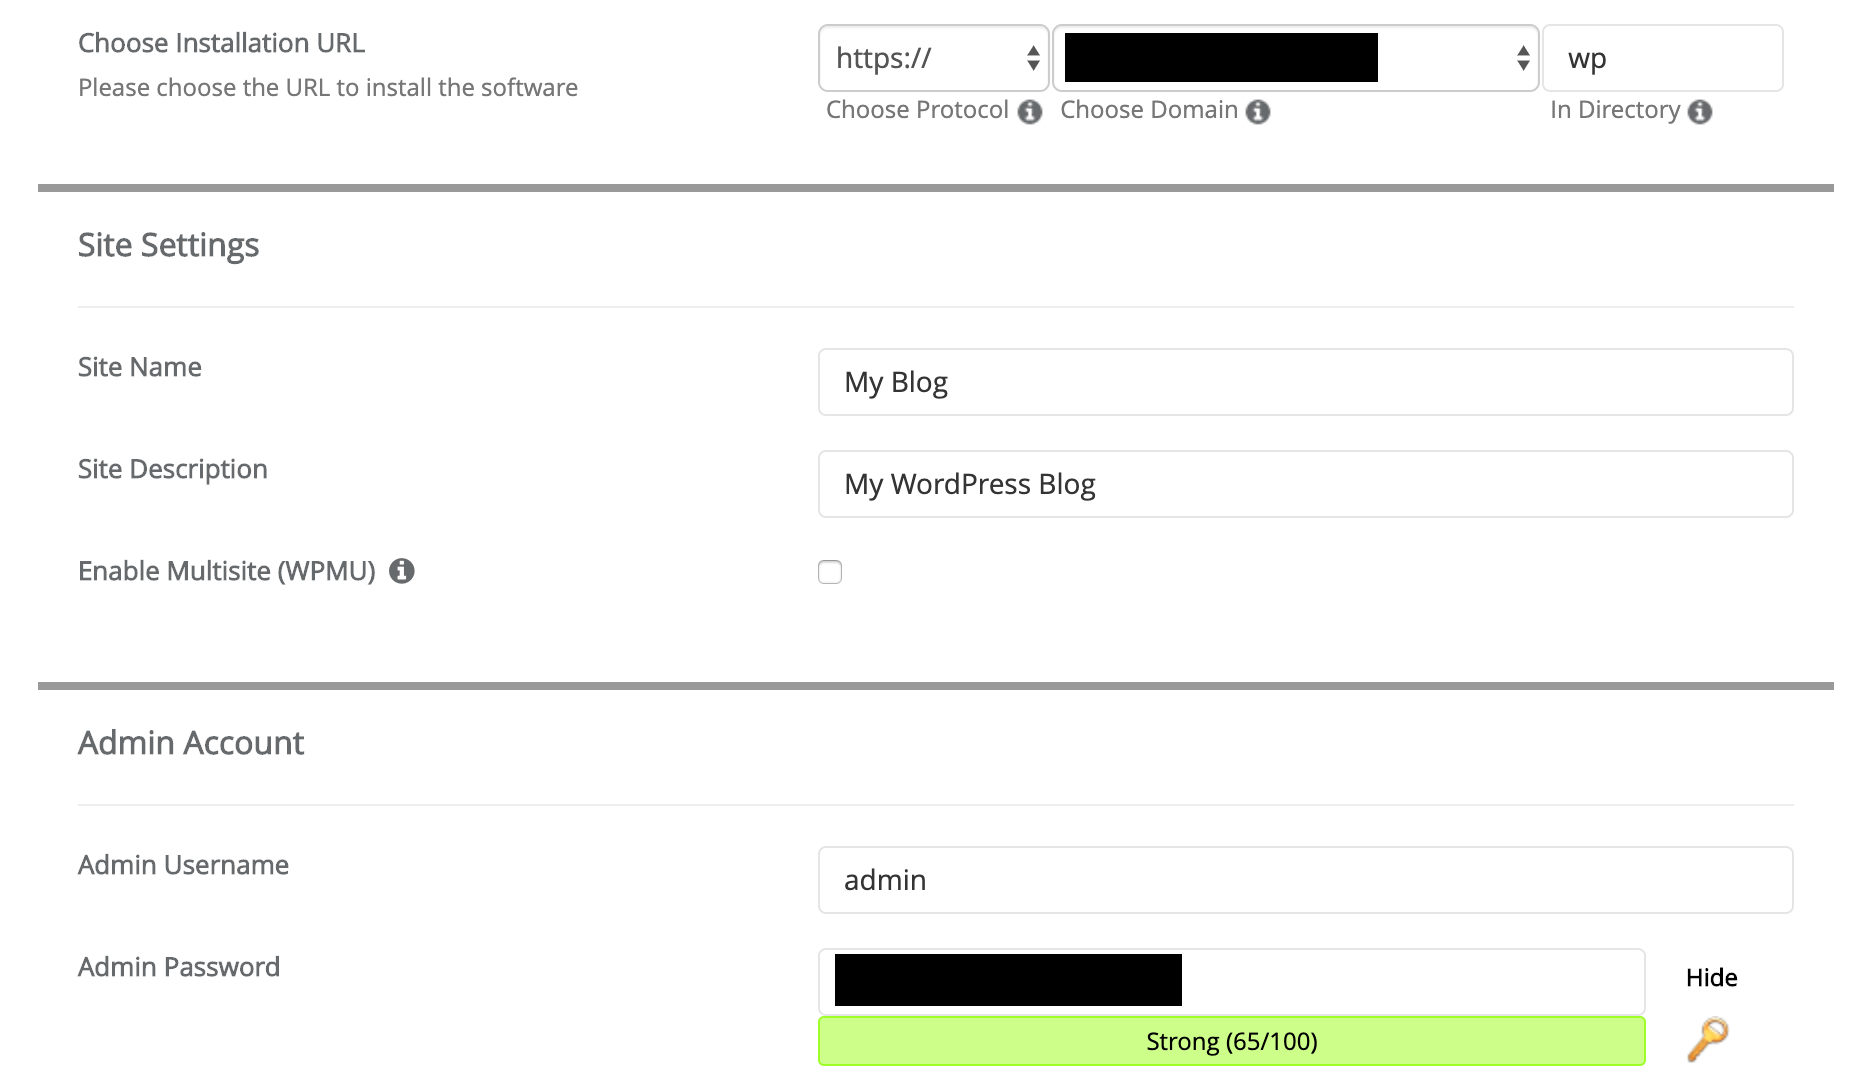
您可以在此处选择站点的域名(默认情况下,您可能已经在其中选择了正确的域名;如果没有,请调整选择),还输入站点的标题和管理员帐户的详细信息。
单击安装后,将开始安装过程。几分钟后,您会收到通知。
在此阶段,您将能够登录WordPress仪表板。
重用空白的WordPress模板网站
如果您经常在新的WordPress网站上工作,那么您会发现自己多次安装WordPress网站的相同结构。
我们都有我们最喜欢的插件,主题,我们最喜欢的网站设置等。每次手动排列它们都是很浪费时间。
有两种很棒的方法可以使自己始终保持相同的WordPress安装:
- 在每个新站点上使用一系列WP-CLI命令
- 创建一个独立的网站模板,然后使用第三方工具将其导入每个新网站
如果您想使事情保持相对简单,请确保已安装所有您喜欢的插件,一个主题以及一些基本的WordPress设置,那么WP-CLI路径就可以了。
要进行更高级的设置-涉及预配置复杂的插件或导入整个首页设计,则需要走另一条路,并使用一些第三方工具。
使用WP-CLI启动模板WordPress网站
就像我们安装WordPress一样,使用WP-CLI也是配置新站点的最有效,最快的方法。
以下是一些您可以使用的基本命令:
wp插件删除你好
- 摆脱了hello插件
wp主题安装THEME_SLUG
wp主题激活THEME_SLUG
- 安装并激活主题
wp插件安装PLUGIN_SLUG
wp插件激活PLUGIN_SLUG
- 安装并激活插件
wp评论删除$(wp评论列表–format = ids)
wp post delete $(wp post list –post_type =’post’–format = ids)
wp post delete $(wp post list –post_type =’page’–format = ids)
- 删除在安装过程中创建的所有评论,帖子和页面
或者:
wp网站为空
- 整个网站一片空白;不会留下任何帖子,评论,术语或元
wp网站为空–uploads
- 从上载目录中删除所有内容
wp post generate –count = 10
- 创建十个空帖进行测试
即使您只想摆脱虚拟内容并安装几个插件,也可以通过WP-CLI更快地完成。
您可以自行创建理想的WP-CLI命令序列,以获取所需的确切插件,主题和入门站点内容。这是可供选择的WP-CLI命令的完整目录。
使用Duplicator启动模板WordPress网站
处理模板网站的一种好方法是使用Duplicator之类的插件。
 复制器– WordPress迁移插件
当前版本:1.3.28
上次更新时间:2020年2月12日
duplicator.1.3.28.zip
98%评级
1,000,000+安装
WP 4.0+要求
如果您一开始就需要更全面的插件集(或主题),并且希望这些插件已经以某种方式进行了预配置,则此路径更适合。
例如,许多开发人员喜欢从他们喜欢的主题,特定的入门网站和特定的页面构建器插件开始,这些插件已经导入了一些常见的页面设计(例如“关于”页面,“联系人”页面等)。您可以建立这种模板网站,然后使用Duplicator进行推广。
偶尔,您也可以更新该模板站点,从而最大程度地减少了以后更新所有内容的需要。
它的工作原理与您期望的完全一样:
- 首先在测试服务器上设置模板站点。
- 请注意您喜欢的基本站点设置。这涉及永久链接,搜索引擎可见性,评论和pingback / trackback设置。
- 安装您认为必须的插件。不要在这里太过分,实际上只能在所有网站上安装您始终需要的插件。通常属于此类别的是备份插件,安全性,SEO,社交媒体,ACF,联系表,性能插件,Google Analytics(分析)。
- 安装您喜欢的主题–但前提是您必须在所有站点上都使用它。
- 预先配置插件和主题。
- 分配必需的小部件(如果有)。
- 将一些虚拟内容导入博客文章。
- 创建必备页面。关于,联系之类的事情。
- 创建一个主导航菜单。

完成所有步骤后,安装Duplicator并完成将站点导出为模板的过程。
我们在此处提供了有关如何执行此操作的指南。该指南还介绍了如何拍摄站点图像并将其部署到新位置。
了解WordPress界面
WordPress的每个新用户都必须熟悉的第一件事是WordPress界面本身。
一旦您学会了绳索,UI确实变得非常易于使用,但是对于人们来说,这并不是最简单的事情。
要登录WordPress仪表板,请访问www.YOURDOMAIN.com/wp-admin/
输入在WordPress主机上设置过程中设置的用户名和密码。
成功登录后,您将看到WordPress主界面:
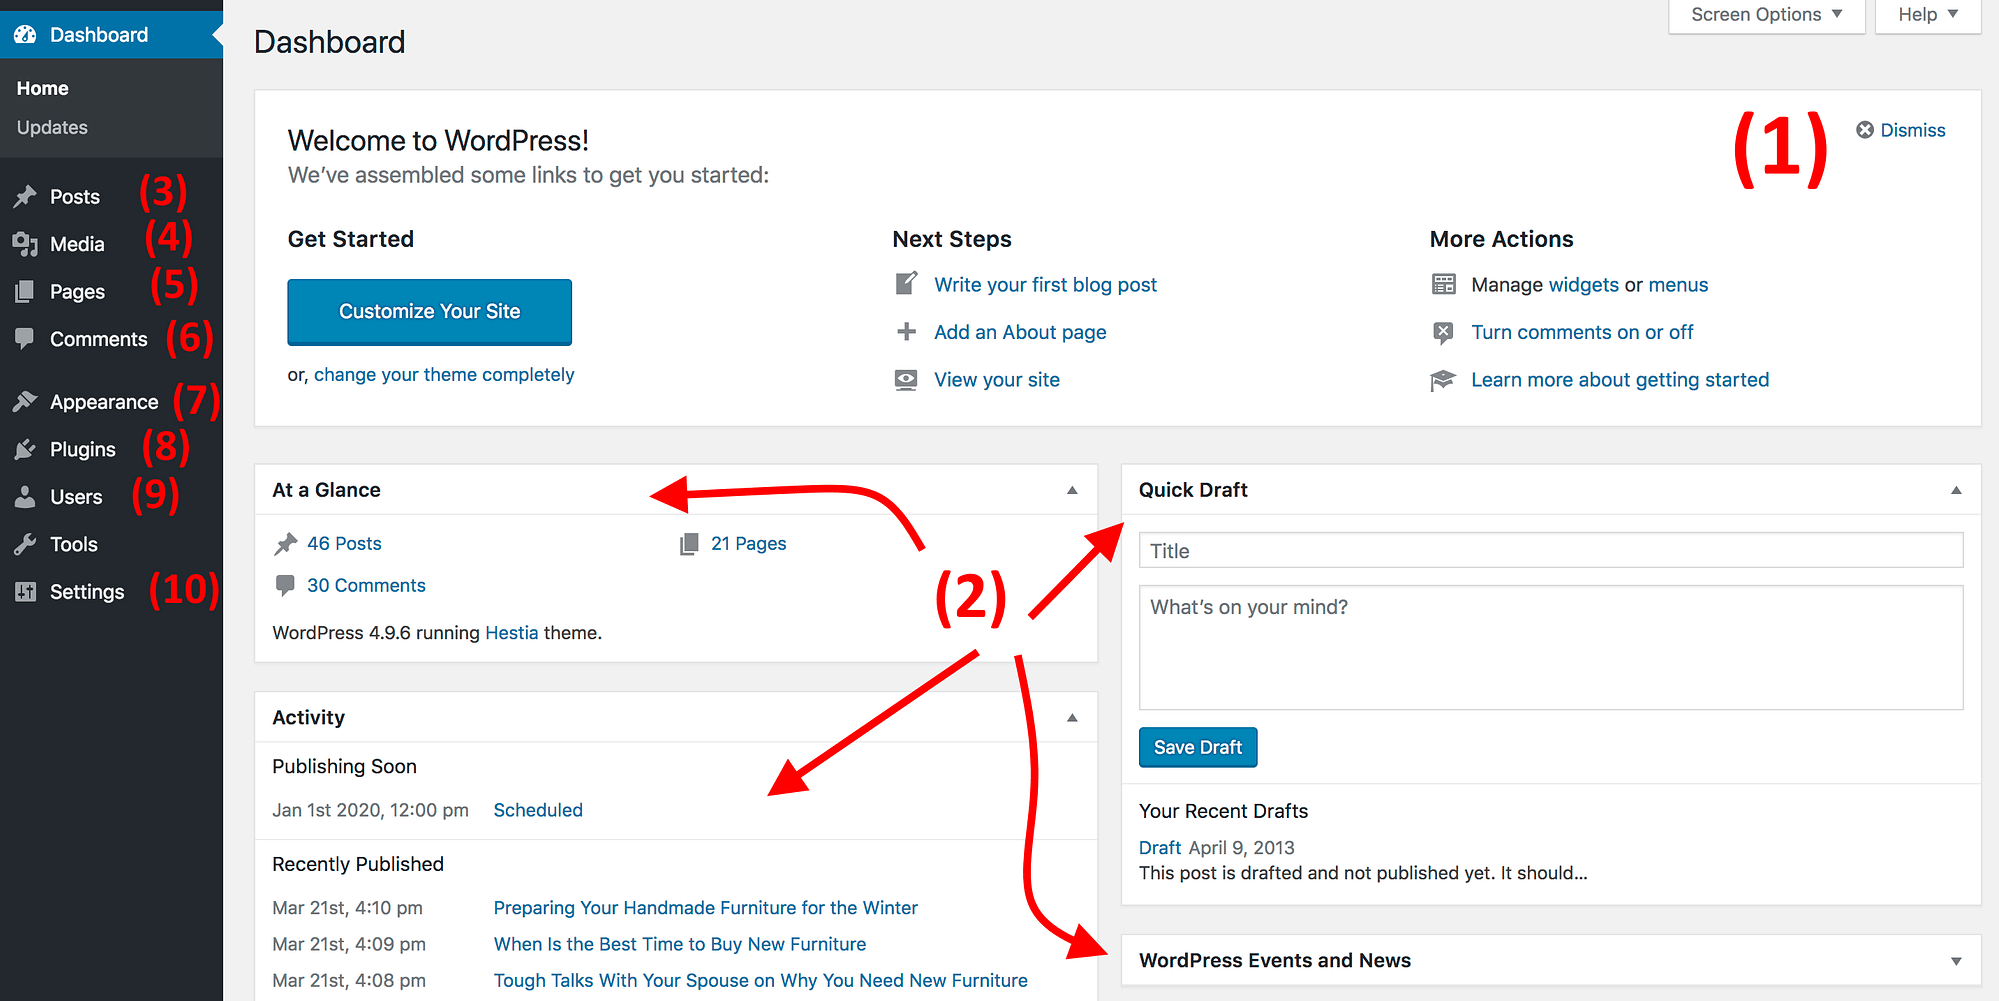
以下是最重要的部分:
-
(1)欢迎留言。在这里,您会找到一些指向管理面板各个关键区域的快捷链接。
-
(2)您网站的当前状态及其进展。
-
(3)帖子。您可以在此处创建博客文章。
-
(4)媒体。您站点的媒体库–在这里您可以上传和管理图像以及其他媒体文件。
-
(5)页。您可以在这里创建页面。
-
(6)评论。您会在此处找到所有读者的评论。
-
(7)外观。在这里,您可以更改当前主题并自定义网站的其他设计功能。
-
(8)插件。在此处安装新插件。
-
(9)用户。管理有权访问该站点的用户帐户。
-
(10)设置。该站点的主设置面板。
建议您在这里花点时间,逐节查看可用的内容。让自己熟悉。
下一个:
照顾一些基本的网站设置
尽管WordPress可以在其默认预设上完美运行,但是在完成一些基本优化后,您将获得更多收益:
设置固定链接
固定链接定义WordPress如何构建网站上各个子页面的网址(称为URL)。
长话短说,您想在URL中添加页面标题。默认设置无法满足您的要求,因此我们需要对其进行调整。
从信息中心的主侧栏中转到设置→永久链接。
选择以下设置:
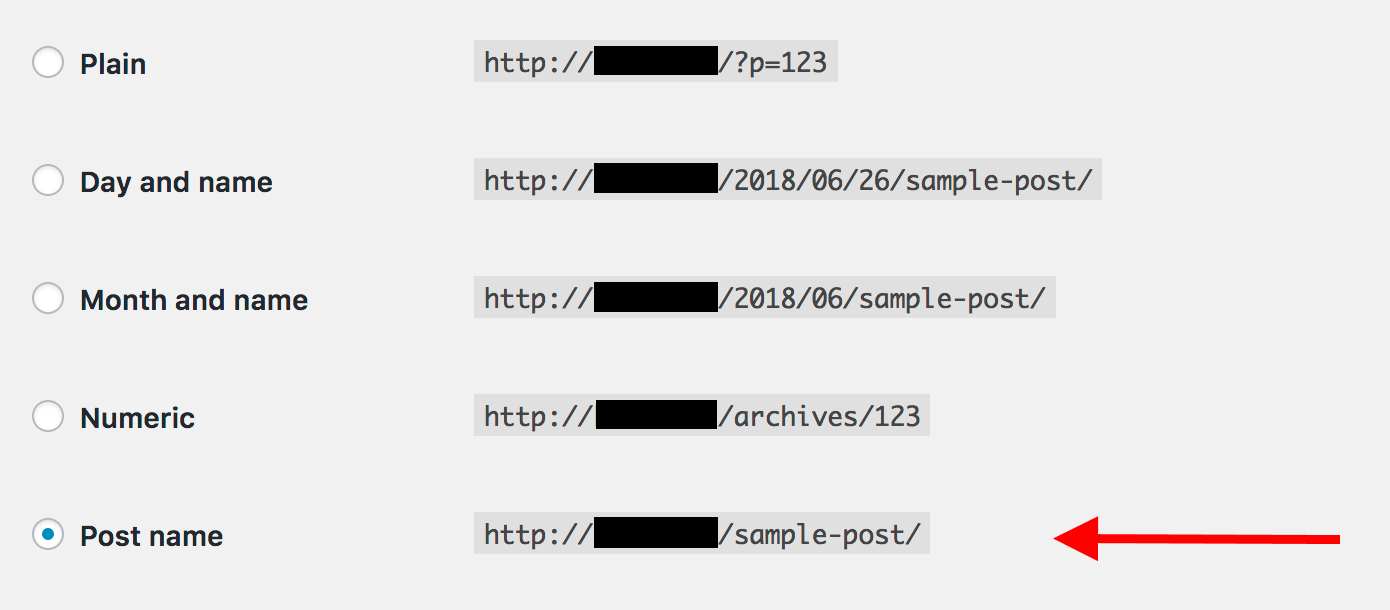
单击保存更改。
使您的网站对Google可见
通常,默认情况下,大多数WordPress网站都设置为对Google可见,但是我们将检查您的网站是否是这种情况–请确保!
转到设置→阅读,并确保未选中标记为“不鼓励搜索引擎……”的框。

检查您的网站标题和口号
转到设置→常规,然后在“网站标题”和“标语”字段中查看内容。根据需要进行调整。
网站标题和标语经常在您的整个网站的首页,SEO标题和说明,网站设计的标头区域等地方使用。
总是设置正确的标题和标语总是很好。
启用/禁用评论
是否要接受读者评论完全取决于您。
支持和反对都有很好的论据,因此请随时做出自己的决定。
要更改网站的评论设置,请转至设置→讨论。这是要调整的字段:

禁用pingback和引用
引用和引用是一天中剩余的功能。没有人使用它们了。
要禁用pingback和引用,请转到“设置”→“讨论”,然后取消选中以下框:

设置正确的时区
时区设置虽然很小,但是如果设置不正确,则可能会使您的网站混乱。
例如,如果时区错误,当您将某些博客文章设置为在上午8点上线时,您可能会感到惊讶,却发现该帖子在深夜上线,因为您的站点认为它在另一个大陆上。它发生了。
为确保您的时区设置正确,请转到设置→常规,然后查找以下字段:

…
所有这些设置都是非常基本的。这部分的总时间不应超过10分钟。
自动化基本网站设置
设置新站点通常是每次相同的步骤序列。
为什么不自动化呢?
再次,我们的好朋友WP-CLI来救援!您可以使用一些有用的命令:
设置固定链接
wp重写结构’/%postname%/’
添加用户帐户
wp用户创建john john@example.com –role = author
确保该网站对Google可见
wp选项更新blog_public 1
设置网站的标题和标语
wp选项更新博客名称“您的站点名称”
wp选项更新blogdescription“您的网站描述”
启用/禁用评论
wp选项更新default_comment_status已关闭
要么:
wp选项更新default_comment_status打开
禁用pingback和引用
wp选项更新default_ping_status已关闭
设置正确的时区
wp选项更新timezone_string“美国/纽约”
can您可以调整的范围并不止于此。继续看一下WordPress数据库中的wp_options表。您可以使用wp选项更新命令来调整任何设置。这是文档。签出并创建您自己的WP-CLI命令序列,以自动执行WordPress网站设置。
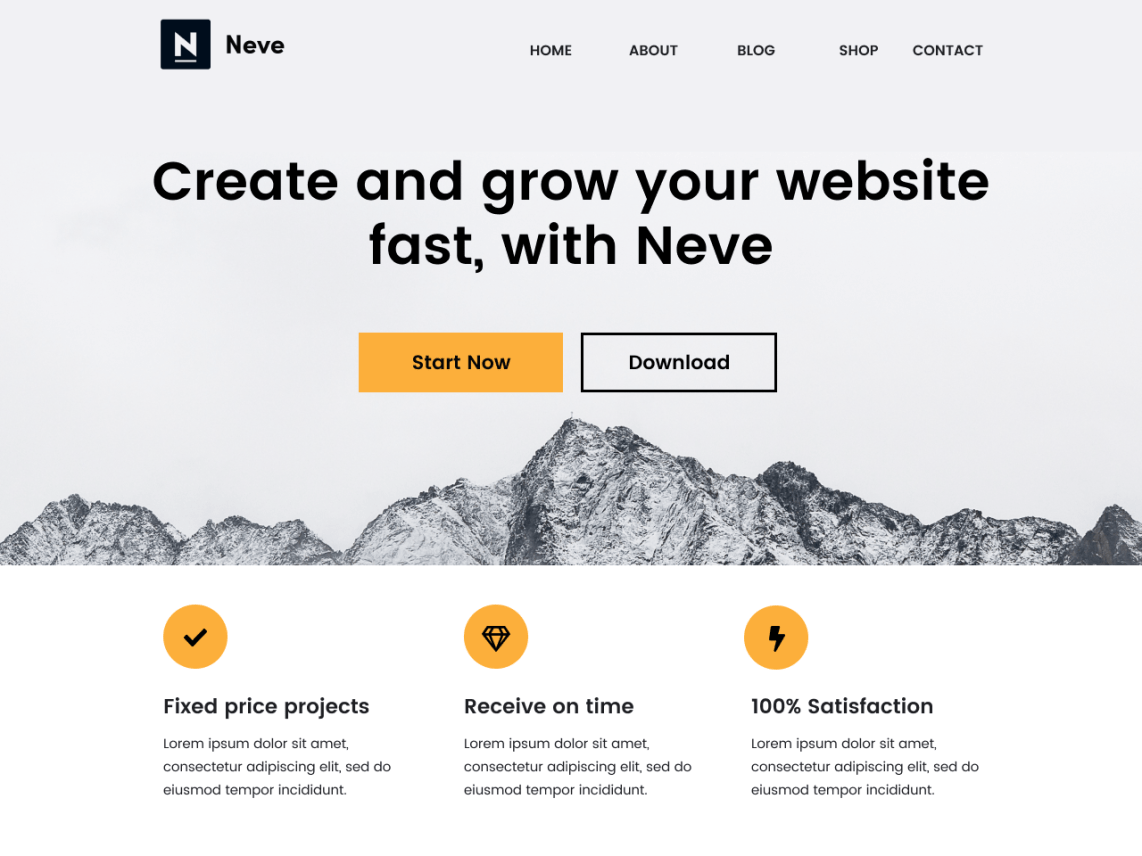
选择一个WordPress主题
关于WordPress的最好的事情之一是,您只需单击几下就可以更改网站的整个设计。这是借助WordPress主题完成的。
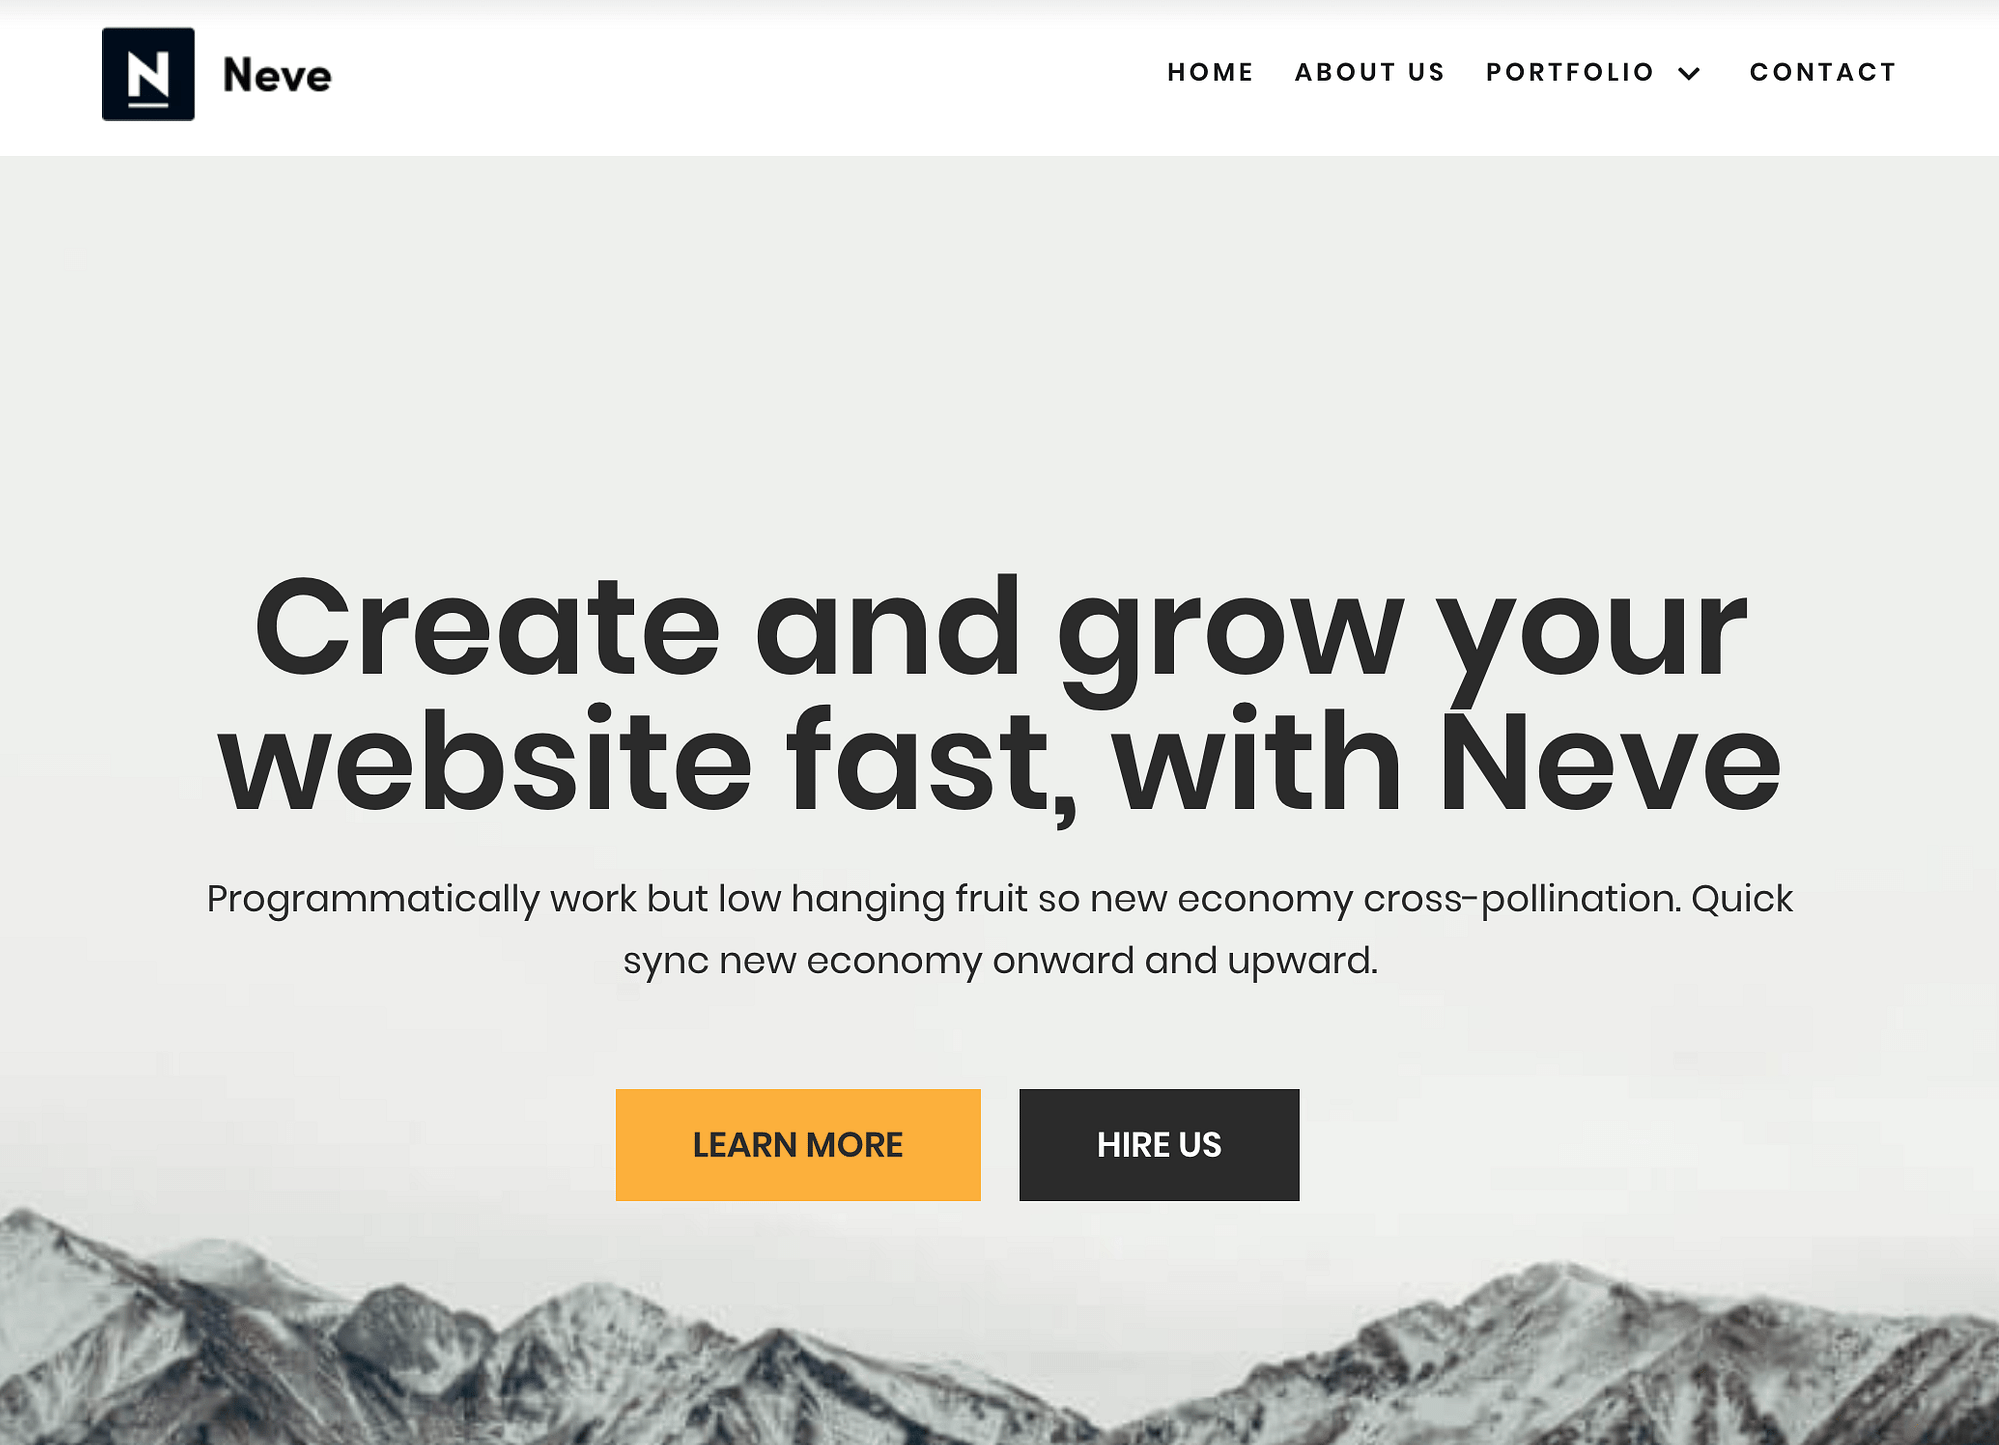
只是为了向您展示可能,这是一个现有的WordPress网站的外观:

这是在安装新主题并花了几分钟的时间对其进行自定义后的外观:
最好的消息?
许多WordPress顶级主题都是免费的。
选择主题并将其安装到您的网站的方法如下:
转到外观→主题,然后单击添加新。

切换到“流行”选项卡。
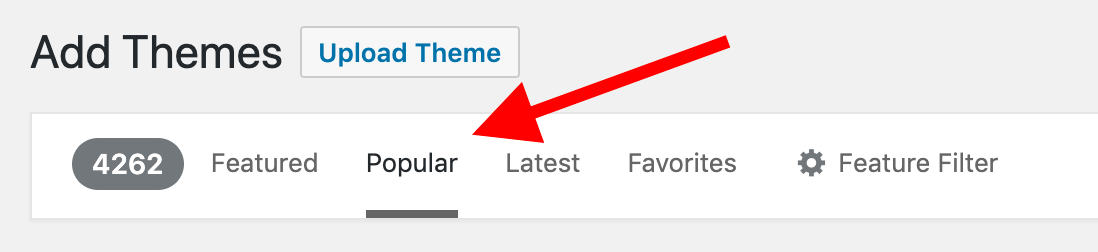
您正在寻找的是社区最欣赏的主题。他们都是免费的。
浏览此列表,然后选择您喜欢的主题。我将选择Neve(这是我们姊妹公司制作的主题,也是目录中最受欢迎的主题之一)。
单击安装以将主题导入到您的站点:
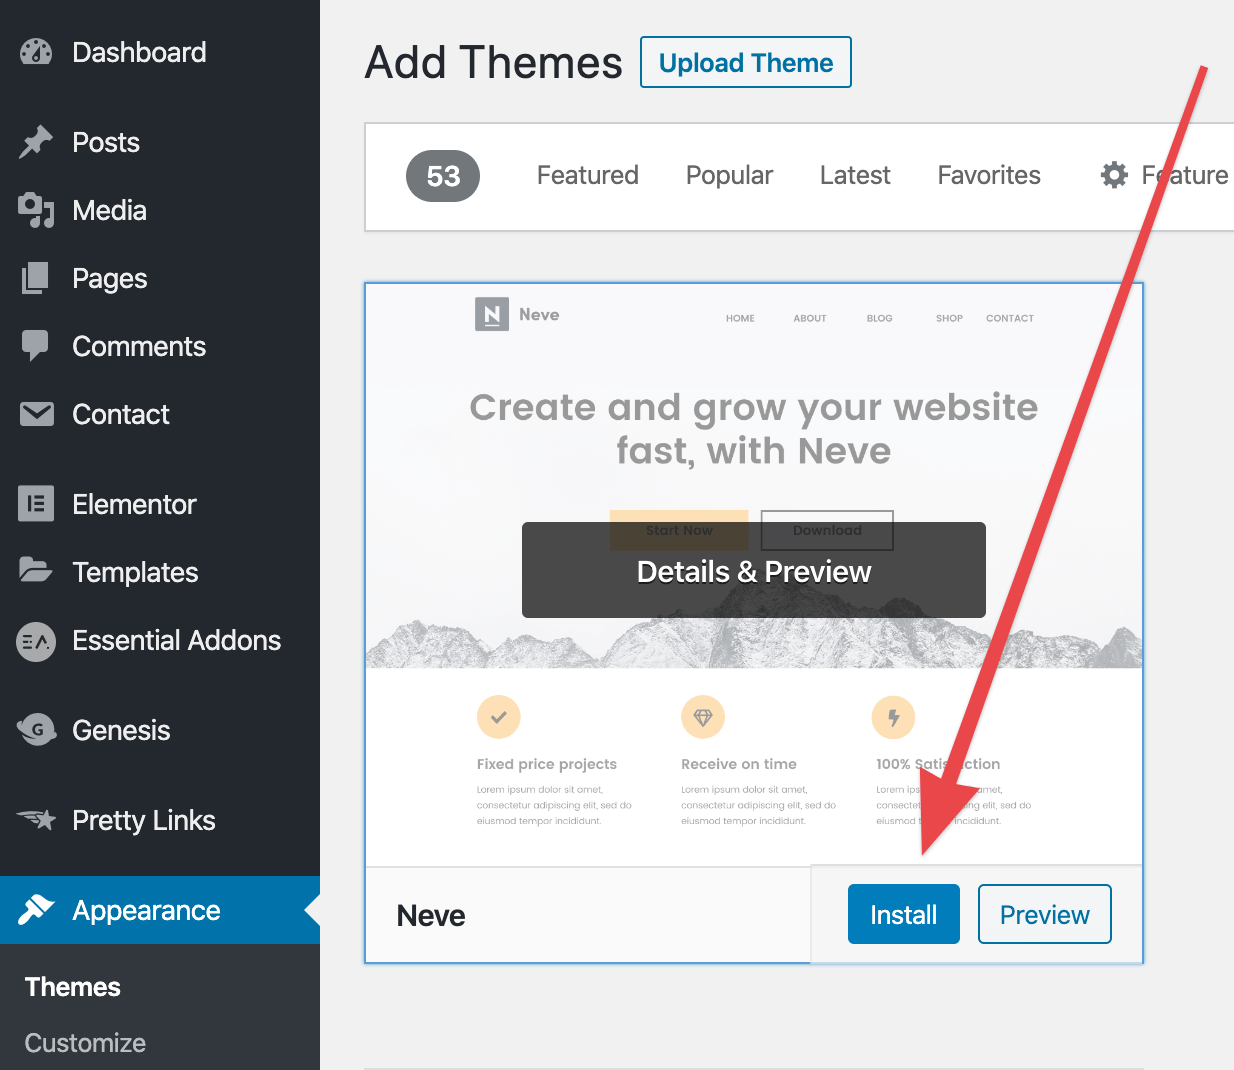
安装完成后,将显示“激活”按钮。点击它。
自定义主题
根据您选择的特定主题,入门和自定义过程可能会有所不同。以下是Neve的工作方式:
在上一步中单击“激活”按钮后,Neve会向您显示一条成功消息,并邀请您通过导入入门网站开始使用主题。
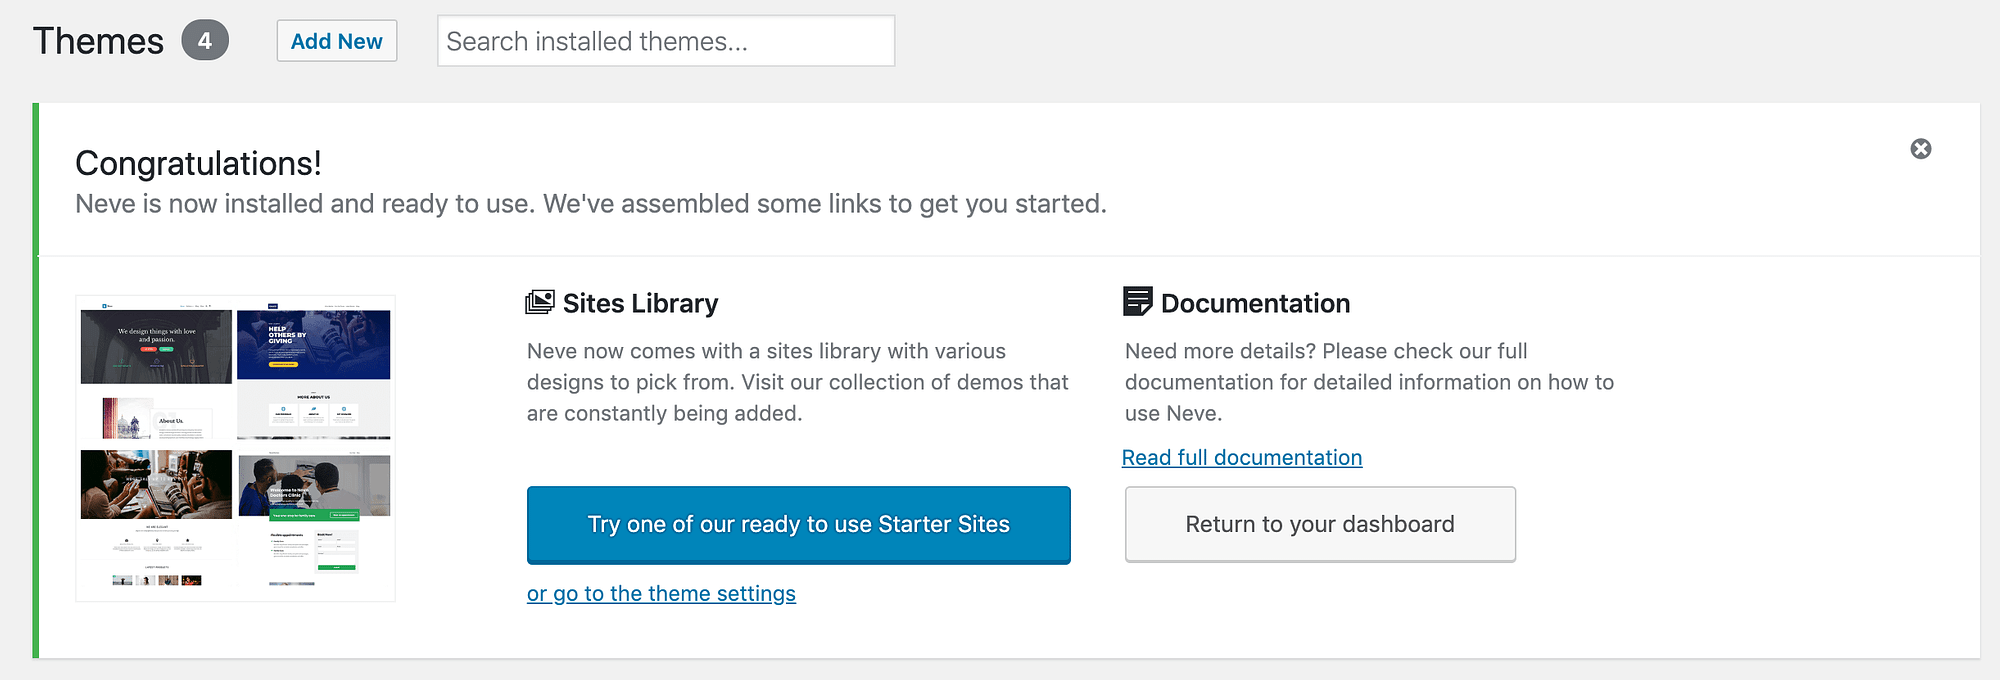
入门网站是一种现成的网站结构,已预先设计并预先填充了演示内容。使用入门网站可以加快新WordPress网站的设置过程。
单击蓝色的大按钮(参见上文)开始导入入门站点。您会看到可用设计的列表。
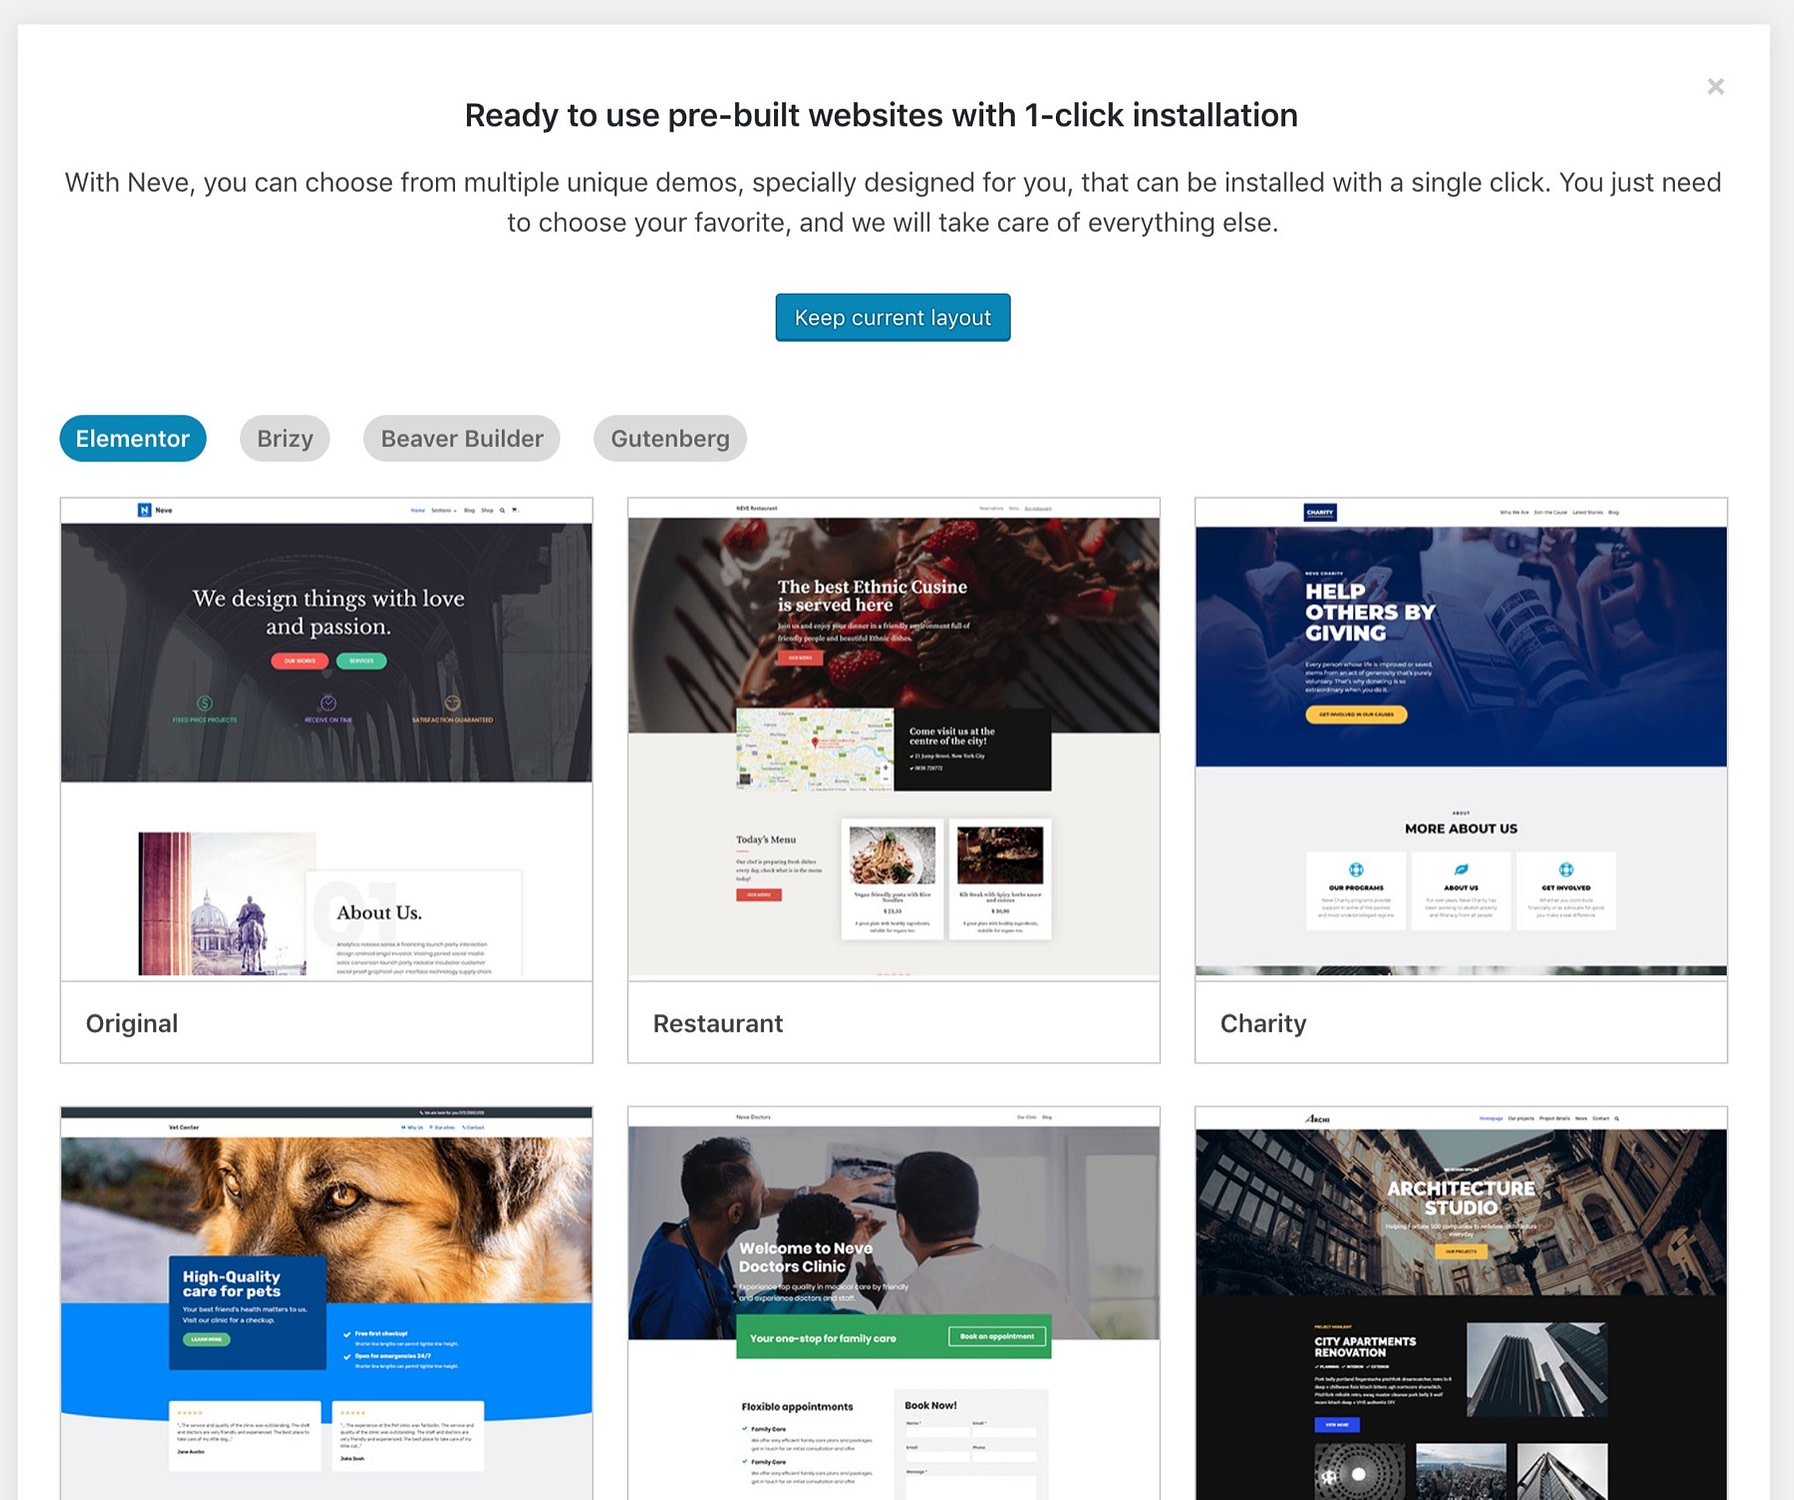
选择您喜欢的设计,单击它,然后单击“导入”按钮。 Neve将让您选择要与设计一起导入的元素。您可以将所有功能保持打开状态以获得最佳效果。
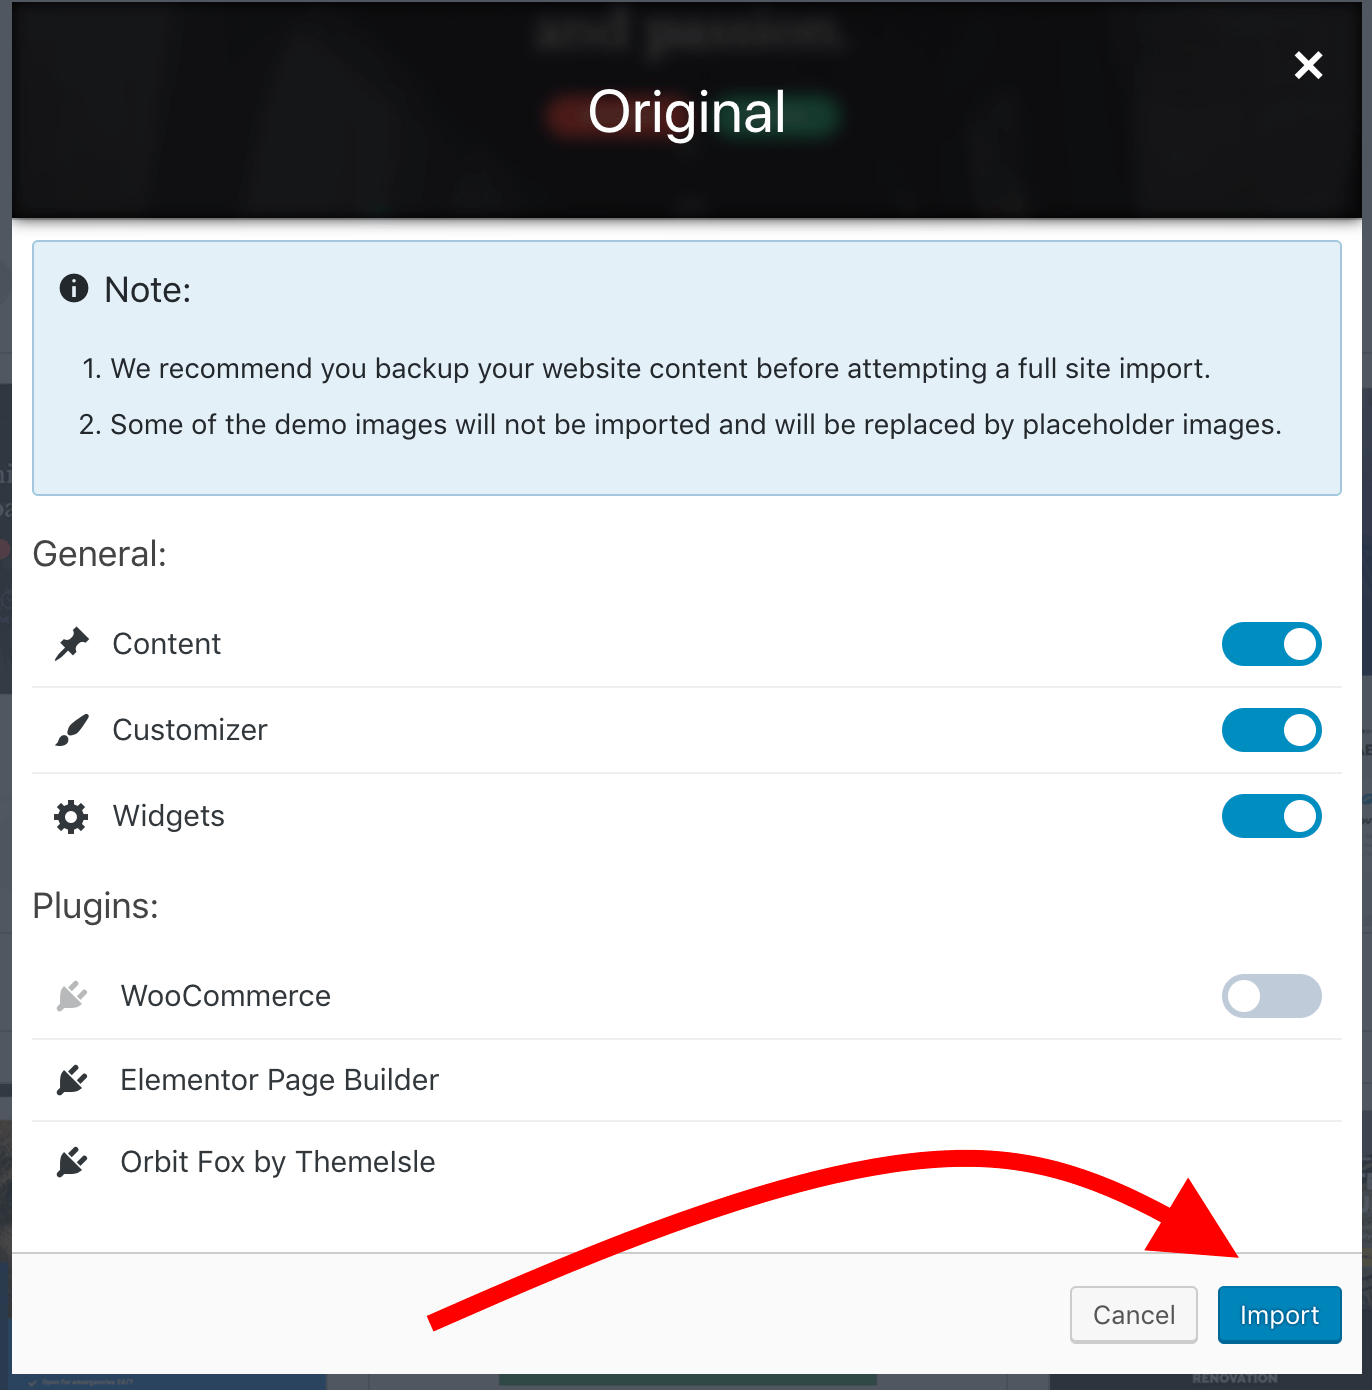
导入本身可能需要一两分钟。完成后,您将可以查看您的网站:
通过定制获得更深入的了解
WordPress中有一个名为“定制程序”的模块。在自定义网站和设计时,它可以使您获得很多细节。
要查看可用的内容,请单击顶部栏中的“自定义”链接,或转到WordPress仪表板,然后进入“外观”→“自定义”。
可用选项的确切范围取决于您使用的主题。通常,您仍然可以调整网站的布局,页眉和页脚,颜色和背景,版式,按钮,菜单等。
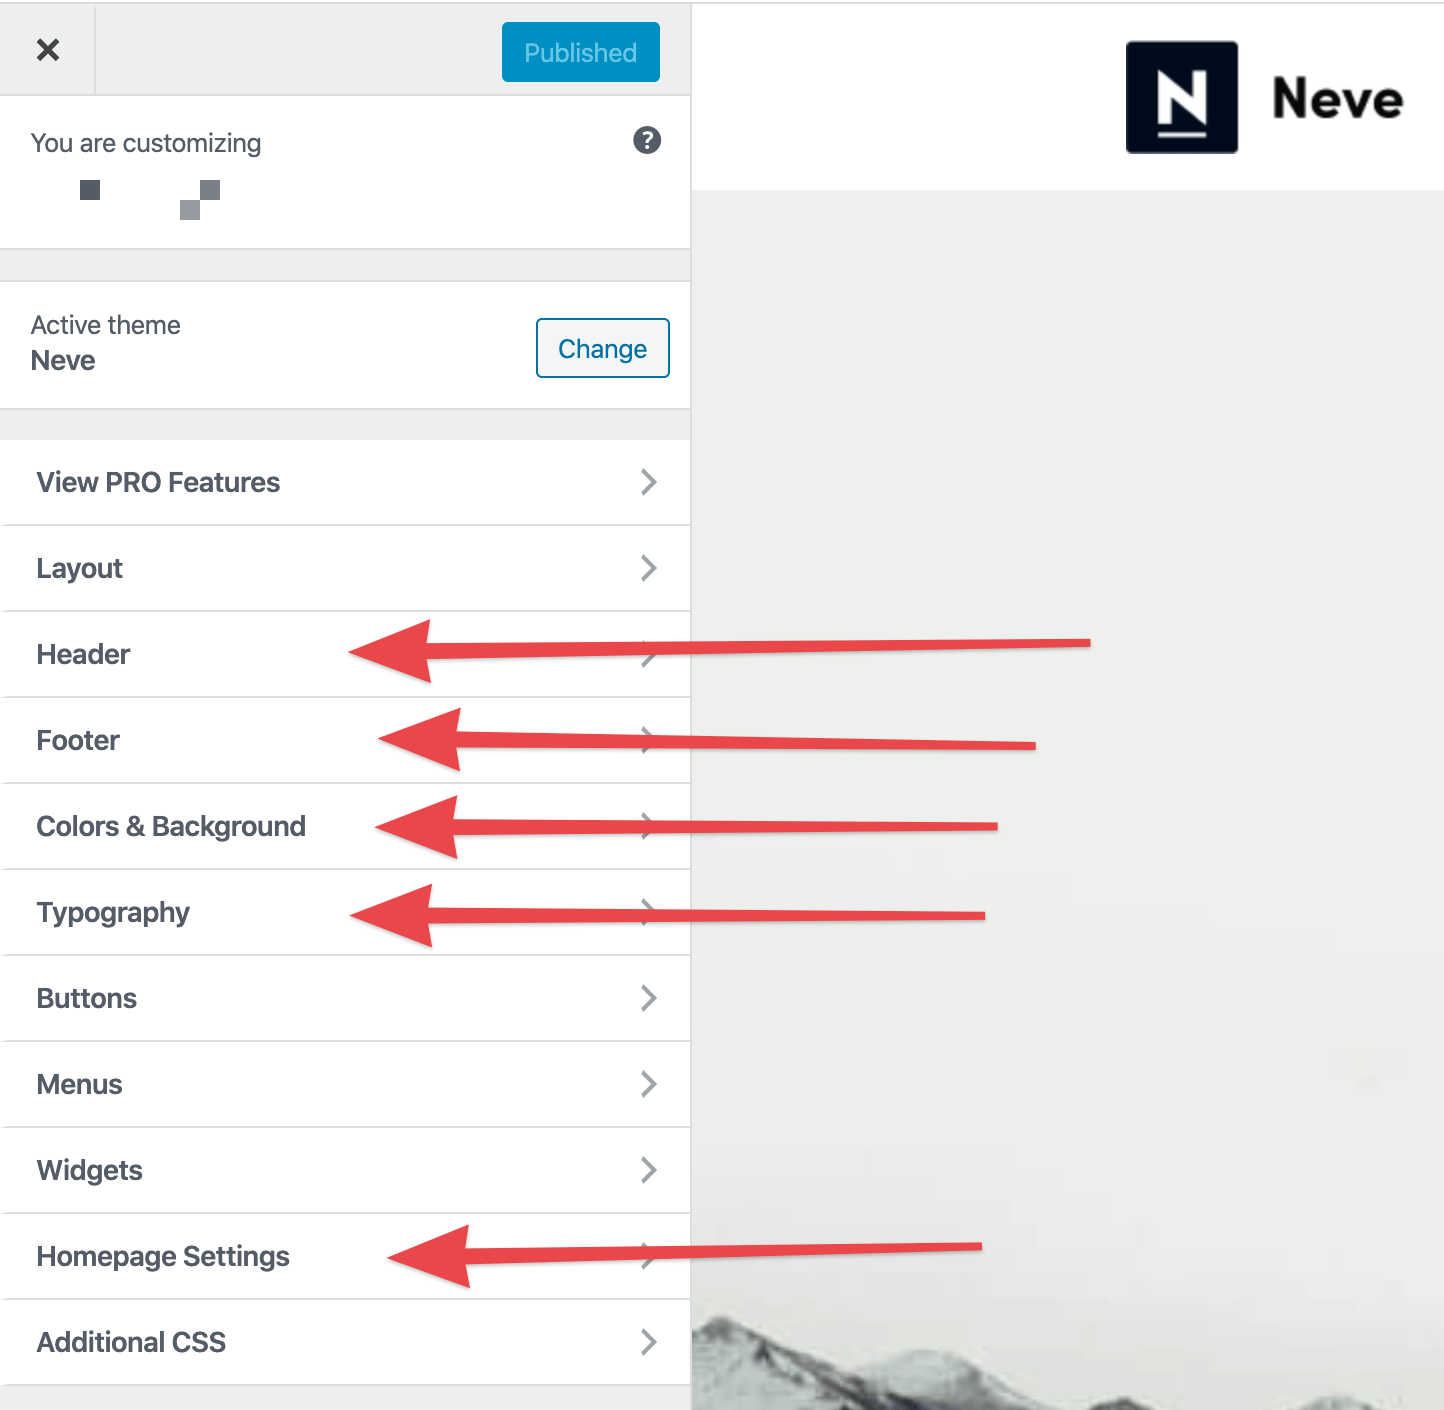
浏览不同的部分,并查看它们的调整对您的网站的影响–更改在右侧的预览窗格中实时生效。
如果要保留更改,请单击“发布”按钮(左上角)。
通过WP-CLI自定义主题
注意;如果您尚未安装主题,请滚动到上一节,其中介绍了如何使用WP-CLI完成该主题。
现在,以半自动方式自定义主题。
还记得我们在讨论您网站的核心设置时使用的wp选项更新命令吗?您也可以将其用于主题设置。
大多数WordPress主题(如果不是全部)都将其设置存储在数据库的wp_options表中。这意味着您可以使用wp option update命令修改这些选项-对其进行预先设置。
不幸的是,无法避免的事情是,您必须通过wp-admin手动进行初始设置和自定义。但是,然后,您可以重复使用这些设置,并在WP-CLI的帮助下将其部署到新站点。
安装并自定义主题后,使用phpMyAdmin浏览wp_options表,然后查找各个选项设置。根据这些设置,创建独特的wp选项更新命令序列,并逐个重做。在新站点上使用它。
安装一组必备插件
插件是您的WordPress网站,而应用程序是您的智能手机。 ?
While you can certainly use your smartphone without installing anything extra on it, you would be missing out on a lot of cool functionality. It’s the same story with WordPress plugins. WordPress is functional out-of-the-box, but you can get a lot more out of it with plugins.
We covered our favorite must-have plugins quite in-depth elsewhere on this blog. I encourage you to check that resource out to get detailed descriptions of what each plugin does and why they should make your must-have list as well.
Here’s an excerpt from that resource – just the names of the plugins and a short description of what each does:
-
Yoast SEO – the most popular SEO plugin for WordPress; it will help your site rank better in Google
-
Google Analytics for WordPress – integrates your website with Google Analytics
-
Cache Enabler – makes your site load quicker; alternatively, check out these caching plugins
-
Wordfence Security – makes your website more secure
-
UpdraftPlus – automatic backups to keep your content safe
-
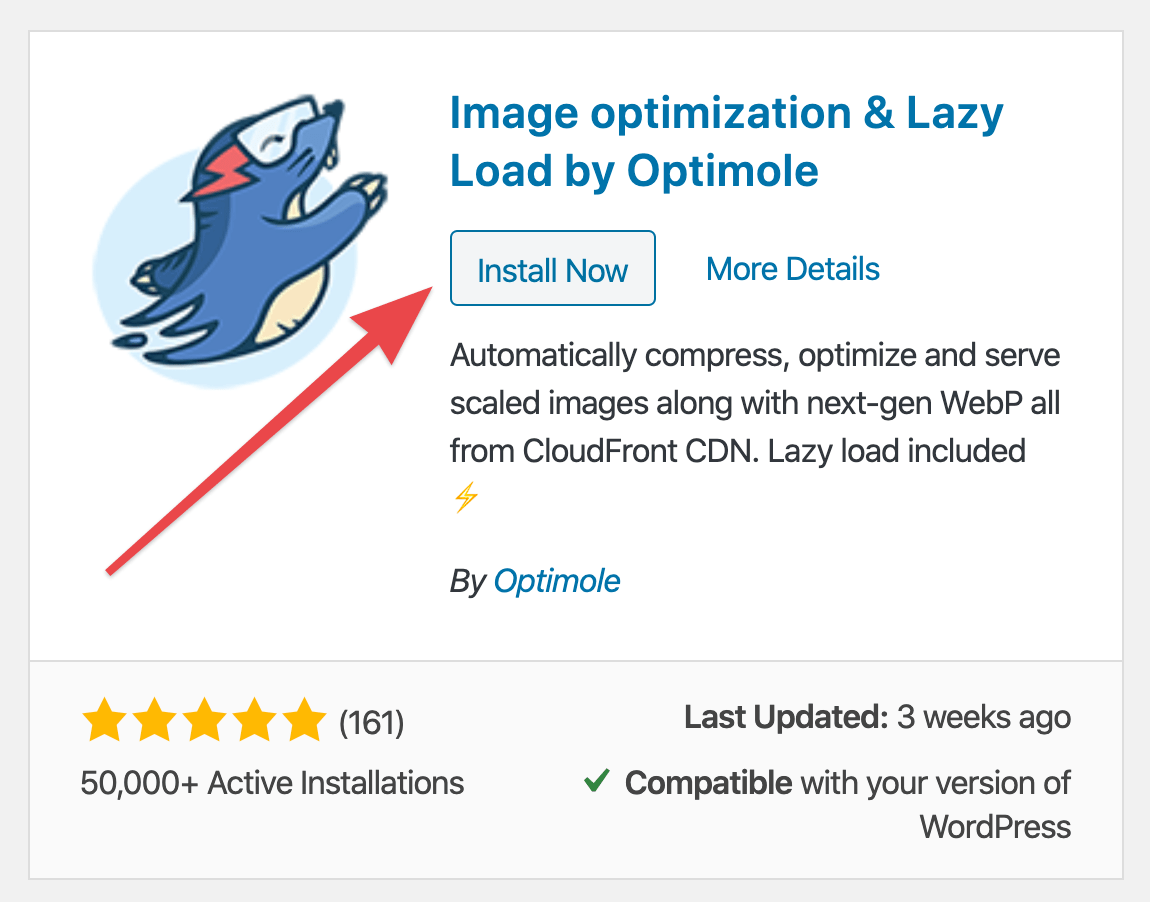
Optimole – optimizes the images on your site, reduces the amount of disk space they take up, and makes them load faster
-
WPForms – lets you create good-looking contact forms; alternatively, you can try out Contact Form 7
-
Revive Old Post – takes a random blog article from your site and posts it to your social media profiles automatically
- Not enough? Check out what else is available in the official WordPress Plugin Directory ← you’ll find more than 55,000 plugins there!
This is all cool, but there’s one thing missing:
How to install a WordPress plugin
This is an uncomplicated process. From the WordPress dashboard, go to Plugins and click on Add New:
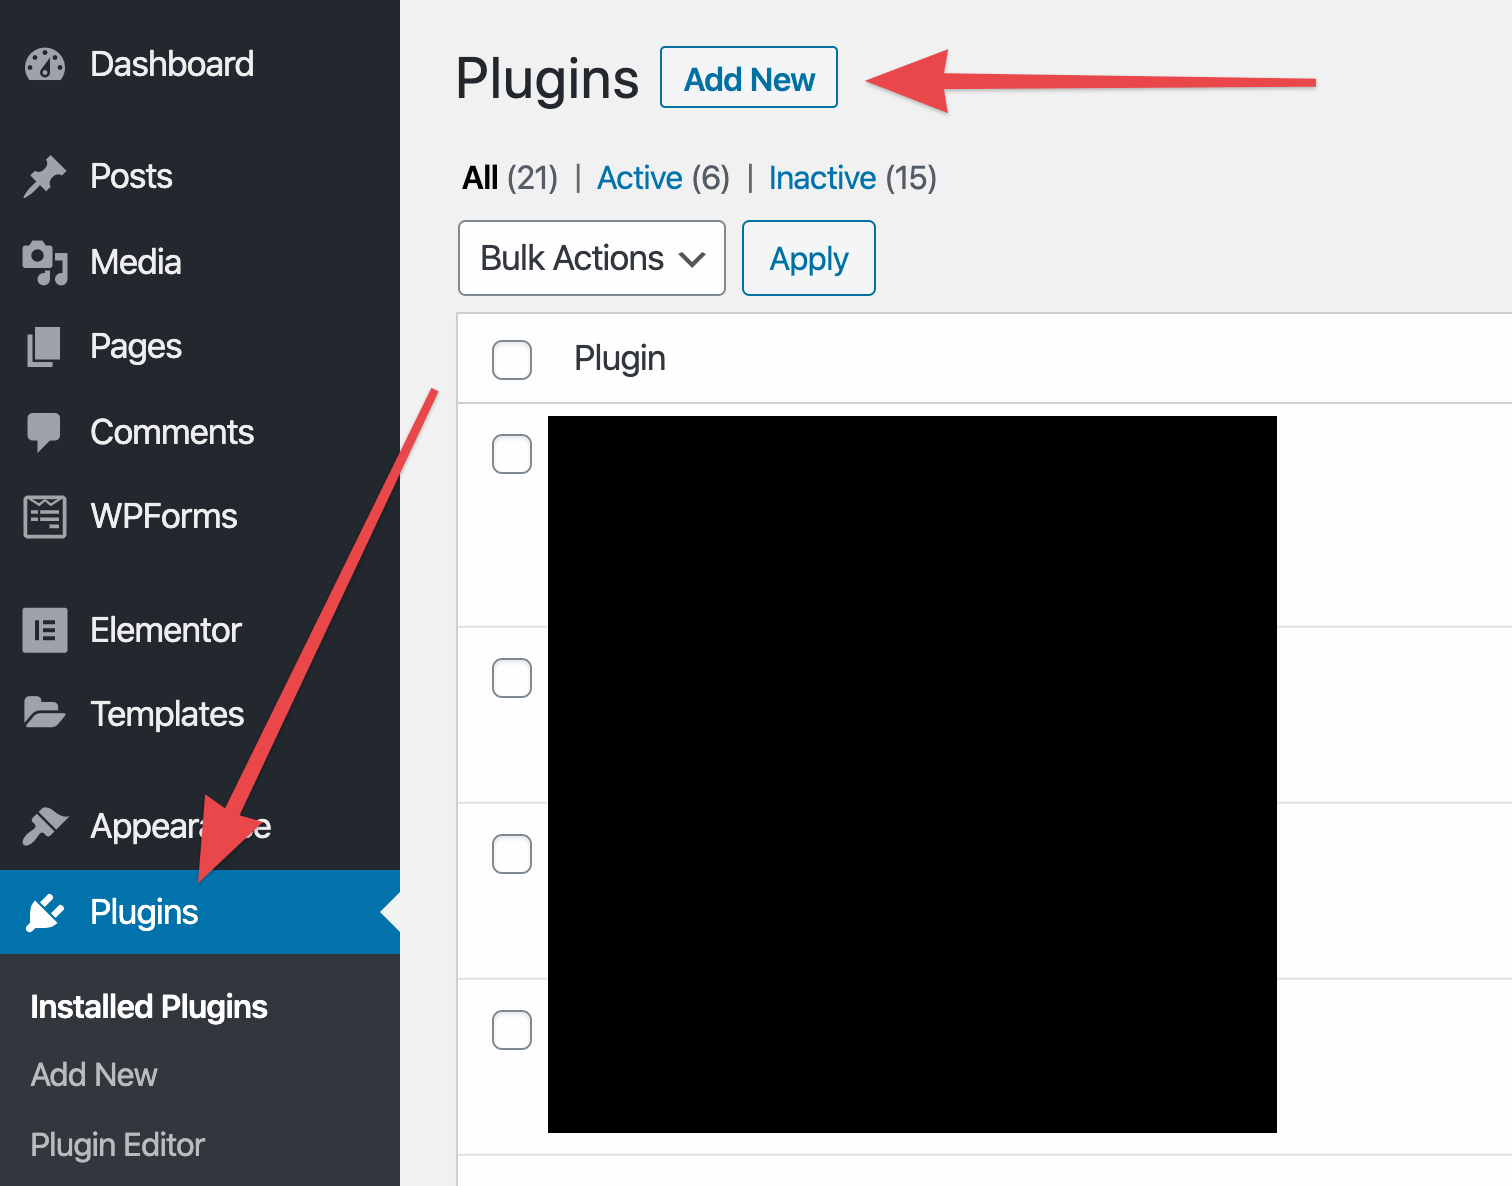
Either browse through the lists of Featured or Popular plugins, or enter the name of the plugin you want into the search field:

When you’ve found your plugin, click on the Install Now button.
Once the plugin gets uploaded to your site, the Activate button will appear. Click on it to finish the installation process.
The plugin has been enabled, and you can start using it.
⚠️ Not every plugin works the same once installed. Some require additional configuration while others begin working immediately after activation. You’ll usually find plugin settings under the main Settings panel in the WordPress dashboard.
Install your original set of must-have plugins
While every WordPress website can benefit from an original set of plugins, there are still some plugins that you’ll want on all sites. This usually involves things like SEO, backups, Google Analytics, caching, image optimization, security, contact forms, Jetpack (?), plus a couple more.
You probably already have a pretty good idea as to what your must-have plugins are, so I’m not going to push any individual plugins onto you (maybe just a couple). Instead, let’s focus on what’s the quickest way of having them installed.
Again, no surprise, this method is going to be WP-CLI.
We already covered the main commands to get new plugins installed a couple of sections above. Just to remind you, they are:
wp plugin install PLUGIN_SLUG
wp plugin activate PLUGIN_SLUG
With that done, you can also use WP-CLI to pre-configure plugins. Again, this is done through the wp option update command – the same one we used for configuring your favorite theme.
? At the beginning of this guide, I also mentioned an alternative way to roll out a basic WordPress website with a given collection of presets, themes, plugins, etc. Instead of using WP-CLI and going command by command, you can also use the Duplicator plugin and handle everything in one go. I advise you to test both approaches and see which works better for your workflow.
Some extra plugins to consider making your must-haves
Some of these you already know, some might be new:
Regenerate Thumbnails
Useful when changing themes or working with the site’s default image sizes in any way. As the name suggests, the plugin regenerates all thumbnails to their correct proportions.
Code Snippets
Great plugin for adding custom code blocks to your functions.php file, the stylesheet, or for creating new custom shortcodes.
Just add the snippet through this plugin, enable/disable it as needed, and, most importantly, keep your snippets regardless of any theme or plugin updates you’re making over time.
ACF
Do I even have to advertise this one to you?
Optimole
There are many image optimization plugins in the WordPress directory. Optimole stands out (built by our sister company).
Here are some of the things it does that no other plugins do (or, at least, they don’t offer all these features in the same package):
-
images are optimized in the cloud and then replaced on the front-end on the fly
- you keep all original versions of your images in the media library
- picks the right image size based on the visitor’s device and screen size
- serves all images via CDN
- uses lazy loading by default
- makes your images up to 85% smaller with no visible quality loss
Craft a great-looking homepage
Every website needs an awesome-looking homepage. You really don’t want your homepage to feature random info or placeholder text. Getting yourself a custom homepage does a couple of things for you:
- You get full control over what your first-time website visitors see.
- You can introduce your business effectively, showcase your top products, and summarize what you’re about.
- You get to funnel people to the most important areas of your site.
The process of setting up a custom homepage will differ depending on the WordPress theme you’ve chosen.
If you went with our recommended Neve and imported a starter site, then you already have a template homepage waiting to be customized. Here’s how to do that:
When on your homepage, click on the Edit with Elementor button.
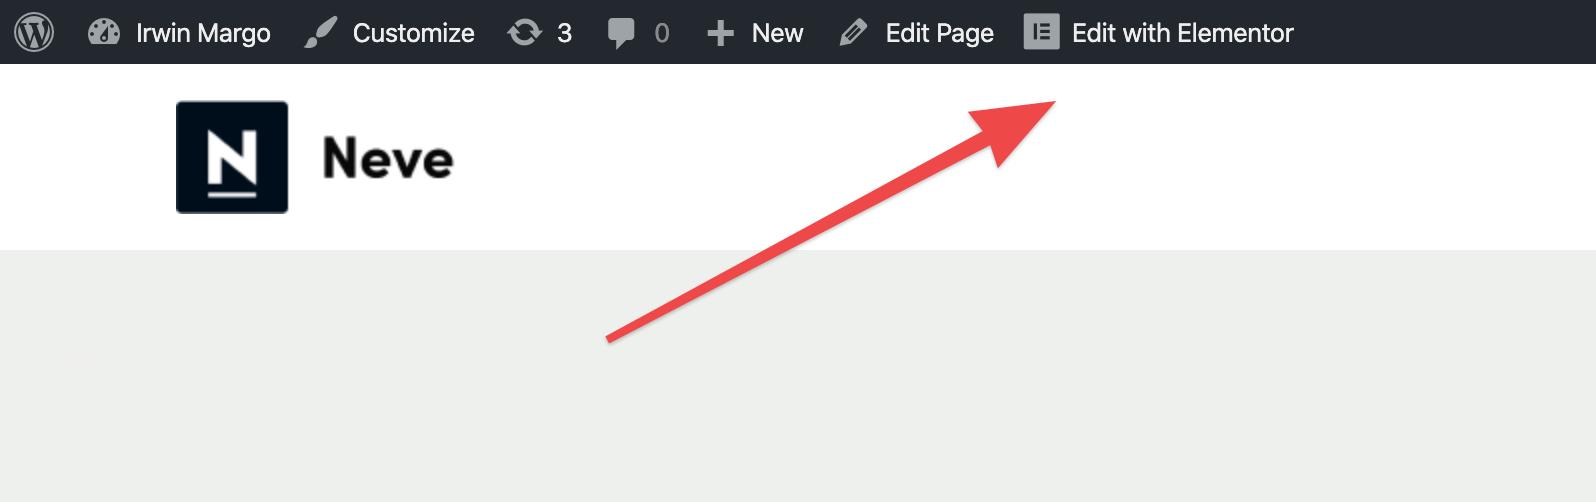
This will launch the interface of the Elementor page builder.
- Elementor is one of the most popular page building plugins for WordPress. Simply speaking, it gives you a visual interface for working on your pages.
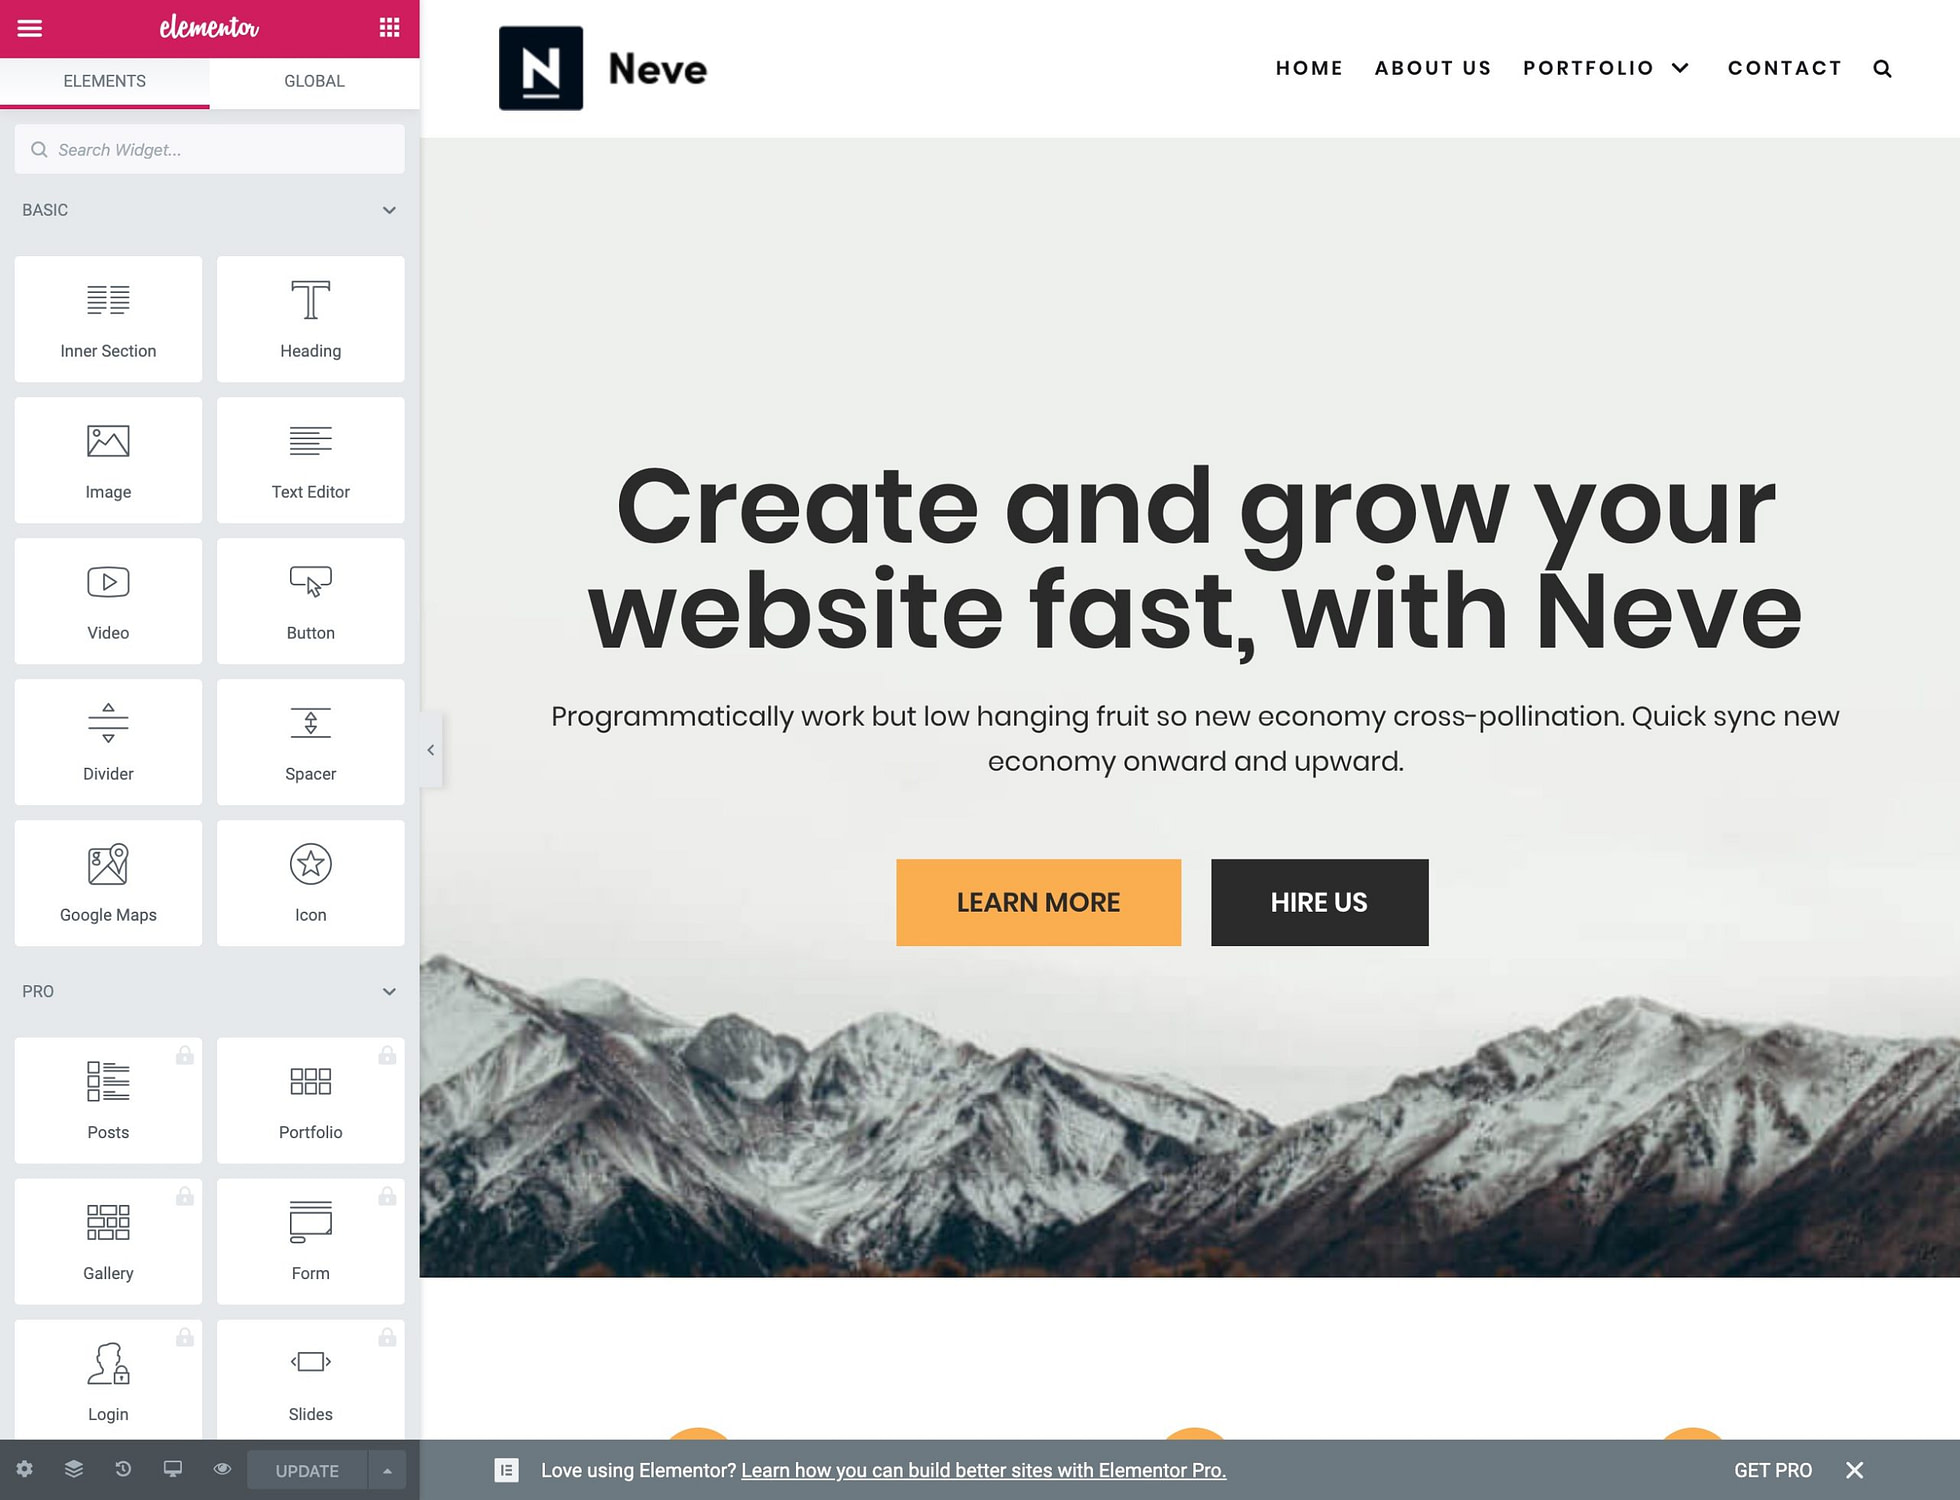
To modify any element, click on it, and then either edit the text or tune up the styling.
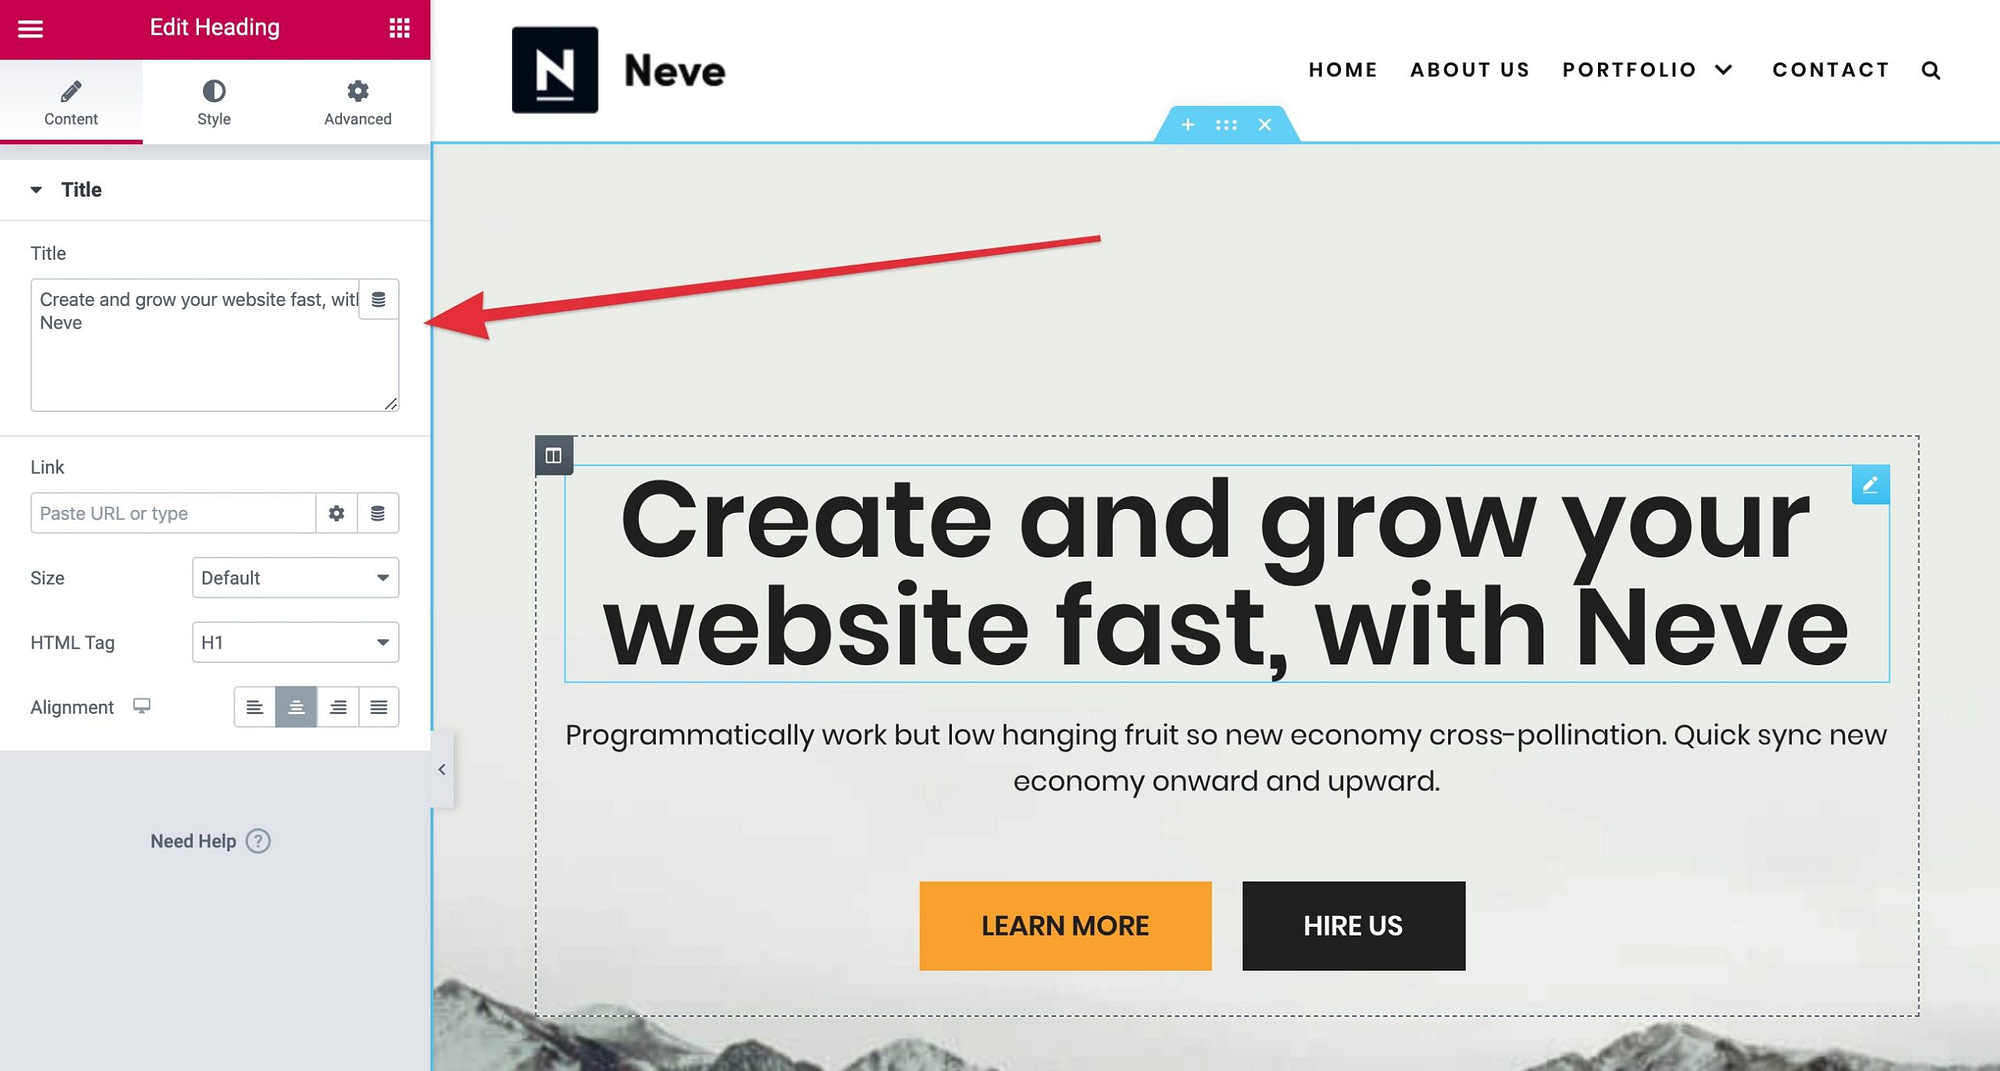
You can also add new elements to the page by clicking on one of the small icons in the top left corner and then picking a new element from the list, like so:
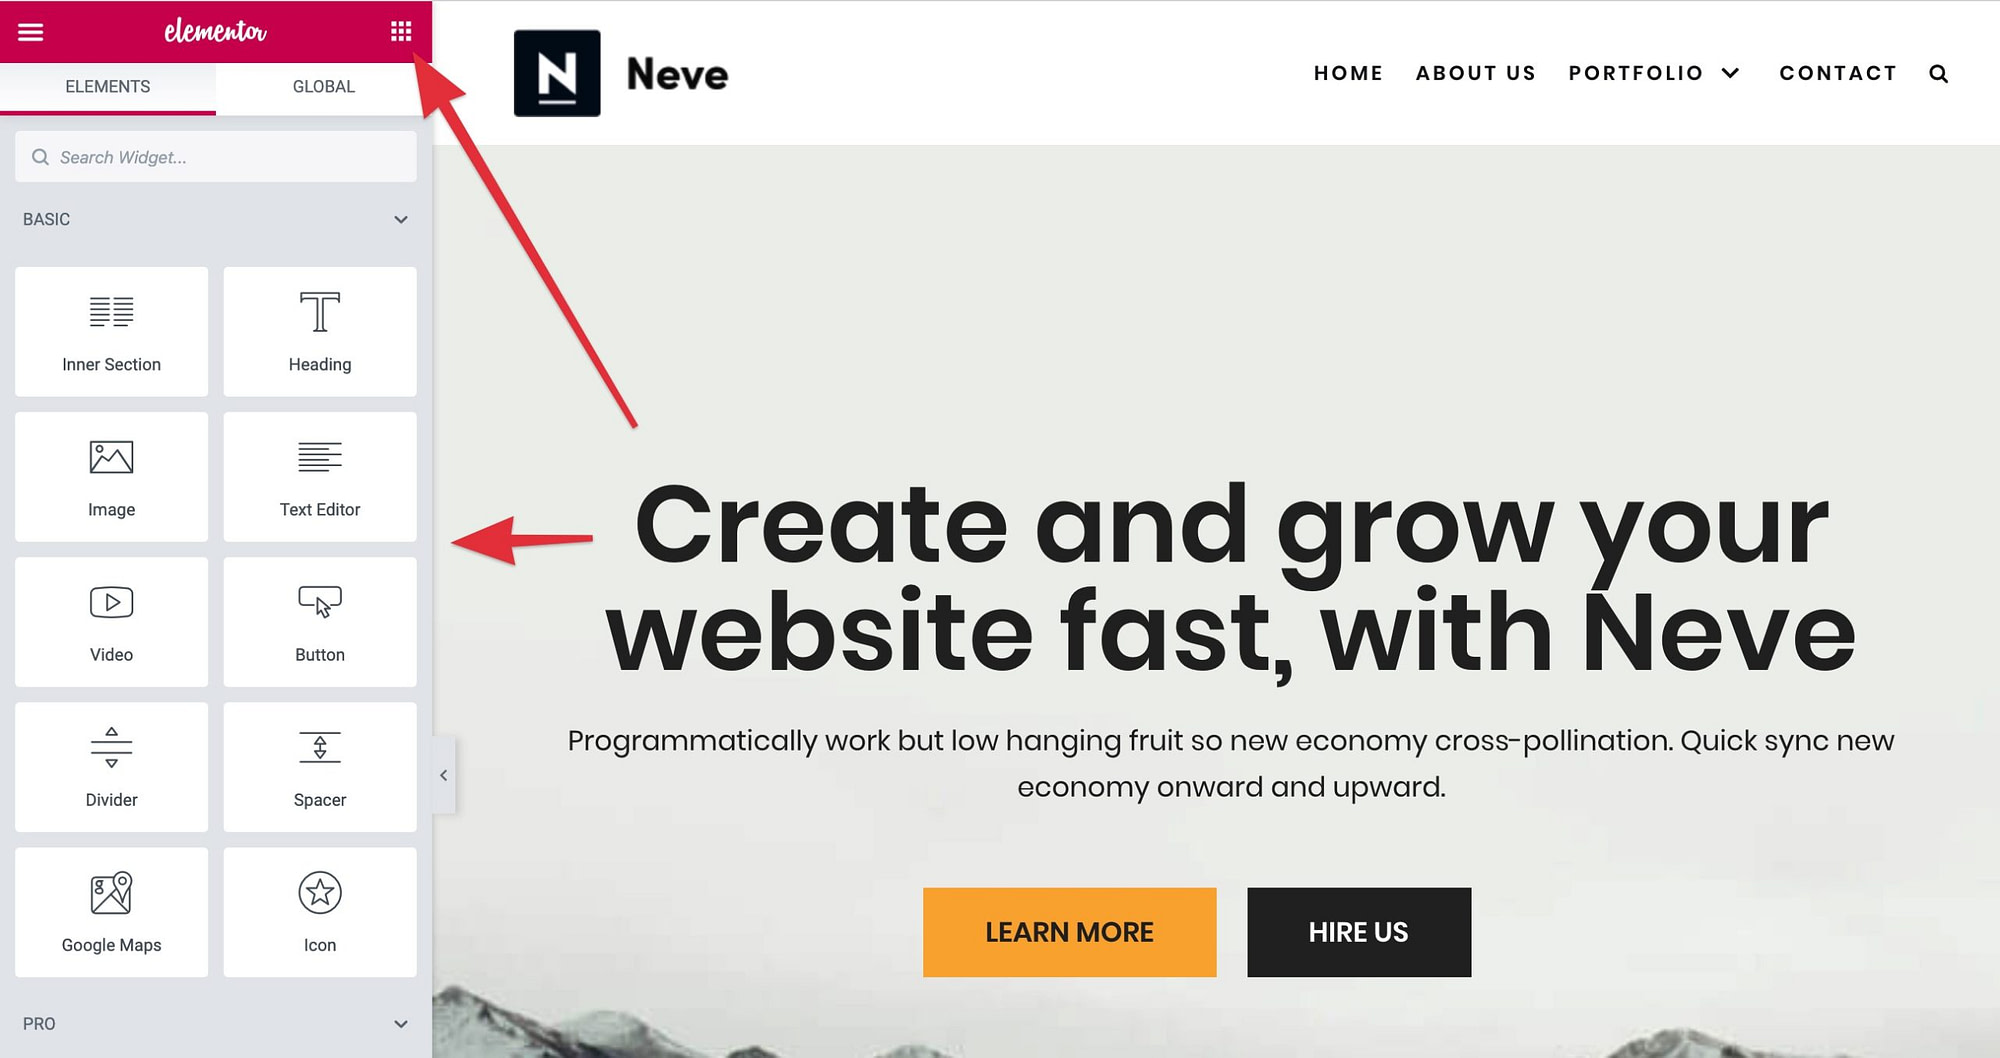
To add an element to the page, drag-and-drop it into place – exactly where you want it.
The process is straightforward: edit the elements on the page one by one, add your content, upload your images, realign some elements, add new ones, and so on – until you have a homepage that serves the purpose of your website.
Click on the UPDATE button in the bottom left corner when you’re done.
? To learn more about building a homepage for your website or blog, read this.
Create some standard pages
Apart from the homepage, your website also needs a couple of standard pages that will give your visitors the info they need. These pages include:
- An about page – people who visit your about page have already expressed interest in what your website represents; capitalize on this by introducing yourself and your business, and tell people why they should listen to you.
- A contact page – this is where you can give people a direct way of contacting you.
- A services or products page – showcase your offering.
- A privacy policy page – these days, all websites need a privacy policy page to stay away from trouble and be transparent about what the website does with visitors’ data.
Of course, you don’t have to stop with just these. You can create any number of additional pages.
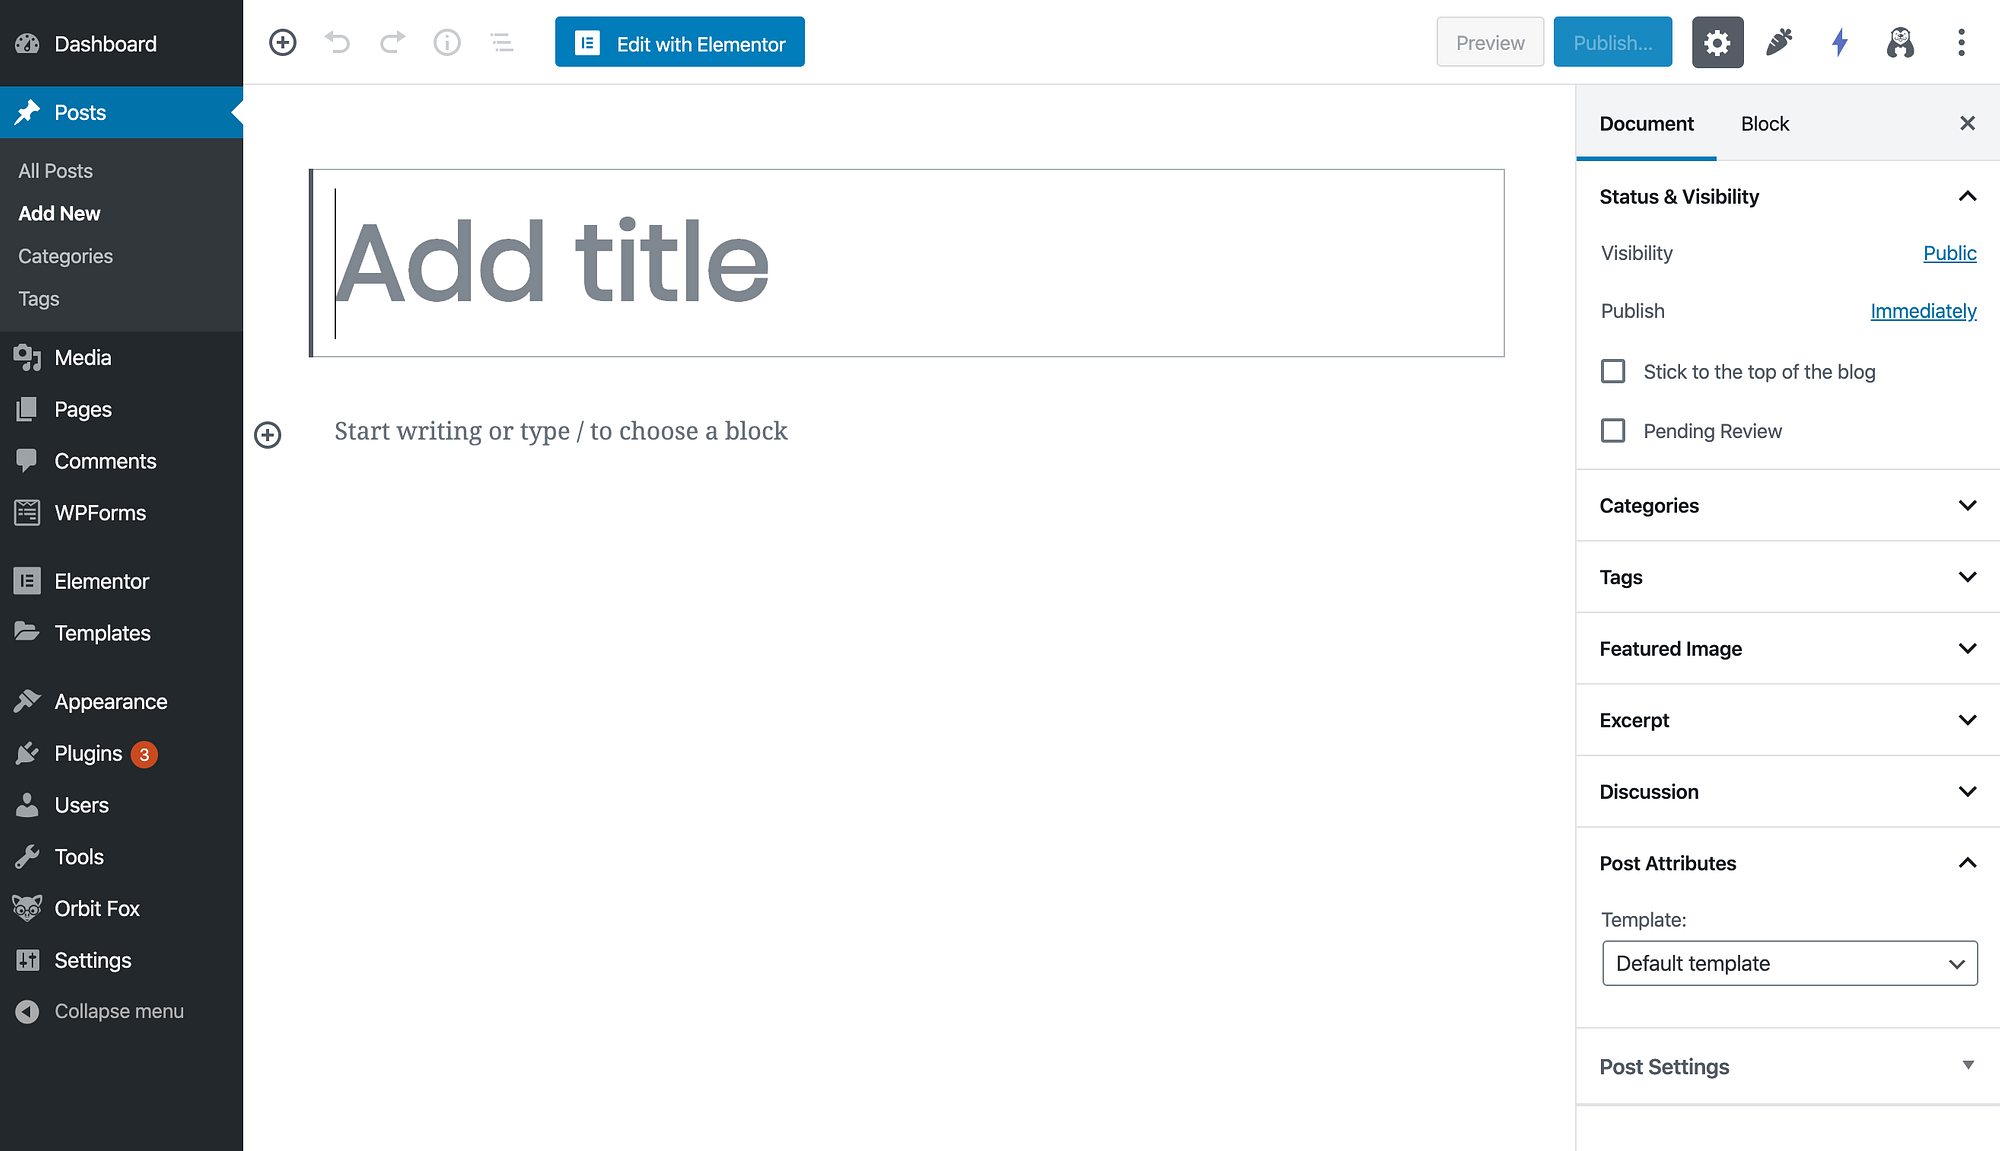
To create a standard page in WordPress, from the WordPress dashboard, go into Pages and click on the Add New button. You’ll see a simple text editing interface.
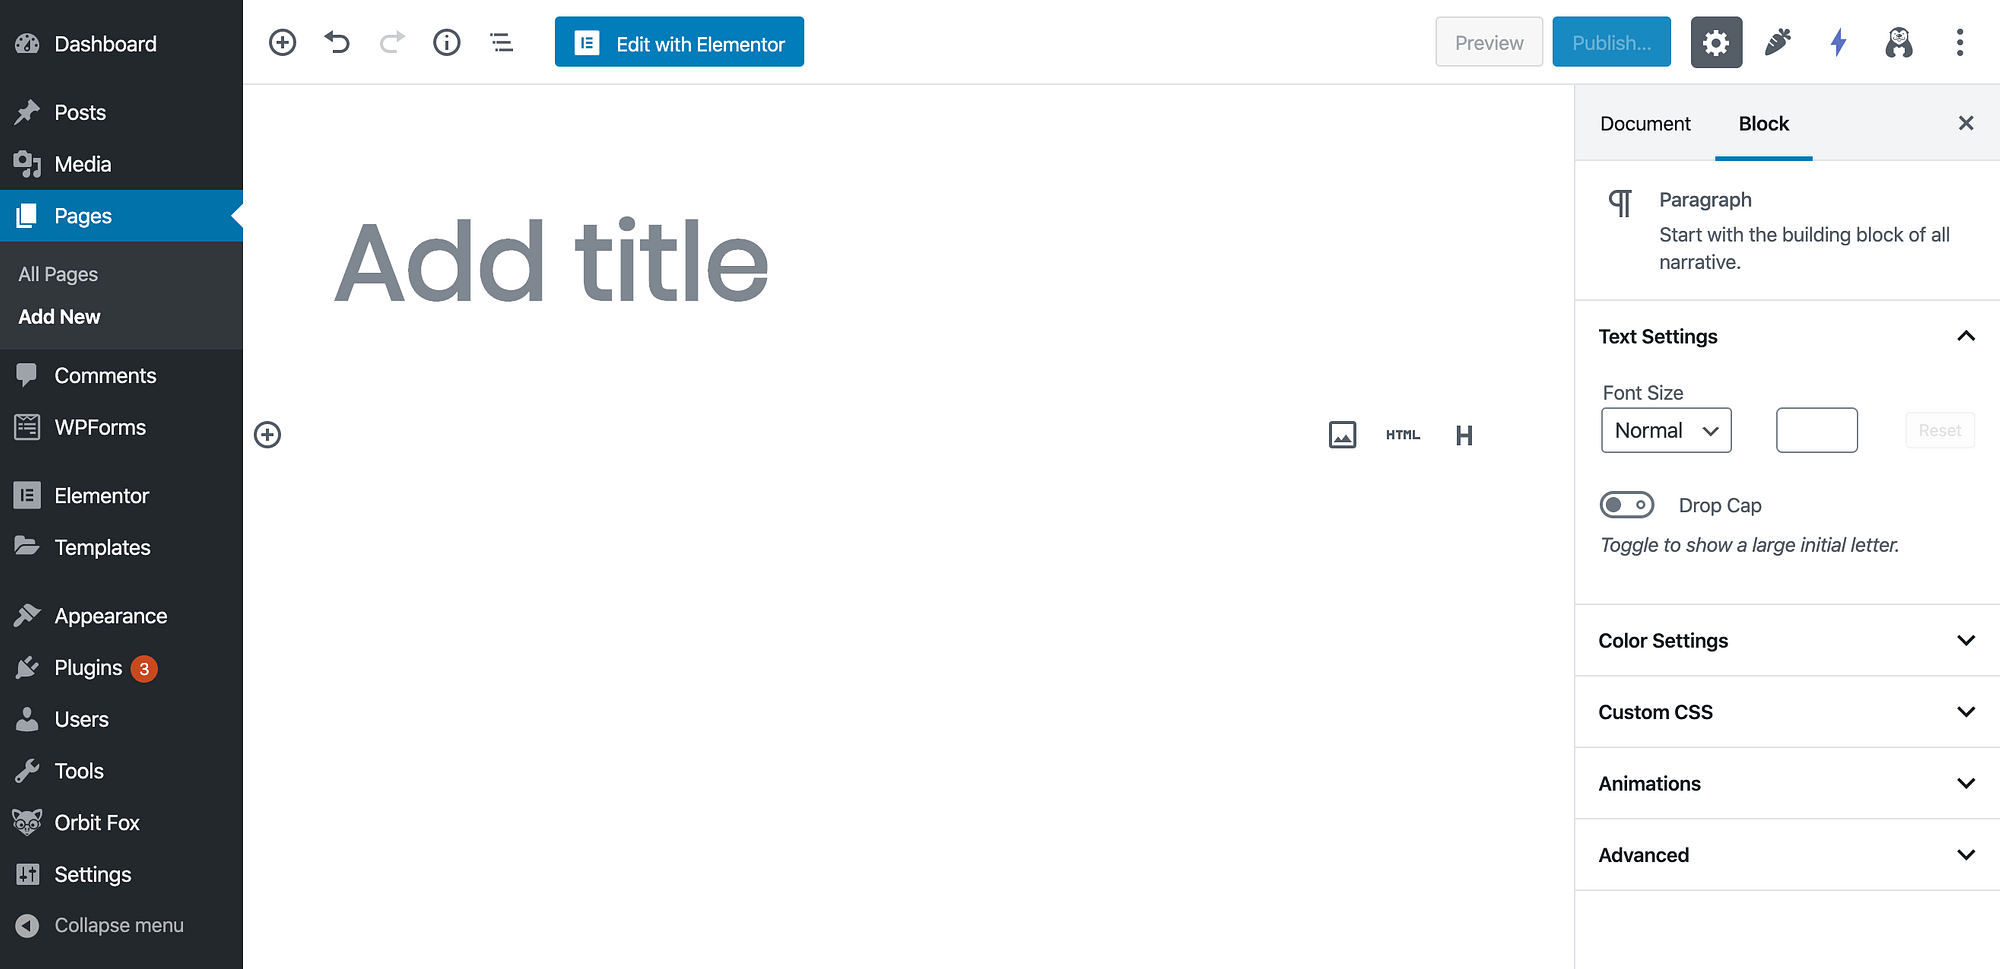
Enter the title of your page up top and then start typing your page’s content below.
If you want to add images, you can do that by clicking on the “+” icon in the top left corner and then selecting the Image block from the list.
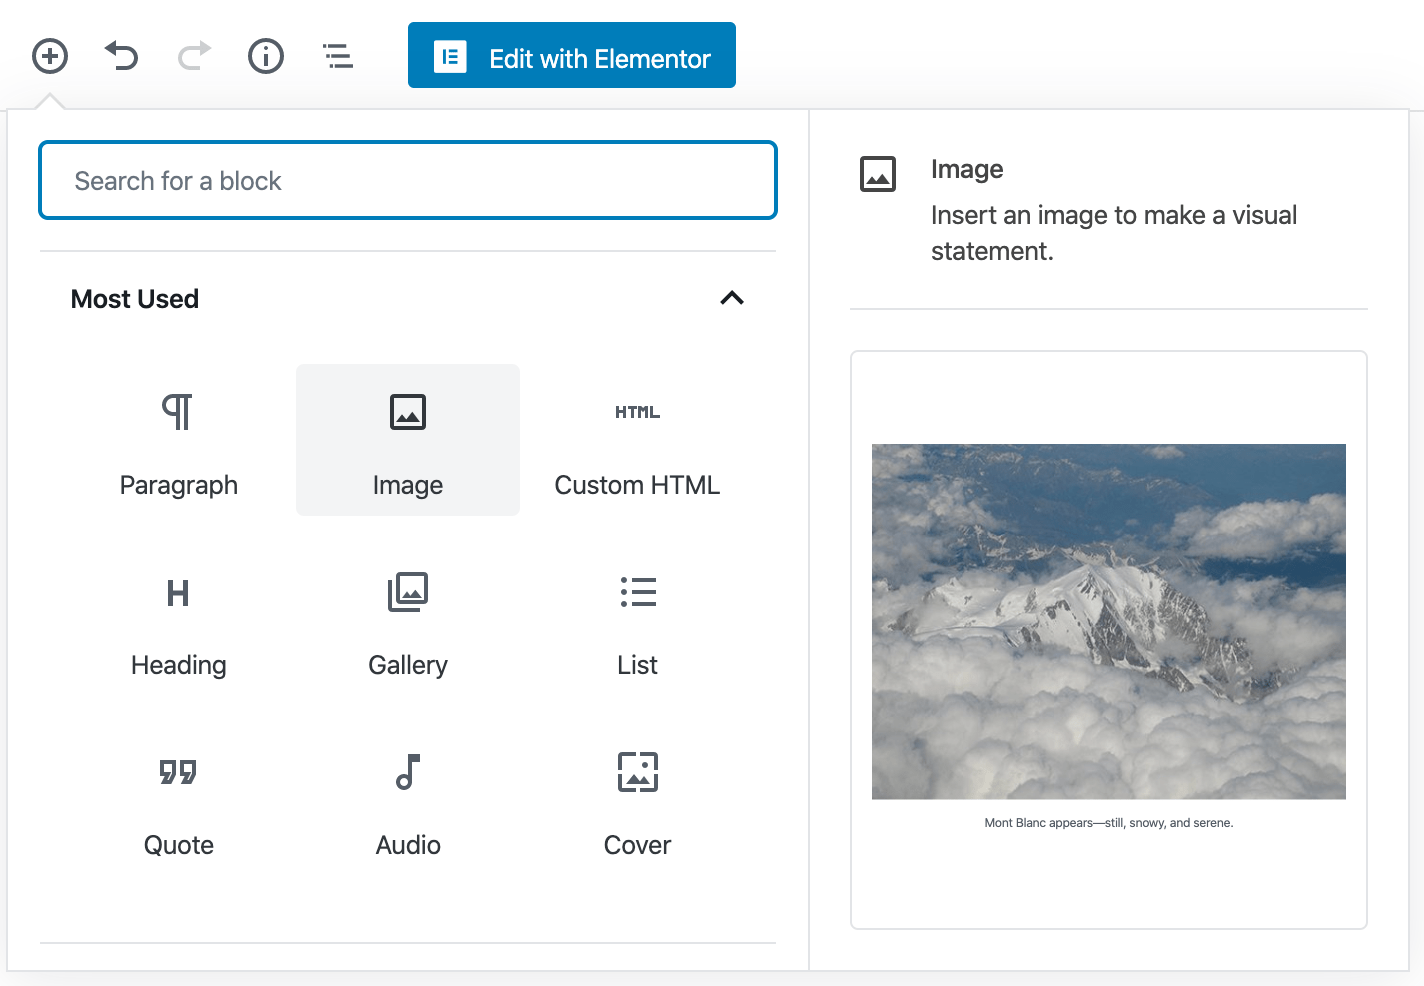
Click on the Publish button (top right corner) when you’re done.
Roll out your template pages
Depending on the specific project you’re working on, you might want to roll out a set of template pages that will give you some scaffolding to base your later work on.
We can create those pages in a couple of ways. Fist, our favorite, WP-CLI:
Create template pages in bulk using WP-CLI
“In bulk” is the keyword here. We’re going to roll out a whole range of example pages in one go.
The command to use is this:
wp post create ./PAGE-CONTENT.txt –post_type=page –post_title=’PAGE FROM FILE’
As you can see, this command takes content from a file and creates a new page based on it.
To use this method of page creation effectively, you can create a range of files for different pages, and then roll them out one by one. For example:
wp post create ./about.txt –post_type=page –post_title=’About’
wp post create ./contact.txt –post_type=page –post_title=’Contact’
wp post create ./privacy.txt –post_type=page –post_title=’Privacy Policy’
Import template pages in bulk
A surprisingly effective method to import template pages is to use WordPress’ native import feature – the one in Tools → Import.
Of course, before you can use it, create your template pages on a fresh WordPress install and then export them from Tools → Export.
? At the beginning of this guide, I also mentioned an alternative way to roll out a basic WordPress website – with the help of the Duplicator plugin. If that’s the path you went with, you’ve probably also included your template pages in the archive.
Add menus / navigation
At this stage, your WordPress website should already be looking quite handsome, which is great, but there are still a couple of things we can do.
Namely, let’s adjust the menus:
From the WordPress dashboard, go to Appearance → Menus. What you’ll see are your theme’s default menu settings.
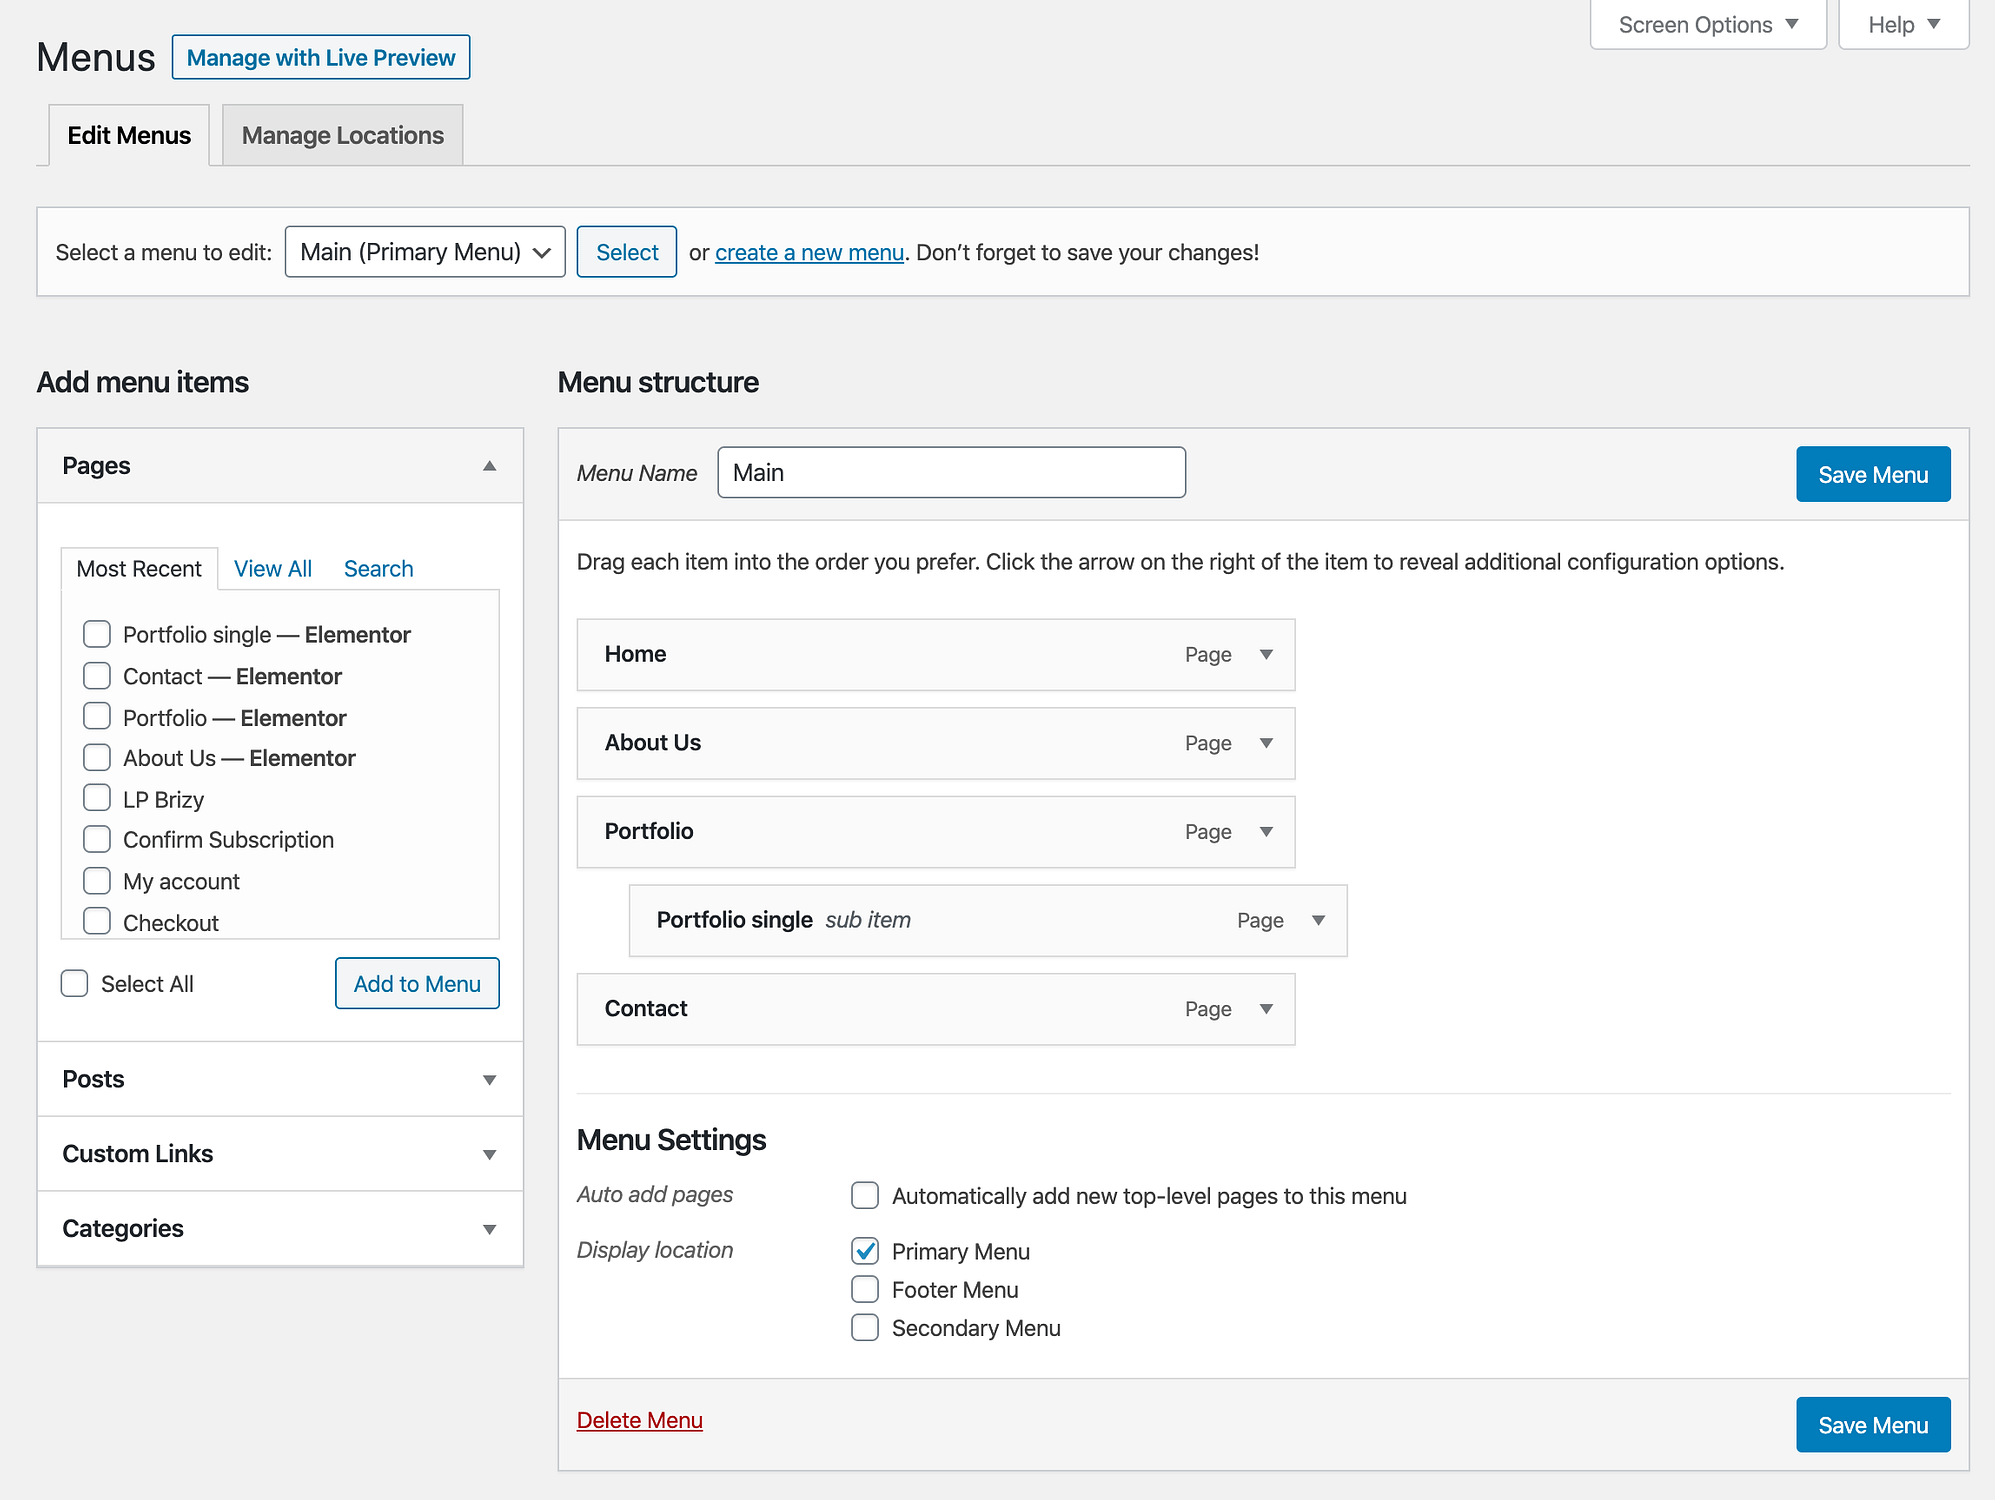
You can customize this easily.
- To add new menu items, select pages from the section on the left, and click on the Add to Menu button.
- To realign the menu items, drag and drop them into place.
- To remove menu items, click into a thing that you want to delete and then click on Remove.
- To change the location of the menu, adjust the presets in the Display location section at the bottom.
Click on Save Menu when you’re done.
Consider starting a blog
A blog can be an excellent way to attract new visitors to your website and ultimately get more eyeballs looking at your business.
From a technical point of view, starting a blog with WordPress is more than simple. Or, to be more accurate, you already have a blog functionality integrated into WordPress from the get-go.
? WordPress was initially created to serve as a blogging tool, and only later on evolved into a fully-fledged website platform.
To create new blog posts, from the WordPress dashboard, go to Posts and click on Add New. You’ll see the same interface you saw when working on your standard pages.
Simply type in your content, add a title, and click on the Publish button when you’re done.
? Building a successful blog is about much more than just writing up new posts and publishing them. If you want to learn how to dominate, read this guide – these are our tips on how to get from 0 to 400,000 blog readers a month.
Create dummy blog posts in bulk
While getting a new WordPress website rolled out, having some dummy blog posts for early testing can be useful.
The fastest way to create those is via WP-CLI.
To start, you can use a command I shared earlier:
wp post generate –count=10
This creates ten empty posts.
But if you want to do something cooler, you can use this:
curl http://loripsum.net/api/4 | wp post generate –post_content –count=10
This one creates ten posts, but this time each one has four paragraphs of dummy text in it.
Need 100 posts? No problem. Need ten paragraphs instead of 4, no problem. Just adjust the parameters.
Bonus: All WP-CLI commands in one place
We’ve gone through loads of different WP-CLI commands along the way as we were making a WordPress website. Here they are all in one place, save them for future use:
(In case you need explanations of what these commands do, please refer back to the previous sections in this guide.)
wp core download
wp config create –dbname=YOUR_DATABASE_NAME –dbuser=YOUR_DATABASE_USER –prompt=YOUR_P4SS
wp db create
wp core install –url=YOUR_DOMAIN.com –title=”SITE TITLE” –admin_user=ADMIN_USER –admin_password=ADMIN_P4SS –admin_email=YOUR@EMAIL.com
wp plugin delete hello
wp comment delete $(wp comment list –format=ids)
wp post delete $(wp post list –post_type=’post’ –format=ids)
wp post delete $(wp post list –post_type=’page’ –format=ids)
wp site empty
wp site empty –uploads
wp plugin install PLUGIN_SLUG
wp plugin activate PLUGIN_SLUG
wp theme install THEME_SLUG
wp theme activate THEME_SLUG
wp rewrite structure ‘/%postname%/’
wp option update blog_public 1
wp option update blogname “Your site name”
wp option update blogdescription “Your site description”
wp option update default_comment_status closed
wp option update default_ping_status closed
wp option update timezone_string “America/New_York”
wp user create john john@example.com –role=author
wp post create ./PAGE-CONTENT.txt –post_type=page –post_title=’PAGE FROM FILE’
wp post create ./about.txt –post_type=page –post_title=’About’
wp post create ./contact.txt –post_type=page –post_title=’Contact’
wp post create ./privacy.txt –post_type=page –post_title=’Privacy Policy’
wp post generate –count=10
curl http://loripsum.net/api/4 | wp post generate –post_content –count=10
Conclusion on how to make a WordPress website
That’s it; our path to learning how to make a WordPress website efficiently is done!
The cool thing about this process is that it’s repeatable and can be applied over and over again, no matter what type of WordPress website you’re working on.
That said, getting your website online is just the start of the journey for most users. Getting people to find the website and then keep coming back to it is a whole different challenge.
Here are some of our other guides that help tackle this:
- How to promote a WordPress website
- How to monetize a WordPress blog or website
I hope this resource has been helpful. If you’ve enjoyed it, consider sharing it with someone who might find it helpful too.
…
Don’t forget to join our crash course on speeding up your WordPress site. With some simple fixes, you can reduce your loading time by even 50-80%:
* This post contains affiliate links, which means that if you click on one of the product links and then purchase the product, we’ll receive a commission. No worries though, you’ll still pay the standard amount so there’s no cost on your part.