WordPress挂钩是WordPress开发人员的工具库中最重要的工具之一。它们是WordPress插件和主题开发的基础。您可以使用WordPress的许多内置挂钩,通过您的自定义代码“挂钩”到WordPress核心中,然后执行或修改某些内容。
#js-mykinsta-video {
背景图片:url(https://kinsta.com/wp-content/themes/kinsta/images/mykinsta-dashboard-v8@2x.jpg);
}
免费试用
WordPress挂钩有两种类型:操作和过滤器。钩子如此普遍,以至于WordPress Core本身都广泛使用它们。 WordPress还提供了一种定义自己的自定义钩子的方法,以便其他开发人员可以钩入您的代码。
学习动作,过滤器和自定义钩子如何工作对于掌握WordPress开发至关重要。
本文的前半部分介绍了WordPress钩子的基础知识,并说明了它们如何与多个示例一起使用。在下半年,您将学习如何使用钩子自定义WordPress,创建自己的自定义钩子以及如何使用它们来构建自己的可扩展插件。
听起来很令人兴奋?让我们潜入吧!
什么是WordPress挂钩?
WordPress页面由大量功能和数据库查询组成。 WordPress核心,插件和主题一起工作以输出页面元素,例如文本,图像,脚本和样式。完全组装后,浏览器然后将它们放在一起并呈现页面。
WordPress挂钩可让您在某些时候“挂钩”此构建过程并运行自定义代码。挂钩的主要功能是允许您修改WordPress或向其中添加功能,而无需接触核心文件。

挂钩将帮助您使用自己的代码扩展WordPress
WordPress插件API支持WordPress挂钩的功能。您可以通过在WordPress运行时期间的特定实例调用称为钩子函数的某些WordPress函数来使用钩子。
使用挂钩函数,您可以将自定义代码捆绑在回调函数中,并将其注册到任何挂钩中。一旦注册,该回调函数将在钩子所在的任何位置运行,从而允许您扩充或替换默认的WordPress功能。
挂钩在代码执行过程中的位置是一个重要因素。您将在接下来的部分中详细了解其重要性。
通过本WordPress钩子指南迷上#webdev。 ⚡️
点击鸣叫
两种类型的WordPress挂钩:操作和过滤器
WordPress包含两种类型的挂钩,分别称为Actions和Filters。通过操作,您可以在WordPress运行时的某些预定义点进行操作,而使用过滤器,则可以修改WordPress处理的任何数据并返回。
动作在WordPress代码中定义为:
do_action(’action_name’, [optional_arguments] );
action_name字符串是操作的名称。您可以指定 [optional_arguments] 变量以将其他参数传递给回调函数。如果未指定此字段,则其默认值为空。
示例:每次WordPress处理站点标头时,都可以将do_action(’wp_head’)操作挂钩以运行自定义代码。此操作没有其他任何参数。
过滤器在WordPress代码中定义为:
apply_filters(’filter_name’,’value_to_be_filtered’, [optional_arguments] );
filter_name字符串是过滤器的名称,value_to_be_filtered变量是需要过滤并返回的值,并且 [optional_arguments] 变量可以传递其他参数,就像操作一样。
示例:apply_filters(’admin_footer_text’,string $ text)过滤器可以被挂钩,以修改显示在admin页脚中的文本。从WordPress 5.4开始,其默认值将显示句子感谢您使用WordPress创建。在管理区域页脚中。
稍后,您将通过WordPress Core中的许多示例来学习如何进行操作和过滤。
上钩后,您可以指导您的代码执行或自定义网站上的某些内容。例如,您可以在发布帖子后使用弯钩发送自动电子邮件,或加载自定义样式表以更改网站的外观。
WordPress挂钩可帮助您与网站互动或修改网站
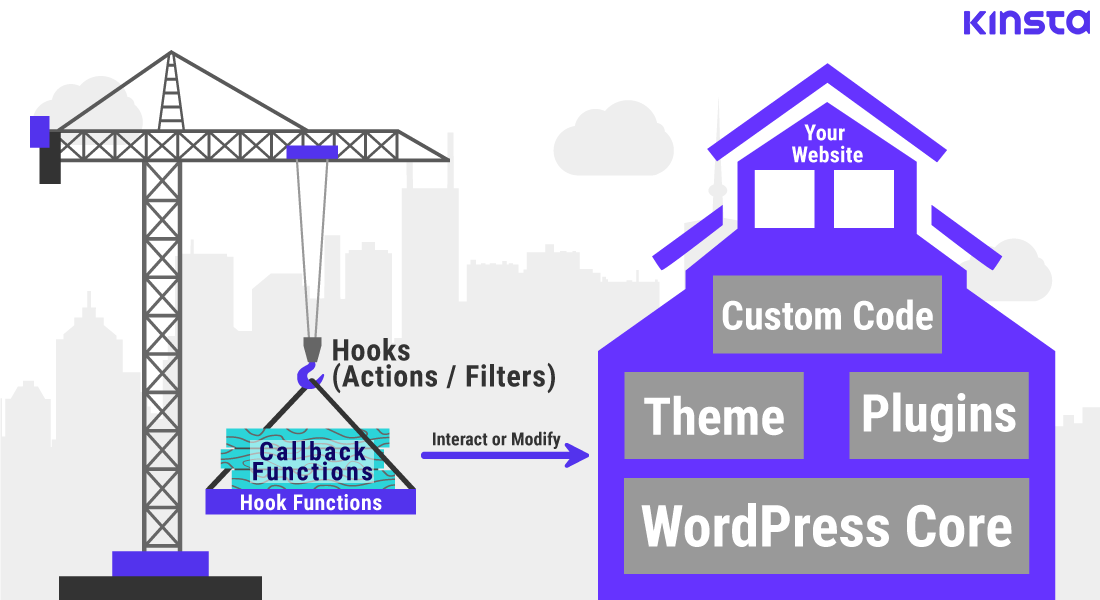
理解钩子的最简单方法是将您的WordPress网站想象为盖房子。
钩子类似于使用起重机来回移动建筑物。转移的项目是包括您的自定义代码的回调功能。这些项目(或功能)可以帮助您建造或修改房屋。
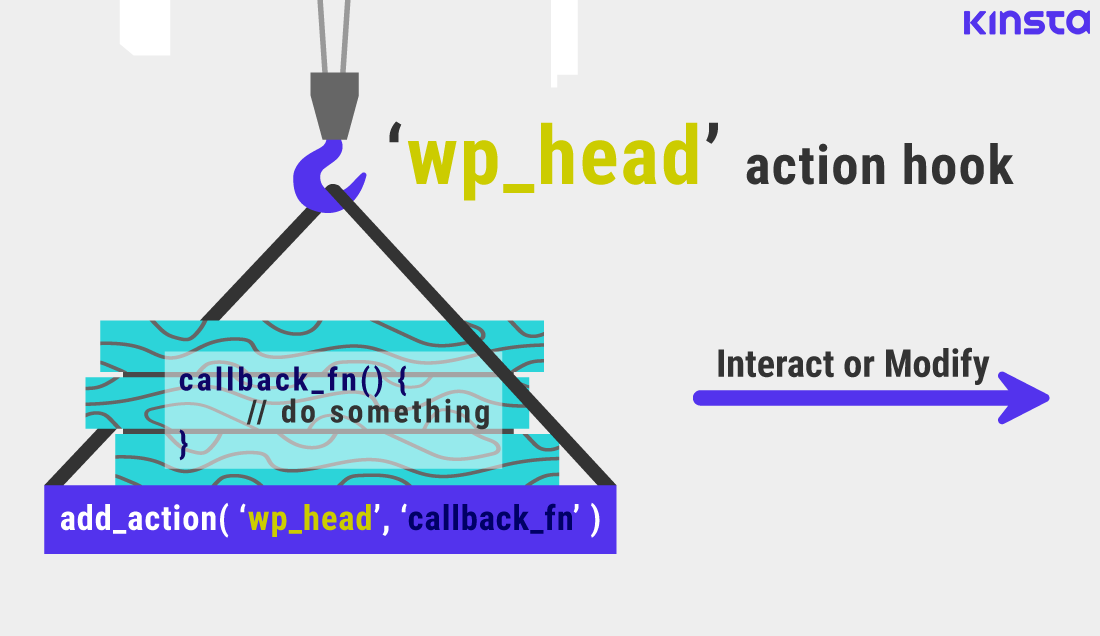
在WordPress中加入“ wp_head”操作的示例
回调函数可以是常规PHP函数,默认WordPress函数或您定义的自定义函数。
我们只能在连接到特定挂钩的特定托架上携带某些物品。因此,动作只能与动作功能挂钩。同样,过滤器只能与过滤器功能挂钩。
尽管更换起重机上的吊钩和托架很繁琐,但WordPress通过包含2200多种默认吊钩类型,使超级简单。
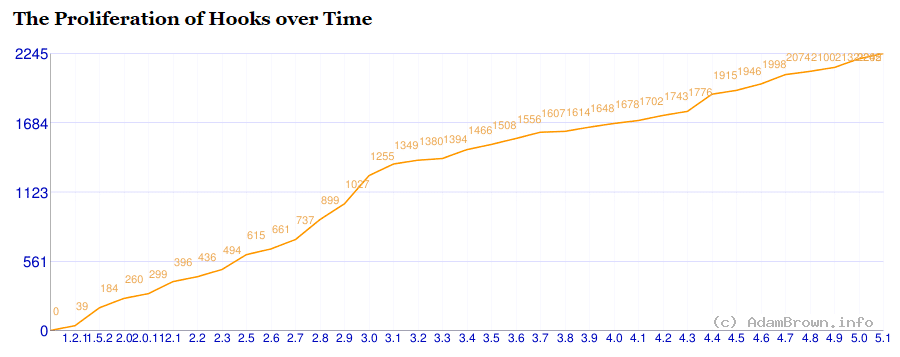
WordPress 5.1具有2200多个本机挂钩(来源:亚当·布朗)
您可以找到散布在WordPress核心上的钩子,使您可以准确地钩入要钩入的位置并运行自定义代码。
WordPress挂钩可让您“融入”页面构建过程…并让您对自己创建的内容拥有更多控制权。
点击鸣叫
钩子vs动作vs过滤器
根据WordPress插件手册:
“挂钩是一种代码用于交互/修改另一段代码的方式……挂钩有两种类型:动作和过滤器。”
在使用“挂钩”,“操作”和“过滤器”等术语时存在广泛的不一致之处。一些教程和指南将它们与与其关联的功能混合在一起。存在这种混乱的主要原因是由于挂钩的工作方式复杂。
即使您仔细查看WordPress核心,也会发现添加操作和过滤器之间并没有太大区别。这是wp-includes / plugin.php文件中add_action()函数的源代码:
函数add_action($ tag,$ function_to_add,$ priority = 10,$ accepted_args = 1){
返回add_filter($ tag,$ function_to_add,$ priority,$ accepted_args);
}
add_action()函数仅调用add_filter()函数并返回其值。为什么?因为除了一个区别外,它们基本上都以相同的方式工作。
apply_filters()函数返回的值可以更改现有数据类型,而do_action()函数则不返回任何值(PHP中为NULL值)。
如果您仍然感到困惑,请不要担心!读完本文的上半部分后,一切都会清楚了。我们将使用官方WordPress Codex术语,因为它是清晰,精确和通用的。
现在,使您熟悉以下所示的挂钩例程。
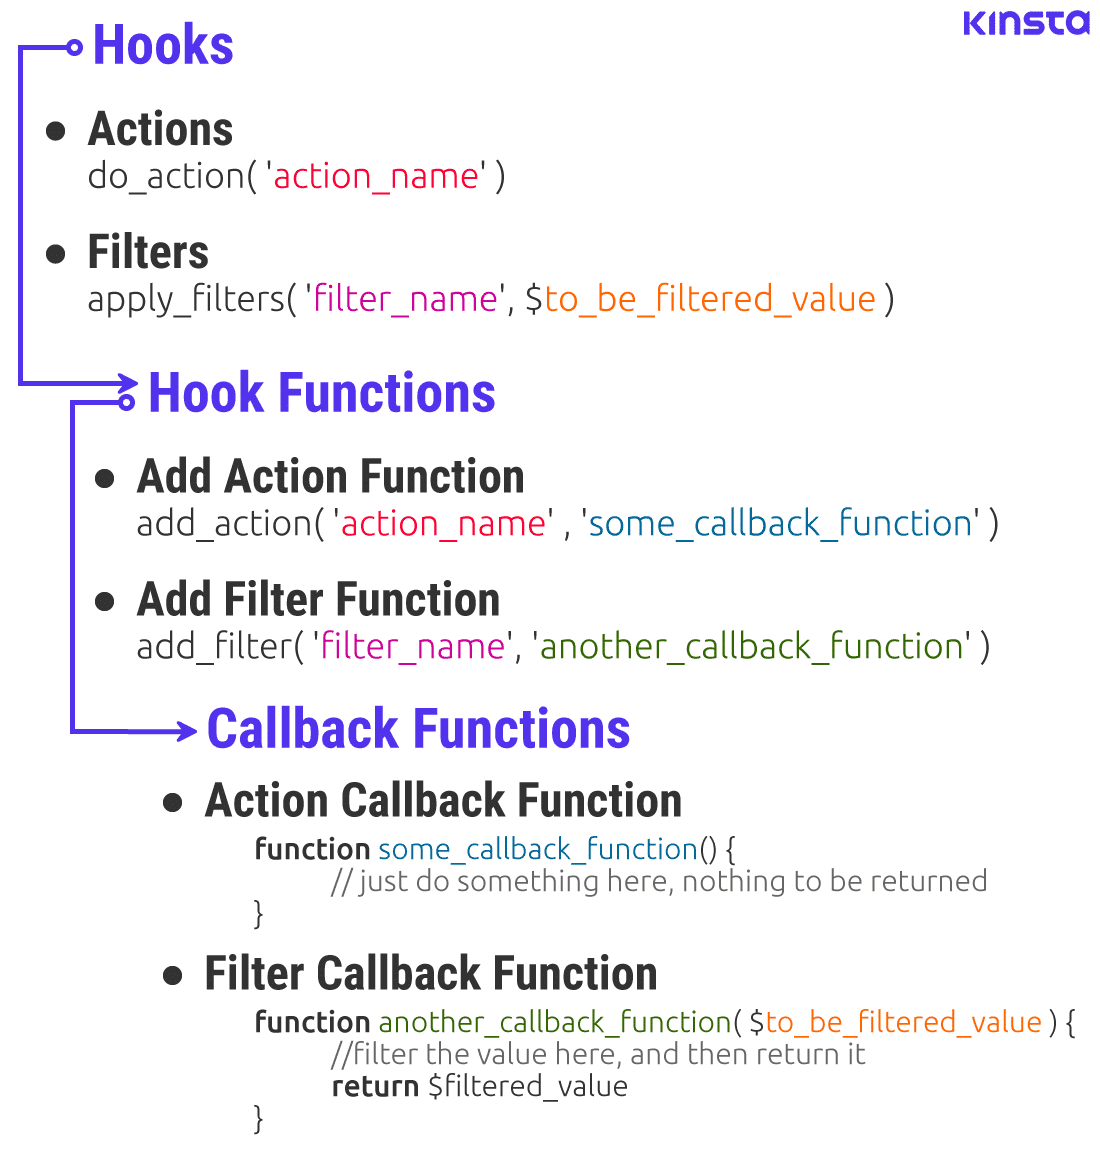
挂钩例程:挂钩,挂钩函数和回调函数
让我们分解一下动作和挂钩之间的区别。
| WordPress挂钩 | |
| 动作 | 筛选器 |
| 在WordPress Core执行期间,动作用于在特定位置运行自定义功能。 | 过滤器用于修改或自定义其他功能使用的数据。 |
| 动作是由WordPress代码中的函数do_action(“ action_name”)定义/创建的。 | 过滤器是由WordPress代码中的apply_filters(“filter_name”,“value_to_be_filtered”)函数定义/创建的。 |
| 动作也称为动作挂钩。 | 过滤器也称为过滤器挂钩。 |
| 只能将动作与动作功能挂钩。例如。 add_action(),remove_action()。 | 筛选器只能与“筛选器”功能挂钩。例如。 add_filter(),remove_filter()。 |
| 动作函数无需向其回调函数传递任何参数。 | 过滤器函数需要至少将一个参数传递给其回调函数。 |
| 动作功能可以执行任何类型的任务,包括更改WordPress工作方式的行为。 | 过滤器功能仅用于修改过滤器传递给它们的数据。 |
| 动作函数应不返回任何内容。但是,它们可以回显输出或与数据库交互。 | 过滤器函数必须将其更改作为输出返回。即使过滤器功能没有任何变化,它也必须返回未修改的输入。 |
| 只要代码有效,动作几乎可以执行任何操作。 | 过滤器应以隔离的方式工作,因此不会有任何意外的副作用。 |
| 简介:一个操作会中断常规代码执行过程,以对其接收到的信息执行某些操作,但不返回任何内容,然后退出。 | 摘要:过滤器修改接收到的信息,将其返回给调用钩子函数,其他函数可以使用其返回的值。 |
有时,您可以使用操作或过滤器来实现相同的目标。例如,如果您要修改帖子中的文本,则可以在publish_post操作中注册一个回调函数,并在将帖子内容保存到数据库时对其进行更改。
//定义回调函数以更改文本
函数change_text_callback(){
//在此处添加代码以更改文本
}
//使用add_action()函数挂接到’publish_post’操作
add_action(’publish_post’,’change_text_callback’);
或者,您也可以使用-content过滤器注册另一个回调函数,以在帖子内容在浏览器中显示之前对其进行修改。
//定义回调函数以修改文本
函数change_text_another_callback($ content){
//添加代码以在此处更改文本,然后返回
返回$ filtered_content;
}
//使用add_filter()函数连接到“ the_content”过滤器
add_filter(’the_content’,’change_text_another_callback’);
两种不同的方法具有相同的结果。知道何时使用一个人是成为一个好的WordPress开发人员的关键。
WordPress挂钩如何工作?
内部示例很简单,足以理解钩子的基本功能,但没有抓住钩子工作原理的复杂性。最重要的是,挂钩位置和特异性的概念。
一个更好的例子是想象将WordPress网页处理为组装汽车。不同于制造汽车要花费时间,组装网页几乎是瞬间的。
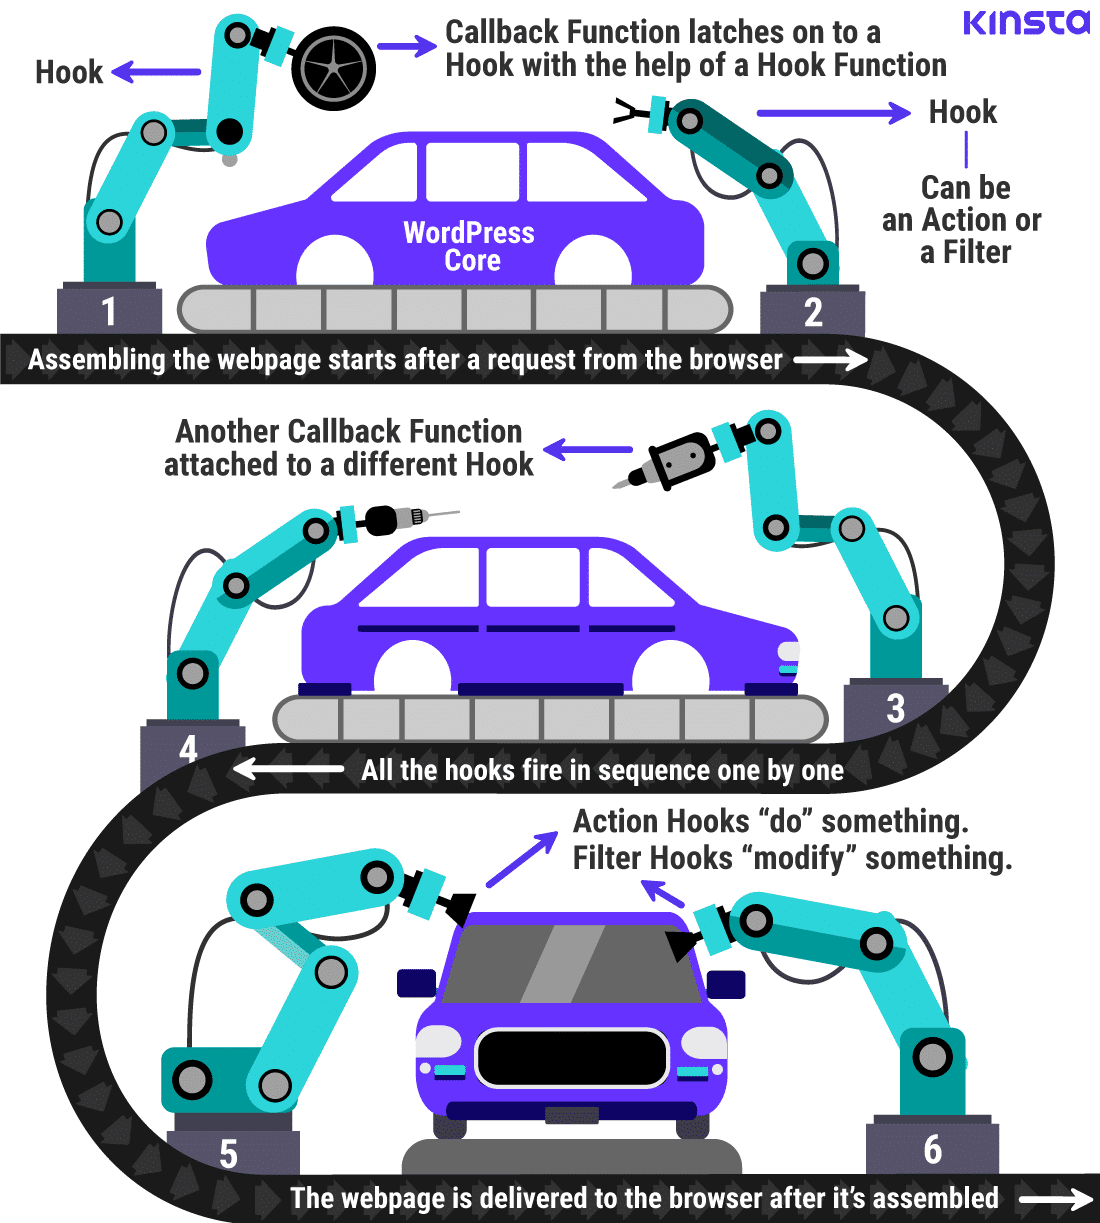
组装网页就像组装汽车
就像汽车如何在现代装配线中进行逐部分组装一样,WordPress网页由服务器和客户端逐个元素地组装。
WordPress核心就像汽车引擎,底盘和其他必需品一样,为网站的“核心”功能提供了动力。
您可以拥有仅具有WordPress Core的功能性网站,但是这样做的乐趣何在?您需要向网站添加令人兴奋的功能。这就是WordPress插件和主题介入的地方,它们都广泛使用钩子。
在上面的示例中,每个编号的工作站都像WordPress核心内的一个钩子。站有两种,例如动作和过滤器。每个工作站都包含一种特定类型的插槽,仅接受某些工具,类似于动作功能和过滤器功能。
为了模块化和高效率,所有站点都按一定间隔放置。
根据特定位置的要求,我们可以为该特定工位安装(或钩住)最合适的工具。这些工具就像用于与WordPress进行交互或修改WordPress的回调函数一样。
一些工具可以极大地改变汽车的工作方式,就像注册为操作的回调一样。其他工具仅用于自定义汽车的外观,例如注册到过滤器的回调。
在正确的位置使用正确的工具对于制造一流的汽车至关重要。同样,钩子可以帮助我们根据我们的独特需求自定义WordPress。
如果您以此类推,则插件就像添加了有用的汽车功能,例如安全气囊,娱乐控制台,远程无钥匙系统等(这些都是为了增强WooCommerce的功能)。主题类似于自定义汽车的视觉部分,例如总体设计,油漆作业,轮辋等(此处是自定义WordPress主题的方法)。
在哪里注册钩子及其功能?
有两种推荐的方法可以在WordPress中添加钩子:
- 插件:制作自己的插件,并在其中添加所有自定义代码。
- 子主题:在子主题的functions.php文件中注册钩子和回调函数。
对于本教程,我们首先创建一个插件。为此,请在/ wp-content / plugins /目录中创建一个新文件夹。
我的插件名称是salhooks,但您可以根据需要命名。根据WordPress准则,您需要在插件目录中创建一个具有相同名称(salhooks.php)的PHP文件。
将以下标头字段添加到您的插件文件中,以在WordPress中进行注册。您可以在WordPress Codex中了解有关插件标头要求的更多信息。
<?php / * 插件名称:Salhooks 版本:1.0 说明:通过多个示例演示WordPress挂钩(操作和过滤器)。 作者:Salman Ravoof 作者URI:https://www.salmanravoof.com/ 许可证:GPLv2或更高版本 许可URI:https://www.gnu.org/licenses/gpl-2.0.html 文本域:salhooks * / // ================================================ = //安全性:如果直接调用此文件,则中止 // ================================================ = 如果(!defined('ABSPATH')){ 死; }
保存此文件,然后在WordPress仪表板中激活插件。我将在本地WordPress安装中使用此插件来演示钩子如何工作。
另外,您还可以直接编辑WordPress Core文件以注册钩子。但是,不建议您这样做,因为每次更新WordPress时,所有自定义代码都会被覆盖。出于同样的原因,您不应该在父主题中添加钩子。
使用WordPress挂钩
WordPress挂钩本身不执行任何操作。它只是位于代码中,等待一些挂钩函数将其激活。要使用钩子,您需要调用至少两个其他函数。
首先,您需要向钩子注册一个钩子函数,并在其中引用一个回调函数。然后,您需要定义钩子函数中前面提到的回调函数。每次钩子触发时,WordPress都会运行此回调函数。
定义这些功能的顺序并不重要,但最好将它们放在一起。
动作和过滤器具有独特的挂钩函数。从现在开始,我们将它们称为“动作功能”和“过滤器功能”。如您所见,它们具有自己的语法和参数要求。
挂钩动作
动作提供了一种在WordPress Core,插件或主题执行的特定时间运行自定义代码的方法。
add_action()动作函数
您可以按照以下步骤向操作注册回调函数:
- 使用内部的自定义代码定义回调函数。当在WordPress的代码执行过程中触发了向其注册的任何操作时,此回调函数将运行。
- 使用add_action()函数将回调函数与所需的动作挂钩。根据WordPress Codex,add_action()函数需要传递至少两个参数:
-
- 要挂接到的动作的名称。
- 触发操作时将运行的回调函数的名称。
-
- add_action()函数还接受两个可选参数来设置优先级和参数数量。我们稍后将讨论它们。
最好将回调函数的参数命名为尽可能接近hook函数传递的参数。
让我们看一个使用add_action()函数的示例。
//定义回调函数,参数是可选的
函数example_callback($ arg1,$ arg2){
//使您的代码对参数执行某些操作
}
//将回调函数挂钩到’example_action’
add_action(’example_action’,’example_callback’, [priority], [no_of_args] );
//’priority’和’arguments’是可选参数
挂钩动作的例子
WordPress包含一个名为init的内置操作,该操作在WordPress完成加载并验证用户身份之后但在发送任何标头之前触发。许多插件使用此钩子作为实例化其代码的起点,因为在WordPress运行此操作时,几乎所有主要WordPress功能都已完成加载。
WordPress具有类似的名为admin_init的操作。在初始化管理屏幕时触发,而仅在WordPress完成加载后才触发init操作。
让我们运行一个自定义代码,以在执行init操作期间回显一条简单的消息。方法如下:
函数custom_callback_function(){
//在此处添加您的自定义代码以执行某些操作
回显“我将在WordPress初始化上被解雇”;
}
add_action(’init’,’custom_callback_function’);
您可以在本地WordPress安装的左上角看到正在回显的消息。
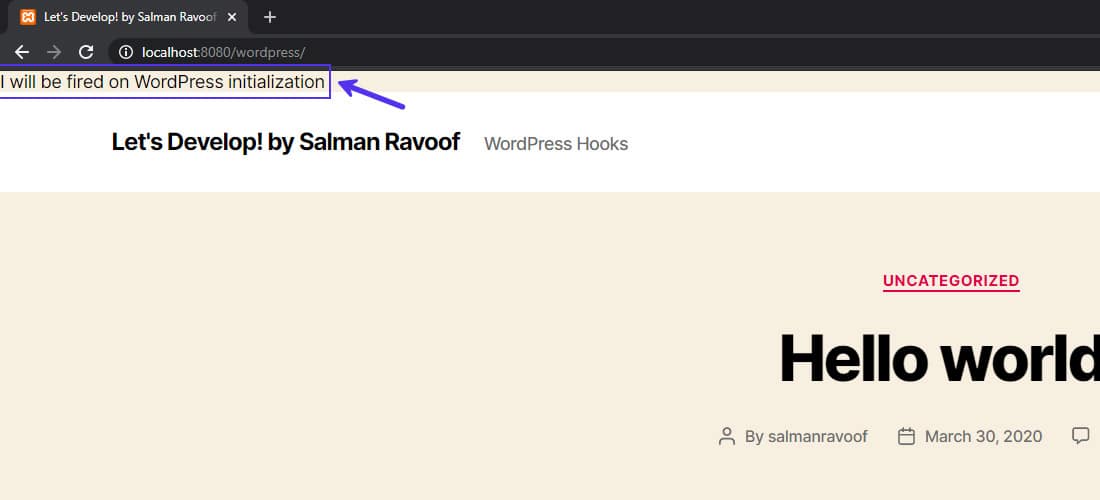
并不是那么漂亮,但这是一个很好的开始!
查找WordPress支持的操作
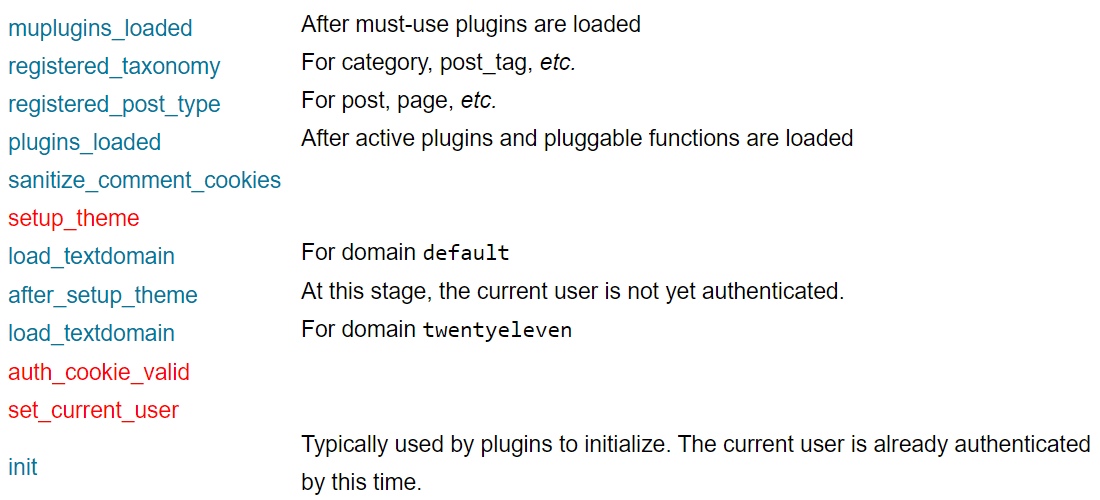
WordPress每次执行某项操作时都会包含操作,例如用户登录或发布新帖子。您可以在“插件API /操作参考”页面中找到WordPress运行的所有操作的完整列表。
几乎所有用途都有一个动作
食品法典将其中列出的所有动作分为不同的类别,并按照WordPress执行顺序从头到尾进行了排列。
在大多数情况下,这些操作中的许多操作都无济于事,因为没有任何关联。但是,如果您需要它们,它们就会在那里供您使用。
对所有动作感到有点不知所措?很自然随着您获得更多经验并遍历WordPress Core源代码,可以更轻松地找到适合您需要的钩子。只需搜索“ do_action”一词,您就会发现很多可以挂接到的动作。
add_action()的附加参数
add_action()函数可以接受另外两个参数:一个用于设置优先级,另一个用于设置参数数量。尽管它们是可选的,但如果使用正确,它们会非常有用。
优先
add_action()函数支持的第一个附加参数设置优先级。此参数只能是一个正整数。优先级数字越低,该功能将越早运行。如果未指定,则默认值为10。
为了了解其工作原理,让我们为init操作注册三个回调函数,但每个函数具有不同的优先级。
//优先级设置为9,低于10,因此排名更高
add_action(’init’,’i_am_high_priority’,9);
//如果未设置优先级,则将使用默认值10
add_action(’init’,’i_am_default_priority’);
//优先级设置为11,高于11,因此排名较低
add_action(’init’,’i_am_low_priority’,11);
在上面的示例中,优先级最低的回调函数将首先运行,而优先级最高的回调函数将最后运行。如果它们的优先级相同,那么它们将按照您注册它们的顺序运行。
当单个钩子可以向其注册多个回调函数时,优先级起着重要作用。为避免意外结果,您可以为每个回调函数设置优先级,以便它们按您希望的顺序启动。
参数个数
默认情况下,通过add_action()函数注册的任何回调函数将仅接收一个参数。但是,有时您可能需要将额外的数据传递给回调函数。
因此,add_action()函数接受用于设置参数数量的可选参数。
展示这一点的一个很好的例子是comment_post动作。 WordPress向数据库添加注释后,此操作将立即运行。如果您未设置arguments of parameter参数,它将仅将一个值传递给回调函数,在本例中为comment_ID。
//用’priority’和’arguments’参数注册钩子
add_action(’comment_post’,’show_message_function’,10,3);
//定义回调函数
函数show_message_function($ comment_ID,$ comment_approved,$ commentdata){
//检查是否使用第二个参数批准了注释
if(1 === $ comment_approved){
//仅在批准注释后才运行代码
}
}
如果如上例中那样将arguments参数的数量设置为3,则动作函数将传递三个值:comment_ID,comment_approved和commentdata。
WordPress将已批准的评论的comment_approved值设置为1,如果未批准,则将其设置为0,如果评论标记为垃圾邮件,则将其设置为“ spam”。
commentdata变量是一个数组,其中包含所有评论数据,例如评论作者的姓名,电子邮件地址,网站以及评论本身的内容。您可以查看WordPress Codex来查找“ commentdata”数组中包含的所有键值对。
您可以根据需要设置任意数量的参数,但是回调函数和add_action()函数需要指定相同数量的参数。
通过将其他参数传递给回调函数,您可以对代码执行更多操作。例如,您可以检查评论是否被批准,如果评论文本获得批准,则会自动通过电子邮件将其发送给管理员。如果不指定其他参数,则无法执行此操作,因为您的回调函数将无法访问comment_content数据。
如果您不想设置优先级,而只想更改参数数量,则仍然需要设置优先级。只需使用其默认值(即10)即可。
WordPress核心如何使用动作
WordPress Core本身使用其许多内置动作来执行各种功能。
以wp_head操作为例。当WordPress输出网页的标头部分(介于两者之间的代码
和 )。您可以在wp-includes / default-filters.php文件中找到与wp_head挂钩相关的大多数WordPress Core动作功能。我遍历了代码,并编译了所有调用wp_head动作的add_action()函数的列表。
add_action(’wp_head’,’rest_output_link_wp_head’,10,0);
add_action(’wp_head’,’_wp_render_title_tag’,1);
add_action(’wp_head’,’wp_enqueue_scripts’,1);
add_action(’wp_head’,’wp_resource_hints’,2);
add_action(’wp_head’,’feed_links’,2);
add_action(’wp_head’,’feed_links_extra’,3);
add_action(’wp_head’,’rsd_link’);
add_action(’wp_head’,’wlwmanifest_link’);
add_action(’wp_head’,’adjacent_posts_rel_link_wp_head’,10,0);
add_action(’wp_head’,’locale_stylesheet’);
add_action(’wp_head’,’noindex’,1);
add_action(’wp_head’,’print_emoji_detection_script’,7);
add_action(’wp_head’,’wp_print_styles’,8);
add_action(’wp_head’,’wp_print_head_scripts’,9);
add_action(’wp_head’,’wp_generator’);
add_action(’wp_head’,’rel_canonical’);
add_action(’wp_head’,’wp_shortlink_wp_head’,10,0);
add_action(’wp_head’,’wp_custom_css_cb’,101);
add_action(’wp_head’,’wp_site_icon’,99);
add_action(’wp_head’,’wp_no_robots’);
很多回调函数只需要执行一项操作即可。在此处设置优先级对于确保最重要的挂钩函数首先运行至关重要。
在上面的示例中,使用wp_enqueue_scripts()回调函数加载脚本(优先级= 1)比使用wp_site_icon()回调函数加载网站图标元标记(优先级= 99)更为重要。
信息
上例中使用的所有回调函数都是WordPress函数。您也可以在任何代码中使用它们。有关更多信息,请访问WordPress Codex上的Function Reference页面。
其他动作功能
尽管add_action()是最常用的操作函数,但还有许多其他功能同样有用。让我们看看它们如何工作。
- has_action()
该动作功能检查是否已钩住动作。它接受两个参数。第一个是动作的名称。第二个参数是可选的,是回调函数的名称。
has_action(’action_name’,’function_to_check’);
如果仅指定第一个参数,则将任何函数挂接到action_name参数时,它将返回true。
但是,如果您还指定了第二个参数,则在指定的回调函数未注册到上述操作的情况下,它将返回false。
但是,如果它找到附加在动作挂钩上的回调函数,它将返回在该动作挂钩上为此函数设置的优先级(整数)。
- do_action()
我们之前遇到过此操作功能。 WordPress使用它来定义其所有默认操作,从而使其他功能可以与它们挂钩。与WordPress一样,您也可以使用do_action()函数通过指定新的操作名称作为参数来创建新的自定义操作。
do_action(’action_name’, [argument1], [argument2] );
仅声明此功能本身不会做任何事情。但是它将位于代码中,等待其他操作功能将其激活。传递任何其他参数是可选的,但如果您希望回调函数使用它们,则这一点很重要。
- do_action_ref_array()
除了一个不同之外,该动作函数与do_action()相同。通过它的任何参数都必须是一个数组。当您有很多要传递的参数或参数已在数组中时,此函数非常有用。
使用WordPress,我们的流量增长了1,187%。
我们将向您展示如何。
加入20,000多个其他人,他们每周都会收到有关WordPress内部技巧的新闻!
现在订阅
成功!感谢您的订阅
您将在一周内收到下一期的Kinsta新闻通讯。
订阅Kinsta新闻通讯
订阅
我同意条款和条件以及隐私政策
//这是一个示例数组
$ arguments_array = array(’arg_1’,’foo’,true,’arg_4’);
do_action_ref_array(’example_action’,$ arguments_array);
由于PHP数组是有序映射,因此请确保传递的参数顺序正确。
此操作功能用法的一个示例是admin_bar_menu操作。可以将其挂钩以添加,操作或删除各种管理栏项目。所有管理栏项目均定义为数组的元素。
- did_action()
如果要计算触发任何动作的次数,可以调用此动作功能。
did_action(’action_name’);
该函数返回一个整数值。
当您只想在第一次运行一个动作而不再运行一次回调函数时,did_action()函数非常方便。
函数example_callback_function(){
if(did_action(’example_action’)=== 1){
//检查’example_action’挂钩是否被触发过一次,然后才运行,再也不会运行!
}
}
add_action(’example_action’,’example_callback_function’);
- remove_action()
此动作函数将删除挂接到指定动作的回调函数。例如,您可以使用此功能删除挂钩到内置操作中的默认WordPress功能,并将其替换为您自己的默认功能。
remove_action(’action_name’,’function_to_be_removed’, [priority] );
调用remove_action()函数有一些先决条件:
- function_to_be_removed和priority参数必须与add_action()函数中最初使用的参数相同。
- 您不能直接调用remove_action()函数。您需要从另一个函数内部调用它。
- 如果回调函数是从类中注册的,则删除它还有其他要求。您可以查看WordPress Codex文档以了解更多详细信息。
- 在回调函数注册之前或运行之后,您无法删除它。
这是WooCommerce如何使用此操作功能删除商店主页面上默认商品缩略图的示例。
remove_action(’woocommerce_before_shop_loop_item_title’,’woocommerce_template_loop_product_thumbnail’,10);
- remove_all_actions()
该动作功能可删除与动作相关的所有内容。 priority参数是可选的。
remove_all_actions(’action_name’, [priority] );
请记住,您要从中注销回调函数的操作无法调用此函数。这将导致无限循环。您可以加入之前触发的操作来运行此功能,而不会出现任何错误。
- doing_action()
该动作功能检查指定的动作是否正在运行。它返回一个布尔值(真或假)。
//检查是否正在执行“ action_name”操作
如果(do_action(’action_name’)){
//在这里执行您的代码
}
您可以将action_name参数留空以检查是否正在执行任何动作。每当执行任何操作时,它都会返回true。
//检查是否正在执行任何操作并执行某些操作
如果(do_action()){
//当执行任何操作时,此处的代码将运行
}
动作示例1:向网站访问者显示维护消息
有时,最好使您的网站脱机并设置“维护中”页面。幸运的是,WordPress提供了一种简单的方法来做到这一点。
//向所有网站访问者显示维护消息
add_action(’get_header’,’maintenance_message’);
函数maintenance_message(){
如果(current_user_can(’edit_posts’))返回;
wp_die(’
保持谨慎!
抱歉,我们暂时无法进行维护。” );
}
让我们分解代码并完成每个步骤:
- get_header是在加载网站的标题模板文件之前触发的操作。如果要中断主站点的加载,这是一个完美的选择。
- 使用带有add_action()函数和maintenance_message()回调函数的get_header动作。
- 定义maintenance_message()回调函数。
- current_user_can(’edit_posts’)是一个用户能力测试功能,用于检查当前用户是否已登录并可以编辑帖子。在WordPress网站上注册的每个用户(具有订阅者角色的用户除外)都可以编辑帖子。还有其他健壮的方法可以执行此检查,但是在这里我们将坚持使用这种简单的方法。
- 使用默认的wp_die()函数优雅地终止WordPress执行并显示带有错误消息的HTML页面。您可以在错误消息参数中使用HTML语法来设置其格式。
将代码保存在自定义插件中后,我以私人浏览模式加载了本地WordPress安装。维护不足页面成功!
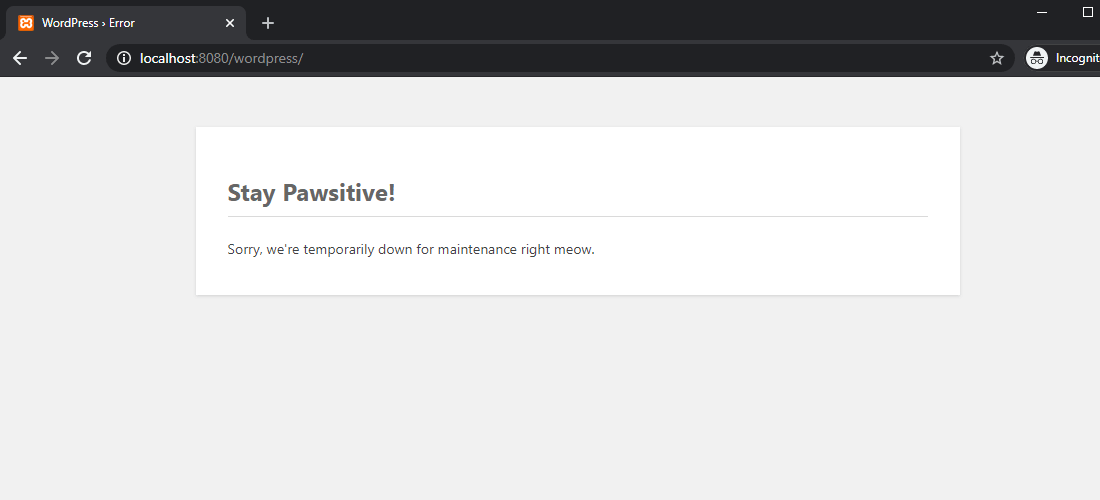
向网站访问者显示错误消息
如果我通过用户功能测试后登录,则该网站将成功加载。现在,您可以继续修复您的网站,同时它向普通访问者显示此页面。
操作示例2:向非管理员用户隐藏仪表板菜单项
如果您正在运行多作者博客或为客户管理网站,则可能需要为非管理员用户从WordPress仪表板中隐藏某些管理员菜单。您可以通过加入admin_menu操作来实现。
//删除非管理员用户的特定仪表板菜单
add_action(’admin_menu’,’hide_admin_menus’);
函数hide_admin_menus(){
如果(current_user_can(’create_users’))返回;
如果(wp_get_current_user()-> display_name ==“ Salman”)返回;
remove_menu_page( ‘plugins.php’ );
remove_menu_page( ‘themes.php’ );
remove_menu_page( ‘tools.php’ );
remove_menu_page( ‘users.php’ );
remove_menu_page( ‘edit.php?post_type=page’ );
remove_menu_page( ‘options-general.php’ );
}
Here’s a step-by-step walkthrough of the code snippet above:
- admin_menu is an action that’s triggered before the admin menu loads in the WordPress dashboard area.
- Hook into the admin_menu action using the add_action() function using the hide_admin_menus() callback function.
- The hide_admin_menus() callback function defines the logic of the code. It’s run every time the admin_menu action fires.
- Inside the callback function, the current_user_can( ‘create_users’ ) function checks whether the logged-in user is an admin. Since only site admins have the create_user capability, the function ends with a return statement if the user is an admin.
- The wp_get_current_user() WordPress function retrieves the current user object. With this function, we can check whether the logged-in user has a particular display_name set. This is an optional line, in case you want to omit certain non-admin users from being locked out due to this callback function.
- The remove_menu_page() WordPress function removes top-level admin menus. In the code example above, I’m removing the following admin menus: Plugins, Themes, Tools, Users, Pages, and Options.
After saving the plugin file, here’s a snapshot of the WordPress dashboard with an admin logged in.
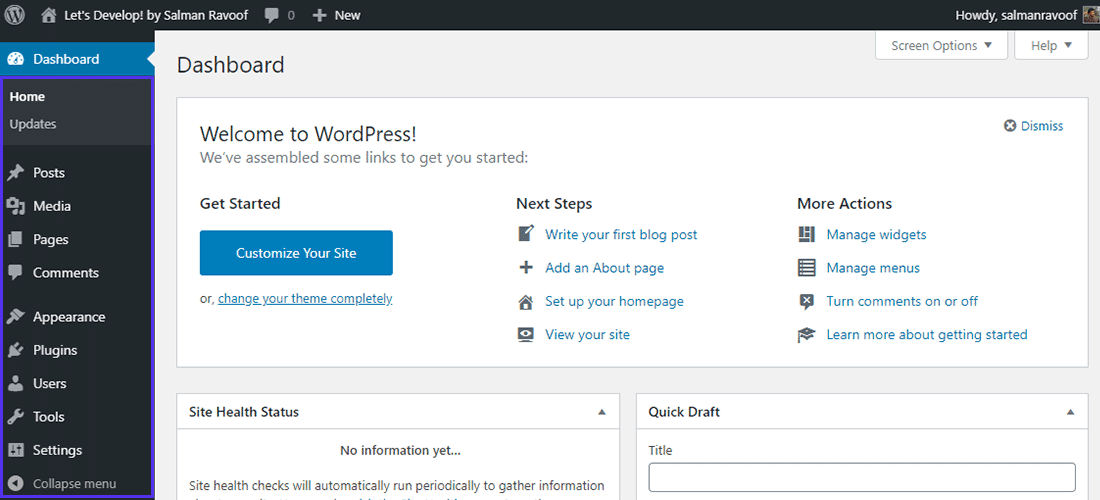
The default WordPress admin dashboard
And here’s a screenshot of the WordPress dashboard with a non-admin user logged in.
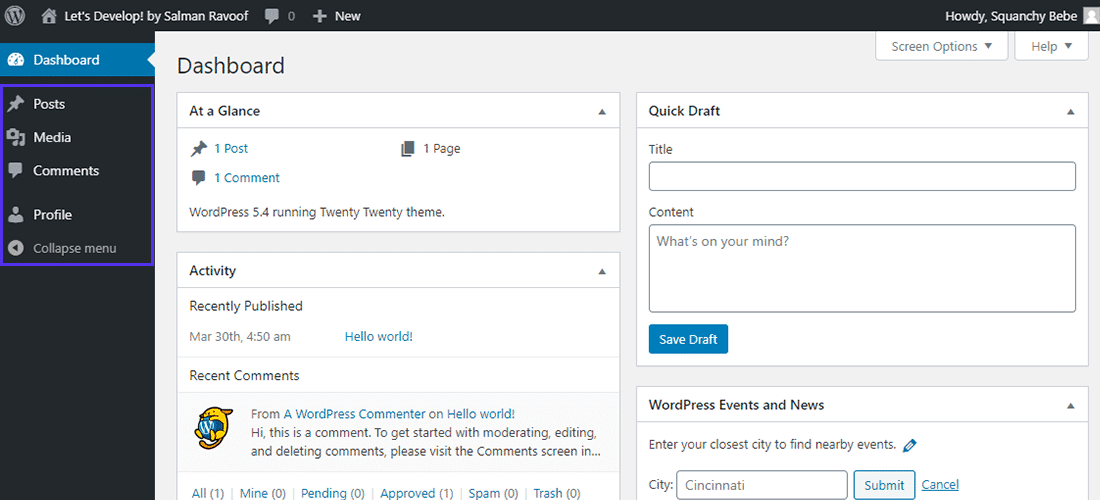
Hiding sensitive admin menu items from non-admin users
This solution only hides the specified admin menu items from appearing in the WordPress dashboard. All users can still access them by entering the menu URLs in their browsers.
To disable certain user roles from accessing specific menus, you need to edit their capabilities.
Hooking a Filter
Filters provide a way for your custom code to modify data used by other WordPress functions. Unlike actions, functions hooked to filters need to return a value.
The add_filter() Filter Function
You can hook a callback function to a filter by following these steps:
- Define a Callback function that will run when WordPress fires the filter. Callback functions for filters need to have at least one argument specified, as all filters pass at least one value to their callback functions.
- Register the callback function to a filter with the add_filter() function. The filter will take care of calling the callback function. As per the WordPress Codex, the add_filter() function needs to pass at least two parameters:
- Name of the filter to hook into.
- Name of the callback function that’ll run when the filter fires.
- The add_filter() function also accepts two additional optional parameters for setting the priority and the number of arguments. These parameters work the same way as with the add_action() function.
Here’s an example of how you can use the add_filter() function to hook a callback function to a filter.
// define the filter callback function with at least one argument passed
// the number of arguments that you can pass depends on how the filter is defined
function filter_callback_function( $arg1, $arg2 ) {
// make your code do something with the arguments and return something
return $something;
}
// now hook the callback function to the ‘example_filter’
add_filter( ‘example_filter’, ‘filter_callback_function’, [priority], [no_of_args] );
// ’10’ is the default priority set for the callback function
// and ‘1’ is the default number of arguments passed
Example of Hooking a Filter
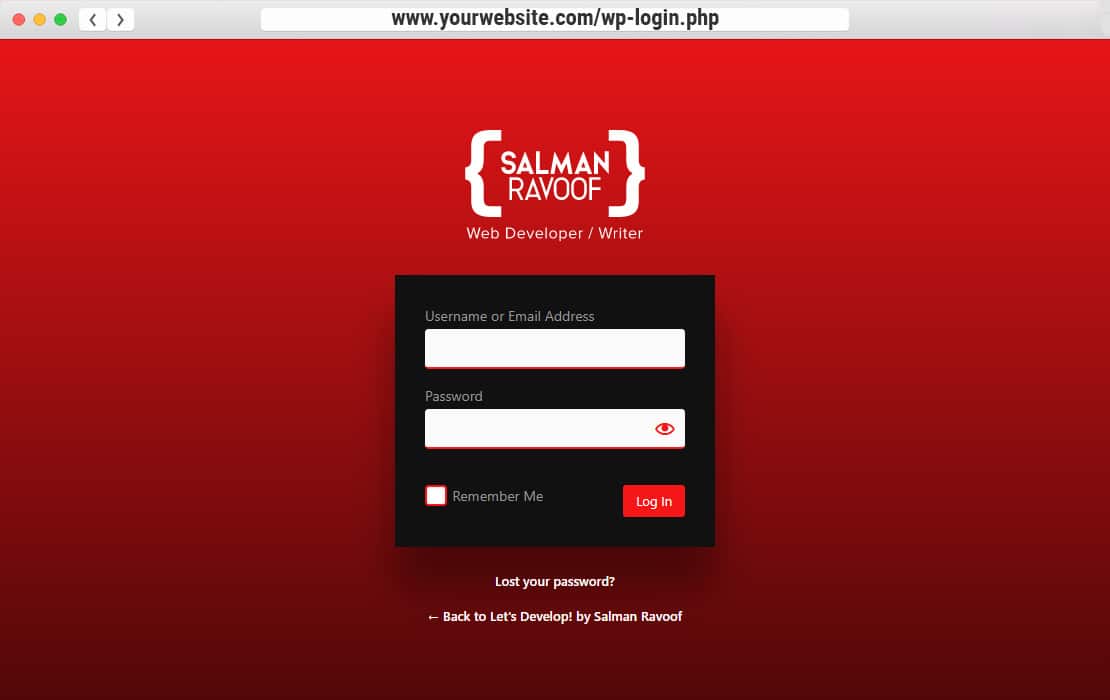
WordPress provides a filter called login_message to filter the message displayed on the login page above the login form. The value returned by this filter can have HTML markup.
Let’s hook into the login_message filter and modify the message shown on the login screen.
// show a custom login message above the login form
function custom_login_message( $message ) {
if ( empty( $message ) ) {
return “
Welcome to Let’s Develop by Salman Ravoof! Please log in to start learning.
“;
}
else {
return $message;
}
}
add_filter( ‘login_message’, ‘custom_login_message’ );
The if-else statement in the callback function checks whether the login message is already set, mostly by another plugin or theme. In such cases, the callback function returns the original value making no changes. This is one way to avoid conflicts with other plugins or themes.
You can see the message being displayed above the login form in the WordPress login page.
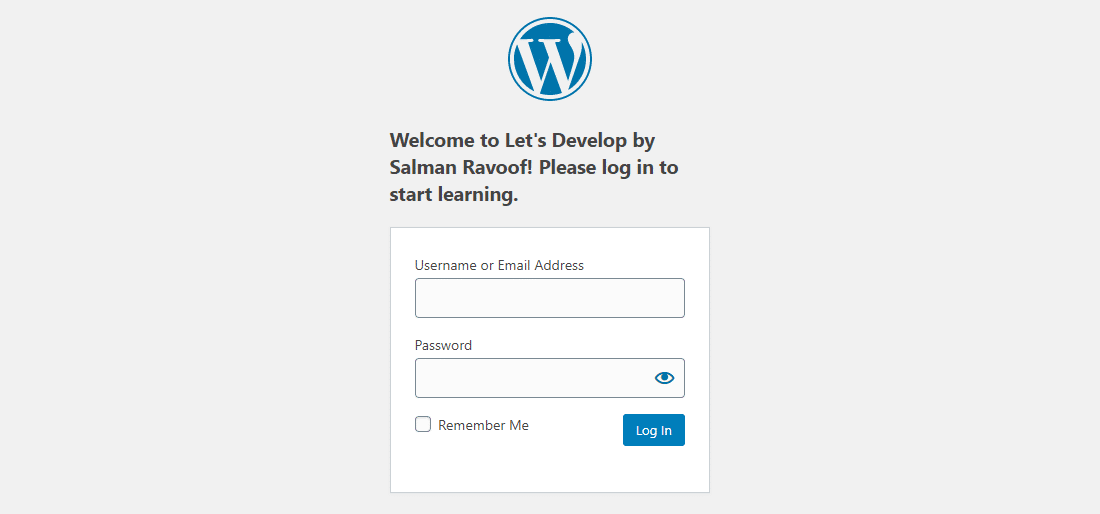
Showing a custom login message above the login form
You can style all the elements on the login page by enqueueing custom style sheets. Doing so will allow you to fully customize your default WordPress login page.
You’ll learn how to load custom style sheets using actions in the “Customize the WordPress Login Page with Hooks” section.
Finding Filters Supported by WordPress
Anywhere WordPress processes or modifies data, you can almost certainly find a filter to hook into and change it. Think of filters as an interface between the WordPress database and the browser.
You can find an exhaustive list of all the filters supported by WordPress in the Plugin API/Filter Reference page.
WordPress provides a variety of filters to hook into
All the filters listed there are split up into multiple categories and arranged from top to bottom in the WordPress execution order.
If you want to find filters to hook into in the WordPress source code, perform a search for the term “apply_filters” and you’ll get tons of results. The WordPress Code Reference is also a great place to search for everything that’s included in WordPress, including actions and filters.
How WordPress Core Uses Filters
WordPress Core itself uses a lot of its built-in filters to modify data used by its various functions.
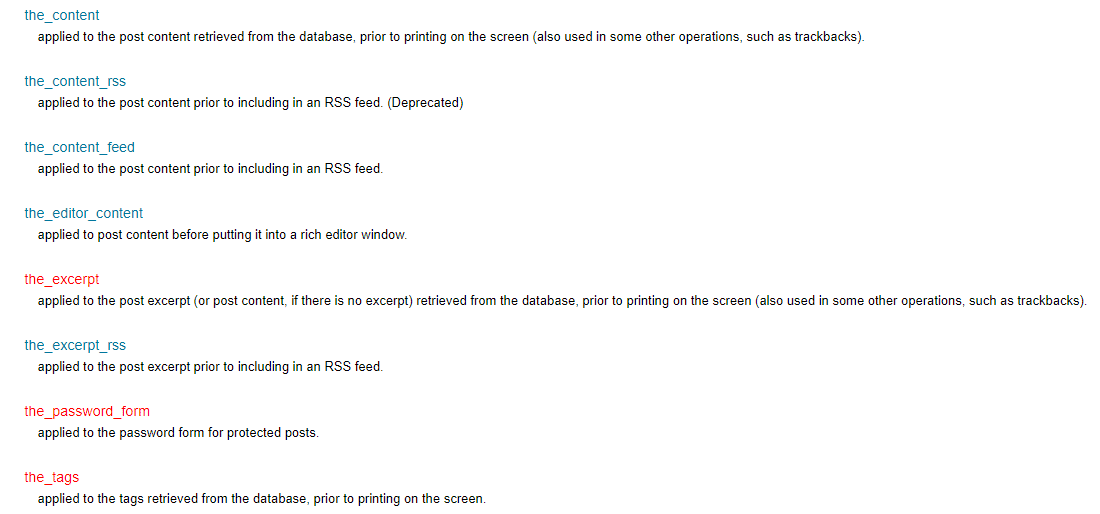
Consider the the_content filter for example. It filters post content after it’s retrieved from the database and before it’s displayed on the browser.
Just like with actions, you can find most of WordPress Core’s filter functions related to the the_content hook in the wp-includes/default-filters.php file.
Here’s a list of all the core add_filter() functions that hook into the the_content filter:
add_filter( ‘the_content’, ‘do_blocks’, 9 );
add_filter( ‘the_content’, ‘wptexturize’ );
add_filter( ‘the_content’, ‘convert_smilies’, 20 );
add_filter( ‘the_content’, ‘wpautop’ );
add_filter( ‘the_content’, ‘shortcode_unautop’ );
add_filter( ‘the_content’, ‘prepend_attachment’ );
add_filter( ‘the_content’, ‘wp_make_content_images_responsive’ );
add_filter( ‘the_content’, ‘do_shortcode’, 11 ); // AFTER wpautop().
Note the priority specified for certain callback functions.
For example, the do_blocks() function parses any dynamic blocks in the post content and re-renders them to be compatible with WordPress’ new block editor. It’s specified a higher priority than the default (10) to make sure that the content is block-ready before the other functions are run.
The convert_smilies() function is set to run at a lower priority as its task is to convert text smileys to image sprites. Having it run in the end after filtering all the post content makes sense.
Fun Fact: Shortcodes are a subset of filters. They take in input from the shortcode, process it, and then return the output back to it. Learn more about shortcodes in this ultimate WordPress Shortcodes guide.
Other Filter Functions
While add_filter() is the most used filter function, there are many other helpful filter functions. Let’s discuss them all in depth.
- has_filter()
This function checks whether the specified filter is hooked by any function. It accepts two parameters. The first parameter is for entering the filter name. The second parameter is optional and is for entering the name of the callback function.
has_filter( ‘filter_name’, ‘function_to_check’ );
If you specify just the first parameter, it’ll return true if the filter_name is hooked by any function.
However, if you specify both the parameters, then it’ll return false if the callback function mentioned isn’t registered with the given filter. If it finds the callback function registered with the filter, then it’ll return the priority (an integer) set for that function on this filter.
One possible application of the has_filter() function is to check whether any filter has been hooked already, and based on that go ahead with code execution.
// check to see if ‘the_content’ filter has been hooked
if ( ! has_filter( ‘the_content’ ) {
// hook the filter if and only if it hasn’t been hooked before
add_filter( ‘the_content’, ‘modify_the_content’ );
}
- apply_filters()
This filter function is like the do_action() action function. Any callback functions hooked to this filter will run wherever this function is in the WordPress code.
You can also use this function to create a new custom filter by specifying the filter name and the filter value as parameters.
apply_filters( ‘filter_name’, ‘value_to_filter’, [argument1], [argument2] );
Don’t forget to specify any additional arguments if you want to pass them on to your callback functions. Most filters only use one argument, so it’s easy to miss out on defining the additional ones.
- apply_filters_ref_array()
This function is like the apply_filters() function, except all the arguments it accepts are bundled up as an array.
// an example array
$arguments_array = array( ‘some_value’, ‘foo’, false, ‘another_value’ );
apply_filters_ref_array( ‘example_filter’, $arguments_array );
This filter function can be handy when you have many arguments to pass or if all of them are already in an array. Ensure that the arguments inside the array are in the right order.
- current_filter()
This filter function retrieves the name of the current filter or action being run. You don’t need to specify any parameters as it runs within the callback function.
Here’s an example of its usage:
function example_callback() {
echo current_filter(); // ‘the_title’ will be echoed
return
}
add_filter( ‘the_title’, ‘example_callback’ );
Despite its name, this function can retrieve the name of both actions and filters.
- remove_filter()
This filter function removes the callback function attached to the specified filter. It’s works exactly like the remove_action() function. You can use it to delete default WordPress functions registered with a specific filter, and if necessary replace them with your own functions.
remove_filter( ‘filter_name’, ‘function_to_be_removed’, [priority] );
To unhitch a callback function hooked to a filter, the function_to_be_removed and priority parameters must be identical to the arguments used when hooking the callback function.
If the filter has been added from within a class, which is usually the case when they’re added by plugins, then you need to access the class variable to remove the filter.
// access the class variable first, and then remove the filter through it
global $some_class;
remove_filter( ‘the_content’, array($some_class, ‘class_filter_callback’) );
Let’s check out a great example of remove_filter() in action.
The WooCommerce plugin uses the wc_lostpassword_url() call function hooked to its lostpassword_url filter to redirect “Lost Your Password?” attempts by users.
It takes any user clicking on that link to a custom frontend page with the URL /my-account/lost-password. Without this filter, it’d take them to the standard WordPress login URL at /wp-login.php.
Say you want to reset this functionality and send your users to the default password retrieval page or to a separate page altogether. You can remove this callback function like this:
remove_filter( ‘lostpassword_url’, ‘wc_lostpassword_url’, 10 );
- remove_all_filters()
This filter function removes all the callback functions registered to a filter.
remove_all_filters( ‘filter_name’, [priority] );
It’s similar to the remove_all_actions() function.
The popular Advanced Excerpts plugin uses this function to remove all default functions hooked to the_excerpt and get_the_excerpt filters. After doing that, it then hooks its own callback function to the filter.
// Ensure our filter is hooked, regardless of the page type
if ( ! has_filter( ‘get_the_excerpt’, array( $advanced_excerpt, ‘filter_excerpt’ ) ) ) {
remove_all_filters( ‘get_the_excerpt’ );
remove_all_filters( ‘the_excerpt’ );
add_filter( ‘get_the_excerpt’, array( $advanced_excerpt, ‘filter_excerpt’ ) );
}
- doing_filter()
This filter function checks whether the filter specified is being executed at the moment.
if ( doing_filter( ‘save_post’ ) ) {
// run your code here
}
It returns a boolean value (true or false).
You should note the difference between this function and the current_filter() function, which returns the name of the filter or action being run (a string).
Filters Example 1: Adding a Profanity Filter for Comments
Managing all the comments on your WordPress site can be a cumbersome process. The comment_text filter lets you set up rules to modify the comments before they’re printed on the display.
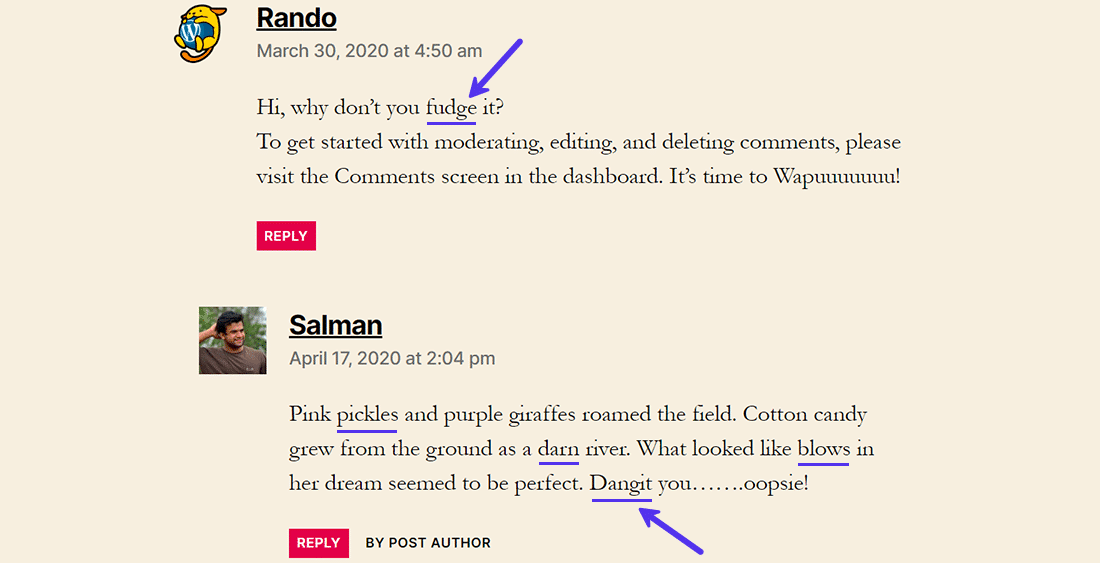
Unfiltered comments with dummy profanities marked
You can direct WordPress to remove any expletives automatically before they’re displayed to your site visitors.让我们开始吧。
// hook into the ‘comment_text’ filter with the callback function
add_filter( ‘comment_text’, ‘the_profanity_filter’ );
// define a callback function to filter profanities in comments
function the_profanity_filter( $comment_text ) {
// define an array of profane words and count how many are there
$profaneWords = array(‘fudge’, ‘darn’, ‘pickles’, ‘blows’, ‘dangit’);
$profaneWordsCount = sizeof($profaneWords);
// loop through the profanities in $comment_text and replace them with ‘*’
for($i=0; $i < $profaneWordsCount; $i++) {
$comment_text = str_ireplace( $profaneWords[$i], str_repeat('*', strlen( $profaneWords[$i]) ), $comment_text );
}
return $comment_text;
}
Here’s a line-by-line breakdown of the code:
- comment_text is a filter hook that lets you modify the text of a comment before the browser displays it. You can register your callback function with it to filter its output.
- The add_filter() function lets you hook into the comment_text filter and attach a callback function to it.
- the_profanity_filter() is the name of the callback function. It accepts only one parameter, which is a string containing the comment text. Define this custom function with the appropriate code logic.
- Store all the profane words in a PHP array called profaneWords. You can add as many words as you want to this array. I’m storing the size of this array in the profaneWordsCount variable with the help of sizeof() PHP function.
- Loop through all the profane words and use PHP’s default str_ireplace() function to replace any of the matching profanities with * symbols. Since this is a case-insensitive string replacement function, you don’t have to worry about capitalization.
- Use return to output the filtered comment text.
Save the changes to your custom plugin file and reload any post with comments. All the words you’ve included in the profaneWords array should now be replaced with ‘*’ symbols.
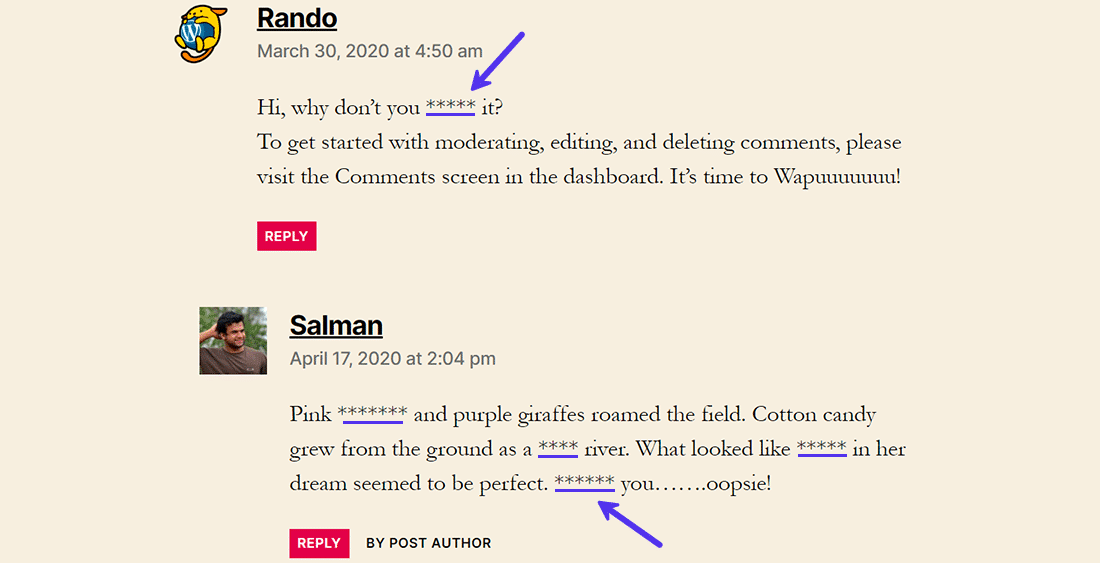
Censoring profanity in comments with ‘*’ symbols
The original comments will still be available as is in the database. This filter only modifies the comment text before it’s outputted to the frontend.
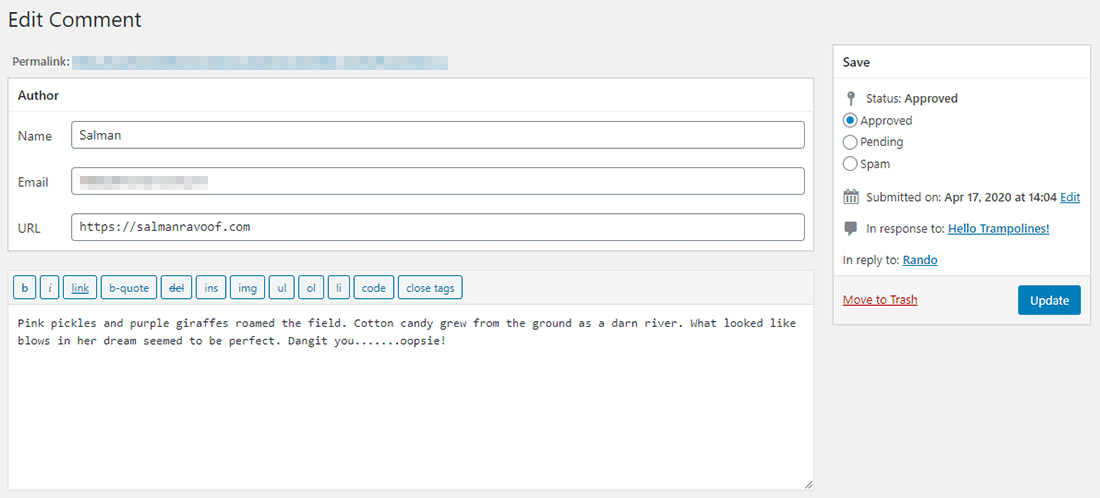
The original comment on the site backend
Once you’re hooked into the right filter, you can do a lot of cool stuff with it.
For example, you can also use the comment_text filter to remove any URLs from all the comments (make sure to read this in-depth guide on how to stop spam comments in WordPress).
Or you can hook into the pre_comment_approved filter and mark comments as approved, spam, or thrash based on predefined criteria.
Filters Example 2: Insert Content After a Post
You’ve already seen how WordPress uses the_content filter to modify post or page content. Let’s use the same filter to add something at the end of each post.
// hook into ‘the_content’ filter with a callback function
add_filter( ‘the_content’, ‘insert_content_below’ );
// define the callback function to insert something below the post
function insert_content_below( $content ) {
// check to see if we’re inside the main loop in a single post
if ( is_single() && in_the_loop() && is_main_query() ) {
return $content . ”
Let me insert myself here
I’ll appear after the post. You can insert anything here. Even HTML. Headers, links, images, scripts, I’ll take them all and append it to the end of the post content. You can also give me a class, so you can style me easily with CSS style sheets.
” ;
}
return $content;
}
Understanding the code logic in the above example:
- the_content filter hook helps you grab the content of the current post and customize it.
- Use the add_filter() function to hook into the_content filter with the insert_content_below() callback function.
- Define the callback function by passing the current post’s content as a parameter ($content).
- Inside the callback function, check that you’re only filtering the content in the main query, which in this case is the post content. If you don’t verify this, sometimes the code will unintentionally filter content from other places such as sidebars and footers.
- is_main_query() and in_the_loop() conditionals determine whether the query is a main query and happening within the main WordPress Loop.
- is_single() conditional checks whether the query is for a single post.
- Use PHP’s string concatenation operator ($content . “your additions”) to add extra stuff to the page content.
- return the filtered comment if all the above conditionals check out. If it doesn’t, then just return the content with no changes.
Save your plugin file, load up any post on your site, and scroll to the end.
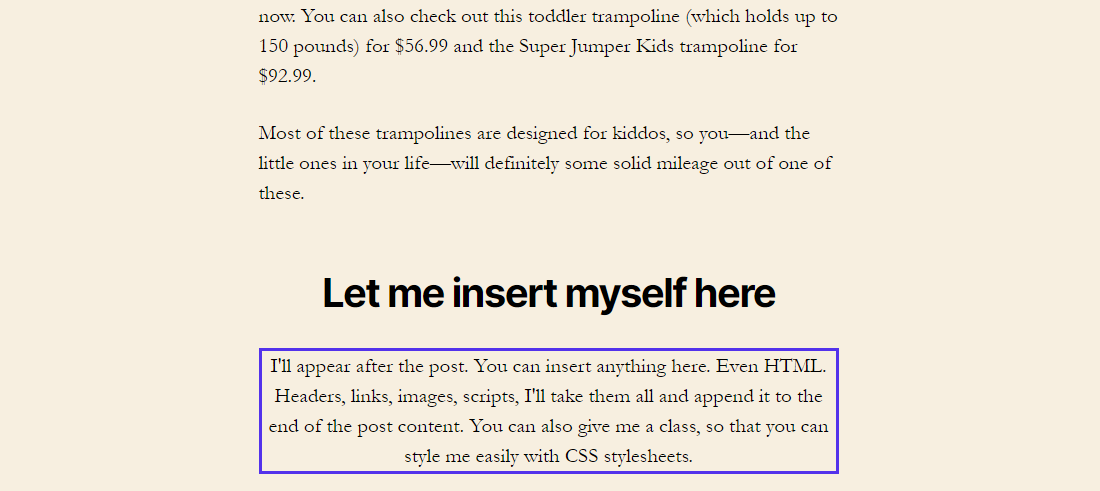
Inserting something at the end of the post content
You can use the same logic to add anything to the beginning of all your posts by reversing the position of string concatenation parameters (“your additions” . $content).
Customize the WordPress Login Page with Hooks
Let’s use both actions and filters to customize the default WordPress login page. I’ll create a new plugin called Sal Custom Login Page to do this. You can find the full source code of this plugin at the end of this section.
Need a blazing-fast, secure, and developer-friendly hosting for your client sites? Kinsta在构建时就考虑了WordPress开发人员,并提供了许多工具和功能强大的仪表板。查看我们的计划
The final customized WordPress login screen
Let’s get started by adding the standard plugin header fields and registering it with WordPress.
First, hook into the login_enque_scripts action to enqueue your custom style sheet. Any scripts or styles you enqueue here are included in the header section of your login page.
If you want to load custom scripts and style sheets on your site’s frontend (rather than on the admin backend or login area), then you need to hook into the wp_enqueue_scripts action. You can read more about it in the WordPress Codex and Kinsta’s article on how to use wp_enqueue_scripts.
Inside the salhooks_login_stylesheet() callback function, use the wp_enqueue_style() function to load the custom style sheet (sal-custom-login-page-styles.css) placed in the same plugin’s directory. WordPress’ built-in plugin_dir_url( __FILE__ ) function makes it easy to get the URL path (with a trailing slash) of the current plugin’s directory.
I won’t explain the CSS styles applied here, but you can find them all in the source code linked at the end of this section.
// Custom login ERROR message to keep the site more secure
add_filter( ‘login_errors’, ‘salhooks_remove_login_errors’, 10 );
function salhooks_remove_login_errors() {
return ‘Incorrect credentials. Please try again!’;
}
Next, hook into the login_errors filter to change the error message shown when someone enters incorrect credentials. Filtering the error message will block attackers from guessing your username easily.
// Remove the login form box shake animation for incorrect credentials
add_action( ‘login_head’, ‘remove_login_error_shake’ );
function remove_login_error_shake() {
remove_action( ‘login_head’, ‘wp_shake_js’, 12 );
}
Every time someone enters incorrect login credentials, the login form box shakes aggressively. This is an optional step, but I’ve included it to show that you can also remove certain features from the login page.
You’ll learn more about remove_action() and remove_filter() functions in the final section of this article.
// Change the logo and header link above the login form
add_filter( ‘login_headerurl’, ‘salhooks_login_headerurl’);
function salhooks_login_headerurl( $url ) {
$url=”https://salmanravoof.com”;
return $url;
}
add_filter( ‘login_headertext’, ‘salhooks_login_headertext’);
function salhooks_login_headertext( $text ) {
$text=”Salman Ravoof”;
return $text;
}
The final step is to change the login header’s URL and text. You can hook into the login_headerurl and login_headertext filters to modify them both.
If you want to build upon this plugin and experiment further, you can download the plugin’s source code and get started.
WordPress Hooks List and Resources
It’s hard to memorize all the various hooks WordPress has. There are thousands of built-in actions and filters to hook into. Hence, finding an appropriate hook may sometimes feel like a scavenger hunt.
Thankfully, there are various resources you can use to identify the perfect hook for your needs.
- WordPress Plugin Handbook — Hooks
The first place to get familiar with hooks is the WordPress Codex, particularly its Hooks section in the Plugin Handbook. Here you can find essential information about hooks and links to complete documentation on all actions and filters.
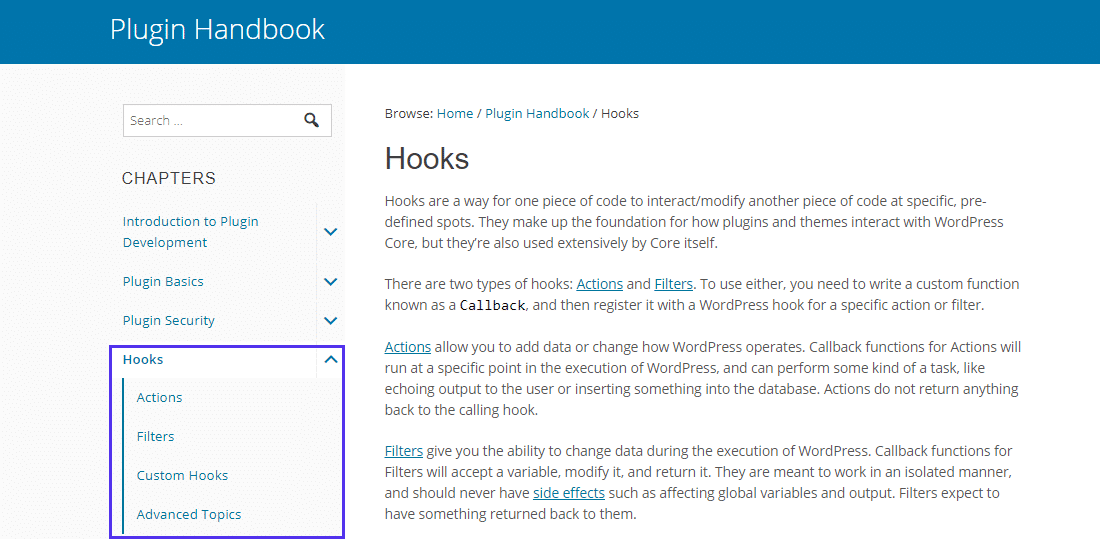
Start learning Hooks with the WordPress Plugin Handbook
Bookmark these helpful links from the Plugin Handbook to speed up your search:
- Plugin API — Hooks Function Reference
- Plugin API — Action Reference
- Plugin API — Filter Reference
Both the action reference and the filter reference pages will give you a list of all the hooks that typically run during a specific WordPress request.
For example, you can find all the hooks fired when you access an admin page, when you’re dealing with post page attachments, or with categories.
- WordPress Code Reference
The WordPress Codex also includes a handy search tool to find all its functions, hooks, methods, and classes. This page also lists new and updated components in the most recent version of WordPress. Head here first if you want to find what’s happening inside WordPress.
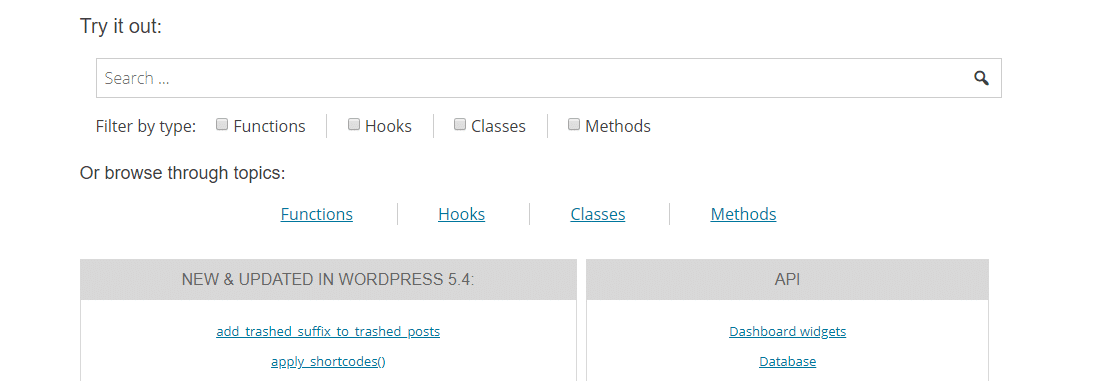
Search for anything inside WordPress here
- Adam R Brown’s WordPress Hooks Index
This index of WordPress hooks sorts all the hooks by type, the WordPress version they debuted, and if they’re deprecated.
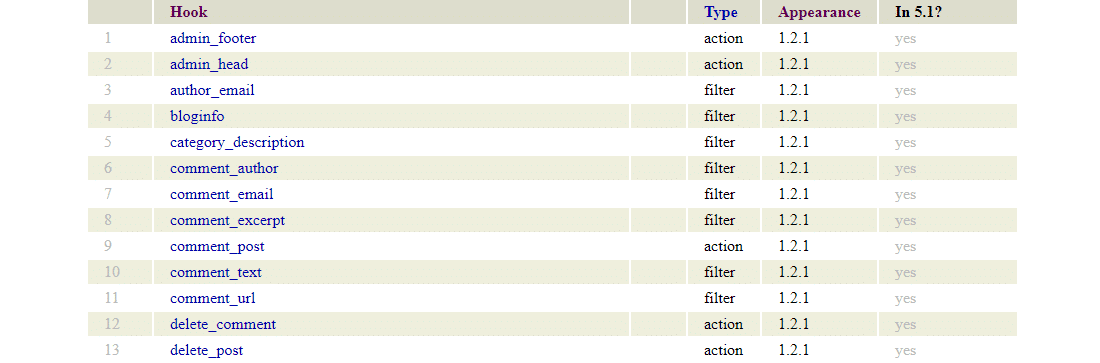
Adam R Brown’s WordPress Hooks Index
Sorting the hooks in order of their appearance will show you that the oldest WordPress hooks are still the most used ones. If you’re new to WordPress development, getting familiar with these popular actions and filters is the fastest way to catch up.
While this index hasn’t been updated since WordPress 5.1, it’s still helpful to skim through all the major hooks.
Still finding it hard to find the hook you want? An online search with the right keyword is always a good way to start. If everything else fails, you can always dig into the WordPress code.
Finding Hooks Registered on a WordPress Page
As we’ve seen, WordPress has tons of hooks available, but not every hook fires on every page. If you can find which actions and filters you can hook into on a particular page, then you’ve won half the battle.
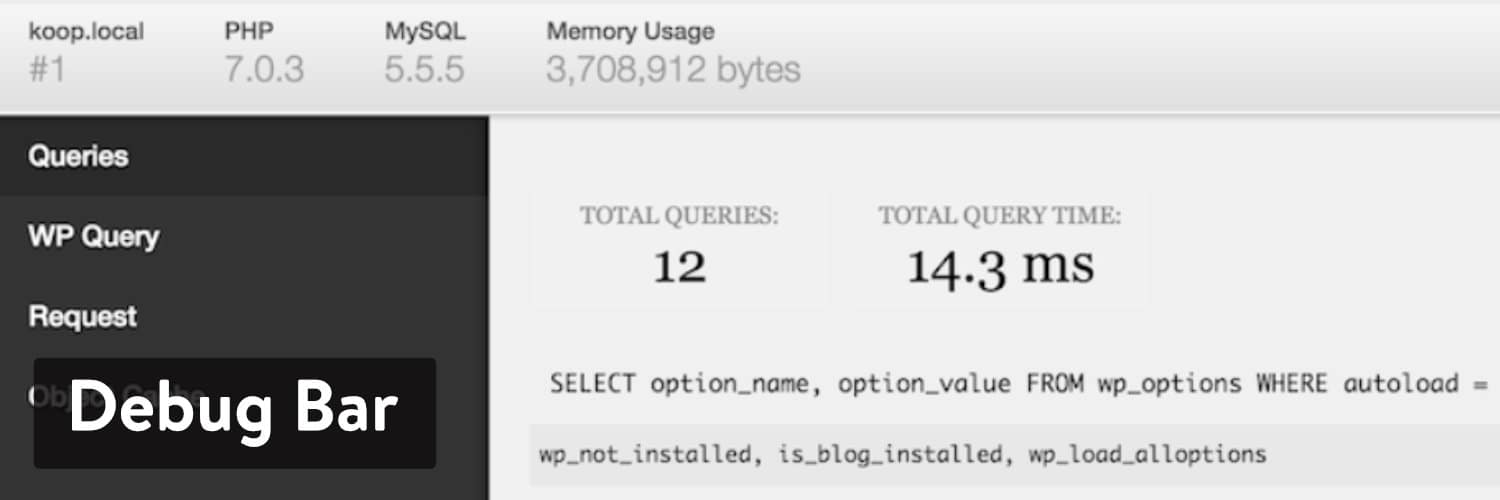
While you can use advanced PHP debugging tools like xdebug and PHPCS to help with this, there are simpler development tools like Debug Bar and Query Monitor which you can run inside WordPress.
Debug Bar with Actions and Filters Add-On
Debug Bar is an official WordPress plugin that adds a Debug menu to your admin bar. It shows PHP warnings and notices, cache requests, MySQL queries, and other helpful debugging information.
Info
This plugging hasn’t been recently updated, nor tested with the latest major releases of WordPress. We’re mentioning it as a handy plugin to learn more about WordPress hooks. Use it on a staging environment.
The WordPress Debug Bar WordPress plugin
After installing the plugin, you need to add the code snippet below to your site’s wp-config.php file to enable its debugging features.
define( ‘WP_DEBUG’, true ); // tracks PHP Warnings and Notices
define( ‘SAVEQUERIES’, true ); // tracks and displays MySQL queries
You should now see the Debug menu option show up in your admin bar. Clicking on it will take you to its dashboard where you can see various queries and caches attached to the page you accessed it from.
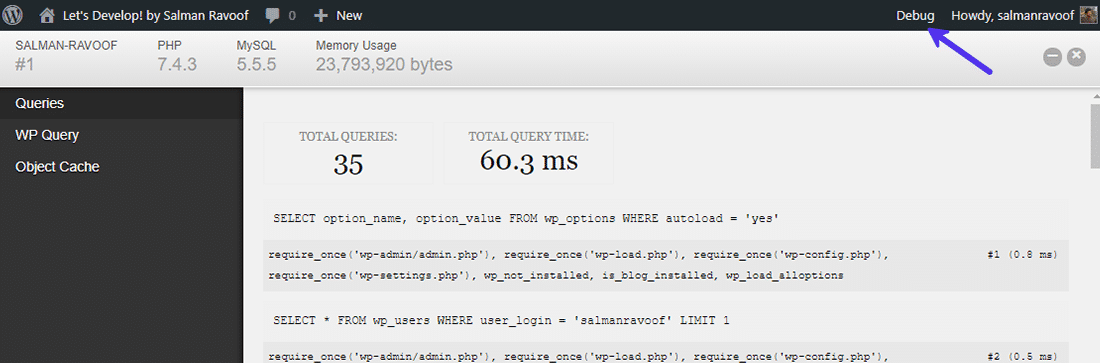
The ‘Debug’ menu in the WordPress admin bar
Next, you need to install the Debug Bar Actions and Filters Addon plugin. It’s a handy extension that’ll add two more tabs to your Debug Bar dashboard to display actions and filters triggered on the current request.
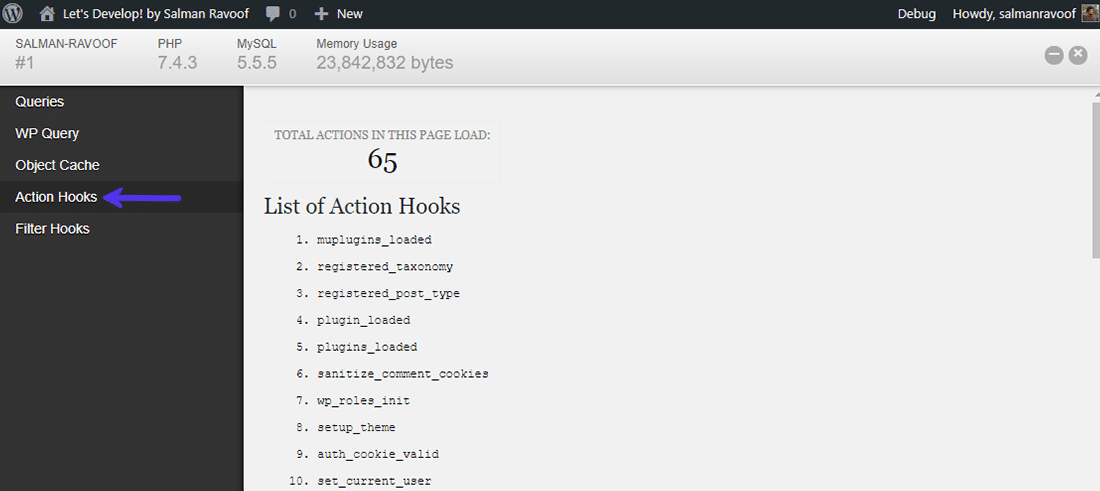
Actions listed in their loading order for the current page
It’ll also list all the functions hooked to them with their priority.
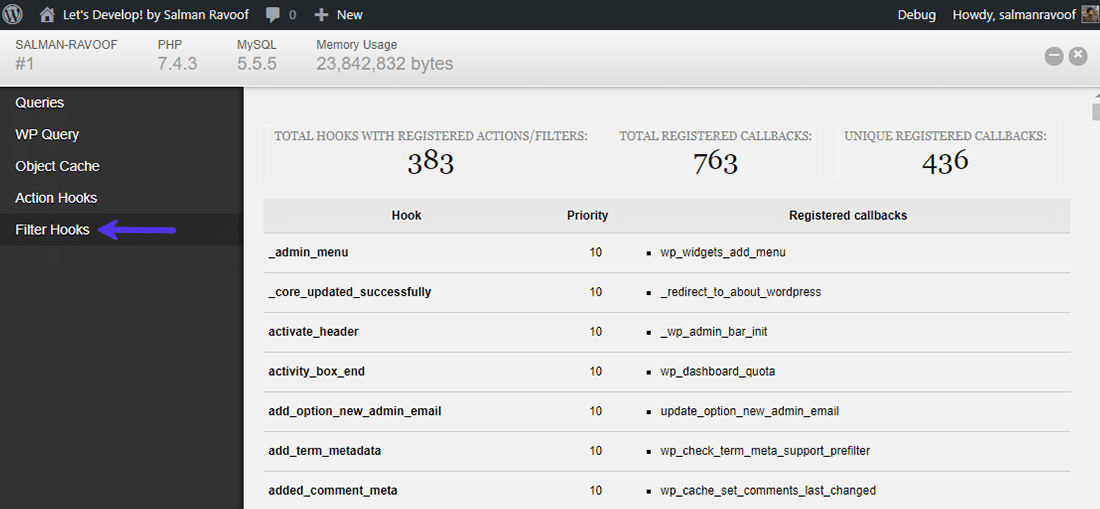
Filters listed with their priority and registered callback functions
You can click on the Debug menu from any page on your site to know all the actions and filters that you can hook into on that page.
Query Monitor
Query Monitor is a powerful developer tools panel for WordPress. You can use it to dig into the hooks available on a page and their load order.
Query Monitor WordPress plugin
Unlike with Debug Bar, you don’t have to install any addons to see the actions and filters triggered on a certain page.
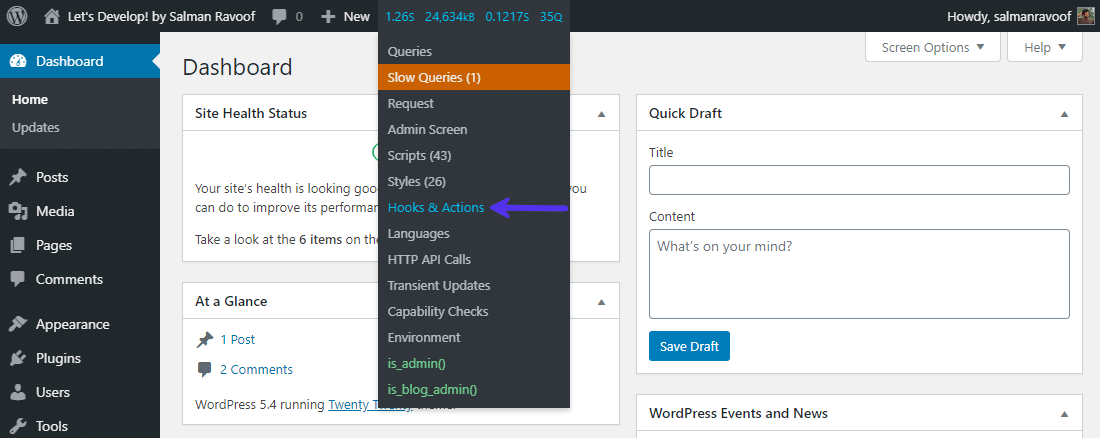
You can access Query Monitor from the admin bar
Query Monitor also gives you more information about where exactly a hook is being fired from.
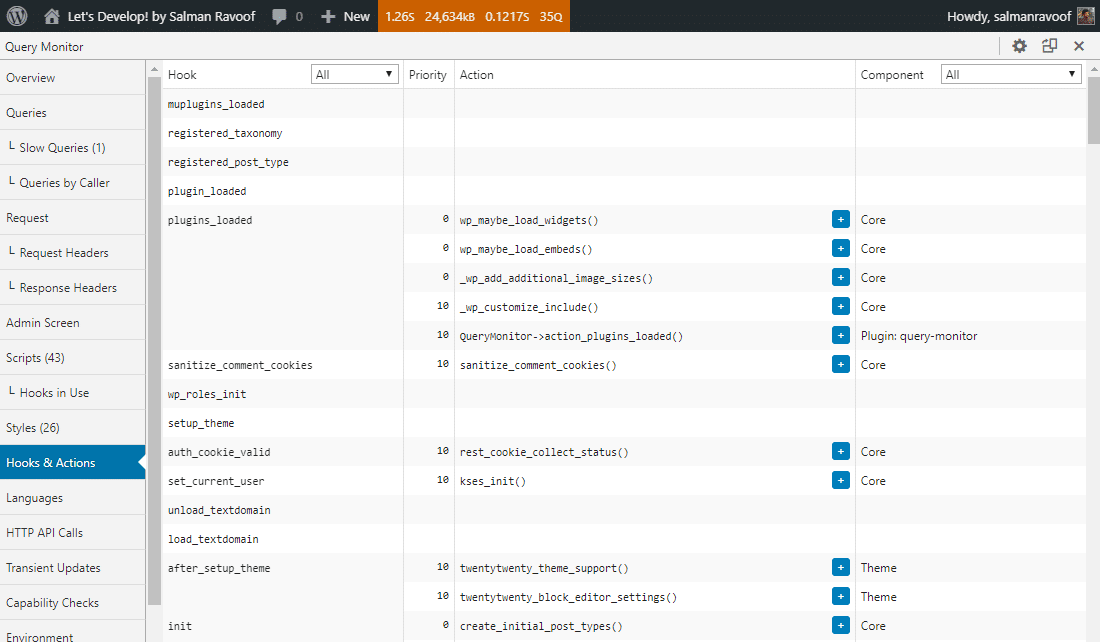
The Hooks & Actions panel in Query Monitor
In the component column, you can see that most of the hooks are registered from the Core. But some hooks are registered from a theme or plugin. A few hooks may be registered from more than one component.
You can use the hook and component dropdown menus to view only the hooks you need.
Note: Query Monitor uses “Hooks” as a catchall term for both actions and filters, but it calls the registered callback functions as “Actions.” This is technically a wrong definition and can confuse you, so do keep that in mind.
You can do more than just check all the queries and requests with Query Monitor. It also includes advanced features such as listing styles, scripts, languages, Ajax calls, user capability checks, and REST API Calls.
The “all” Hook
WordPress has a special hook named ‘all’ that you can hook in to run a callback function for every single hook, regardless of whether it’s registered with them all. It’s useful to debug page crashes or if you want to know when a particular event is happening.
For instance, you can use the all hook like in the example below to echo all the actions being run.
// echo all the actions being run
function debug_helper_function(){
echo ‘
‘ . current_action() . ‘
‘;
}
add_action( ‘all’, ‘debug_helper_function’ );
The debug_helper_function() defined above will run when any action fires. Knowing what the last run action was will give you a better idea of where you need to look into.
Where Are WordPress Hooks Stored?
WordPress uses the WP_Hook class to implement how hooks work. This core class is used to handle all the inbuilt WordPress actions and filters. You can find almost all the code related to this class in the wp-includes/class-wp-hook.php file.
Technically, the WP_Hook class is an array of objects comprising properties such as callbacks, iterations, current_priority, nesting_level, and doing_action. It also defines a lot of useful hook functions which can be called using the WP_Hook methods.
Most WordPress developers don’t have to worry much about where WordPress stores hooks as long as they stick to the Plugin API guidelines.
There are two types of WordPress hooks: actions and filters, and this guide breaks down exactly when (and how!) to use each one ?
点击鸣叫
How to Create Your Custom WordPress Hooks
You’ve seen the various hooks WordPress provides through its Plugin API. You’ve also looked at how you can use the default hooks to inject your own code into WordPress runtime.
If you’re a plugin or theme developer, it’s good practice to provide other developers with a way to interact with your code the same way. Custom hooks let you do exactly that. They allow other developers to extend and modify the functionality of your plugins and themes.
Creating your own actions and filters is fairly simple. You use the same functions WordPress Core uses to create hooks. Let’s look at a few examples.
How to Create Custom Actions in WordPress
Use the do_action() function to create a custom action hook.方法如下:
// the position where you insert your action is where it’ll run when called
do_action( ‘ my_unique_custom_action’ );
// continue with the rest of your code
Now, other developers can hook into your plugin or theme without modifying the source code. All they have to do is register their callback functions to your plugin’s custom action using the add_action() function.
add_action( ‘my_unique_custom_action’, ‘some_callback_function’ );
// define the callback function you mentioned in the above action function
some_callback_function() {
// this code will run wherever your custom action hook is
}
Make sure to document your custom hooks thoroughly, explaining what they do in detail. After all, the main use of creating custom hooks is to help other developers interact with your code.
How to Create a Custom Filter in WordPress
Use the apply_filters() function to create a custom filter hook. Here’s how you can do it:
$value_to_filter = “I’m a string, but this can be any PHP data type”;
// filters modify a value and are typically tied to a predefined variable
apply_filters( ‘my_custom_filter’, $value_to_filter );
Your custom filter’s parameters should include a unique identifier and a value to filter. Other developers can hook into your custom filter with the add_filter() function and modify the passed value.
add_filter( ‘my_custom_filter’, ‘some_callback_function’ );
// define the callback function you mentioned in the above filter function
function some_callback_function( $value_to_filter ) {
// modify the passed value (or not)
return $value_to_filter; // returning a value is a must for filters
}
When you’re defining your custom filter, ensure that it’s not positioned before the value it’s supposed to filter is defined. If you don’t position the filter correctly, the filtered value will get overwritten by the default value afterward.
Custom Hooks Naming Convention
It’s important to choose a unique name for all your custom hooks. Since any plugin or theme can have its own custom hooks, having identical hook names can cause code collisions with unexpected results.
For example, if you name your action send_email, it’s highly likely that other plugin developers may also choose the same term as it isn’t unique enough. If any website installs both yours and the other developer’s plugins, it can cause errors that’ll be hard to trace.
You can prefix all your custom hooks with a common identifier to keep them both simple and unique. So, instead of send_email, you can name it plugin_name_send_email (plugin_name_ is the unique prefix here).
Custom Hooks Demo with an Extensible Plugin
Let’s create an extensible plugin (or a pluggable plugin) that will allow other developers to interact with it using its custom hooks.
I’ll name this plugin Custom Hooks Demo. Its main function is to output a quotation box wherever you insert a shortcode. It’ll include custom actions and filters at the right locations to make it possible for other developers to modify or extend its functionality.
You can refer to my WordPress shortcodes guide to learn more about how shortcodes work.
Let’s get started with the extensible plugin.
“;
echo $quote_content;
echo ““;
echo “― ” . $quote_author . ““;
echo “