
永久链接是用于访问您网站上特定内容的链接。
#js-mykinsta-video {
背景图片:url(https://kinsta.com/wp-content/themes/kinsta/images/mykinsta-dashboard-v8@2x.jpg);
}
免费试用
例如,金斯塔(Kinsta)的主页位于https://kinsta.com/,我们的博客位于https://kinsta.com/blog/,单个帖子使用的链接如https://kinsta.com/blog/ wordpress-widgets /。
永久链接还用于存档页面,静态页面以及您网站上需要其自身URL的任何内容。
在这篇文章中,我们将向您展示永久链接的工作方式,如何针对您的网站进行优化,以及如何通过设置屏幕和编写一些代码进行配置。
什么是WordPress永久链接?
WordPress永久链接在官方WordPress Codex上定义为:
“指向您个人博客文章的永久URL,以及博客文章的类别和其他列表。”
您网站中的每个页面(包括帖子,页面,存档页面和其他页面,例如404页面)都将具有自己的永久链接。
因此,例如,您的主页将位于yoursite.com,而您的博客将位于yoursite.com/blog。
如果您的博客中有“精选”类别,则可以使用以下网址之一:
- yoursite.com/category/featured
- yoursite.com/blog/featured或仅
- yoursite.com/featured。
各个帖子也有自己的固定链接。在主题模板文件中,模板标签the_permalink()将用于获取帖子的URL并从中创建可点击的链接。
WordPress使用此方法为单个帖子获取唯一的永久链接,并将其输出到 元素,因此可以将其用作博客文章列表中的链接。
拥有此模板标记的好处在于,您只需要使用一段代码即可获取指向您网站上任何帖子的链接,而无需对您的主题中的任何链接进行硬编码。
永久链接,子段和链接之间的区别
在这篇文章中,我们将重点关注永久链接,但同时我们也会研究。那么它们之间有什么区别?
永久链接是指向帖子的完整链接。因此,我之前在小部件上的Kinsta帖子上给出的链接是https://kinsta.com/blog/wordpress-widgets/。
子弹是该永久链接的最后一部分,对于该帖子而言是唯一的。在这种情况下,它是wordpress-widgets。
会根据帖子标题为您自动生成该条。而且,如果您想为帖子手动创建一个子弹,则可以。在本文的后面,我将向您展示如何(以及为什么要这么做)。
永久链接,段,链接,URL …这些都是什么?了解WordPress永久链接的来龙去脉⛓
点击鸣叫
WordPress永久链接的创建方式
在静态网站中,URL通过资源的名称和目录路径标识资源,如以下示例所示:
https://example.com/path/to/resource/wordpress-permalinks.html
为了拥有结构良好的URL,我们只需要一个结构良好的文件系统和正确命名的资源。
但是网络是动态的,我们习惯于使用数据库驱动的CMS管理网站,这意味着URL将包含许多参数,这些参数的值确定了要针对数据库运行的查询。
考虑以下示例:
https://example.com/?key1=val1&key2=val2
在该网址中,您会注意到一个分隔符(问号),以及一组构成查询字符串的键/值对(以&符号分隔)。该URL不满足可用性和可访问性要求,应将其转换为更有意义和SEO友好的永久链接。
这些“丑陋的” URL转换为优化的永久链接的方式取决于您的Web服务器。如果您是Apache用户,则需要在根文件夹的.htaccess文件中添加一组重写指令。如果您是Nginx用户,则可以在主配置文件中添加一个try_files指令。
但是不用担心!在大多数情况下,您不需要逐行配置网络服务器,因为WordPress会为您完成配置。
作为管理员用户,您可以在管理面板中快速轻松地设置自定义重写规则。高级用户和开发人员可以受益于WordPress Rewrite API,该API提供的功能和挂钩可将永久链接自定义提升到更高的水平。
WordPress查询概述
为了构建查询,执行查询并存储WordPress数据库中的结果,WordPress提供了WP_Query类。多亏了此类,我们不需要关心查询,因为WP_Query会自动处理请求,构建查询并执行它。然后,根据模板层次结构,WordPress将返回请求的资源。
WordPress开箱即用,可以接受对单个帖子,页面,帖子类型以及按类别,标签,日期,作者等进行排序的大量存档的请求。
此外,如果默认功能还不够,开发人员可以通过创建WP_Query类的新实例(查询对象)或在执行查询之前将特定参数传递给现有查询实例来构建自定义查询。
查询参数被命名为查询变量,并分为三组。
公共查询变量
从可以在公共请求(即URL)中使用它们的意义上说,这些变量是公共的。由于这些变量,我们可以要求作者发表文章:
?author = 12?
author_name =米奇
按类别或标签:
猫= 4、5、6
?category_name = CMS
?tag = wordpress
按日期和时间:
?monthnum = 201601
年= 2015年w = 13
天= 31
按帖子或页面:
?p = 123
?name = hello-world
?page_id = 234
以及更多。
专用查询变量
这些变量无意添加到URL查询字符串中。它们可用于仅在脚本(插件或主题的functions.php文件)中影响查询。
以下查询字符串将不会返回预期结果:
?meta_key = city&meta_value =伦敦
meta_key和meta_value是私有查询变量,不在查询字符串中定义。它们应该传递给查询对象的实例,如我稍后将向您展示的。
请参见食典中公共和私有查询变量的完整列表。
自定义查询变量
这些用户定义的变量可以通过URL查询字符串传递,就像公共查询vars一样。公共变量和自定义变量之间的主要区别是WordPress不会自行处理自定义变量,我们应该从插件获取它们的值以自定义查询。
话虽如此,让我们回到固定链接。
丑陋的WordPress固定链接和查询变量
丑陋的永久链接显示查询字符串,即URL中包含一组查询变量(查询字符串)的部分,这些变量将确定返回的资源。

固定链接设置屏幕中的普通设置
例如,考虑以下URL:
https://example.com/?cat=5
https://example.com/?cat=5,7,9
响应这些URL,WordPress将返回属于指定类别的帖子的存档。
我们不仅限于每个URL一个参数。在以下示例中,我们将构建更复杂的查询:
?author_name = lucy&category_name = WebDev?tag = wordpress&m = 201606
在第一个查询字符串中,author_name和category_name将要求WebDev类别中指定作者的所有帖子。在第二个查询字符串中,tag和m将要求所有标记为“ wordpress”并于2016年6月发布的帖子。
如您所见,我们可以设置多个查询变量,并迫使WordPress仅向查询字符串添加适当的key = value对来运行高级查询。
漂亮的永久链接:更好的选择
通过启用Pretty Permalinks,我们设置了一个可用,可访问且SEO友好的URL结构。让我们比较以下网址:
https://example.com/?p=123
https://example.com/wordpress-permalinks/
在此示例中,丑陋的永久链接显示p变量及其值(帖子ID),而漂亮URL则显示帖子段。
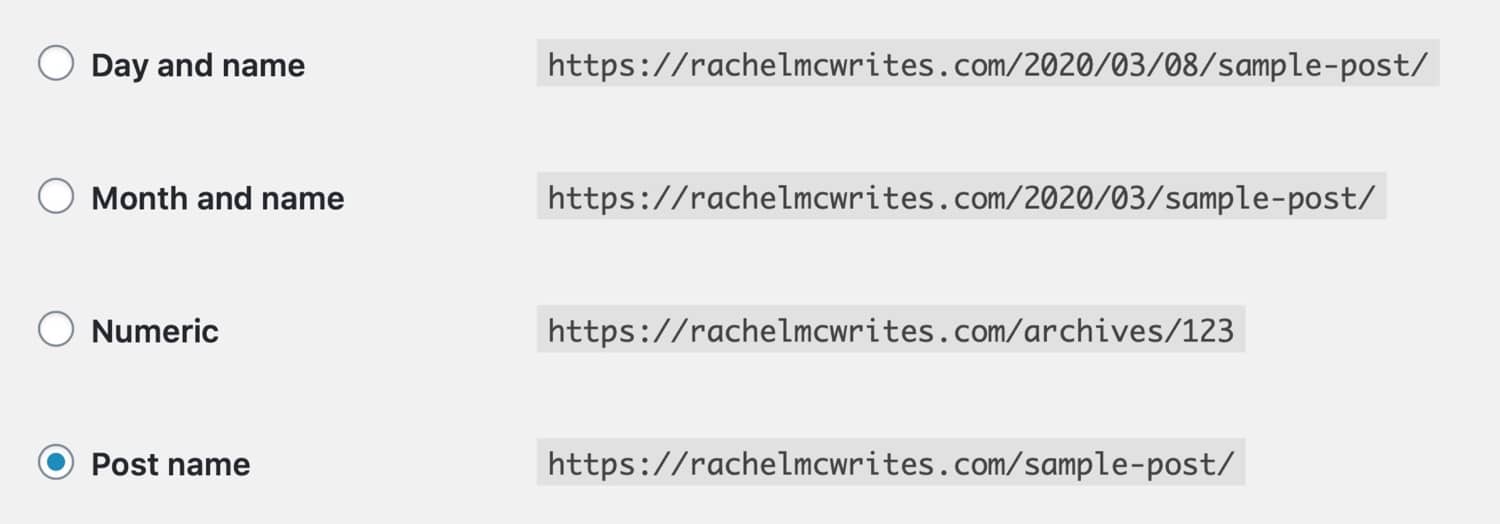
WordPress提供了四种Pretty Permalink格式,我们可以在“ Permalink设置”屏幕中进行选择,如下图所示。
永久链接设置中的漂亮永久链接
但您不仅限于默认格式,因为WordPress可让您通过设置一个或多个结构标签来自定义漂亮的永久链接格式。

自定义结构选项
我将在本文的后面详细介绍这些。
为什么漂亮的固定链接很重要?
为您的WordPress网站使用漂亮的永久链接将带来两个好处:SEO和用户体验。
为什么?搜索引擎使用您的URL来指示帖子的内容。如果永久链接的内容与您的帖子的内容有关,则将有助于搜索引擎确定您的帖子是关于什么的,以及关于该帖子所声称的是合法的。
对于UX,漂亮的永久链接会更好,因为它们使用户更容易记住和使用您网站上的URL。如果是yoursite.com/?p=456,没有人会记住您的联系页面的URL。但是他们会记住yoursite.com/contact。
固定链接,子弹和SEO
帖子条目是帖子URL的最后一部分。如果您配置了WordPress永久链接设置,以便使用帖子名称,则名为“如何创建漂亮的永久链接”的帖子的标签会自动生成为yoursite.com/how-to-create-pretty-permalinks/。
那是一个不错的子弹。它告诉用户该帖子的内容,对于搜索引擎来说,它包含“漂亮的永久链接”,这可能是您定位的关键字。
但是可以改进。
您的子弹应该足够长,可以包含您要定位的关键字,但又要足够短,以使用户能够记住,并且不要使搜索引擎上出现许多不必要的单词(这里介绍了如何在WordPress中创建SEO友好的永久链接)。
因此,发布一则名为“如何创建漂亮的永久链接”的文章可能会更好一些,让您获得yoursite.com/pretty-permalinks/。或者,如果您有很多关于永久链接的帖子,并且想给此帖子一个具体的提示,请使用create-pretty-permalinks,为您提供yoursite.com/create-pretty-permalinks。
或者,为了进一步发展,您可以通过添加“ WordPress”来进一步提高SEO:example.com/create-wordpress-pretty-permalinks。
当人们在搜索结果中查看您的链接时,您也不希望搜索结果太长而无法全部读取。当我在Google上搜索“ wordpress永久链接”时,从Kinsta博客中获得了以下两个结果。
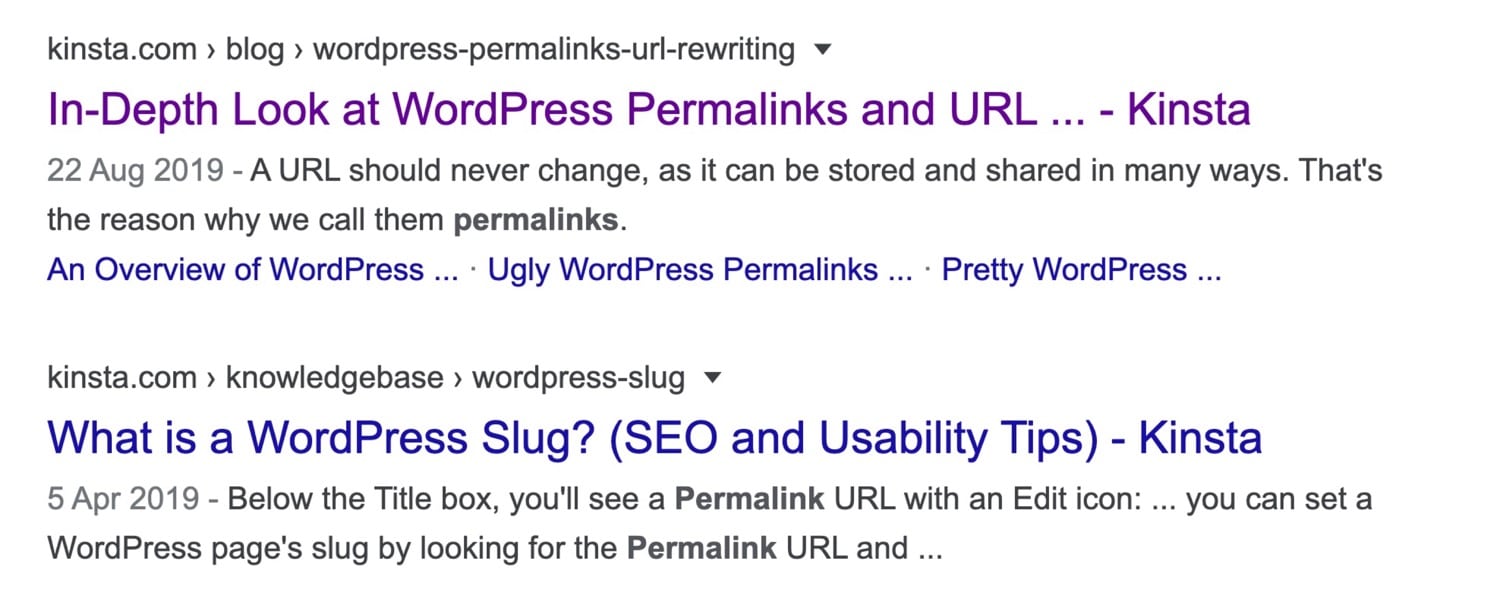
Google搜索结果– WordPress永久链接
两者均具有优化的弹头。第一个是wordpress-premalinks-url-rewriting,表明它的目标是这些关键字,第二个是wordpress-slug,它的重点更加突出。
这些不会浪费任何文字。他们告诉搜索引擎该帖子是关于什么的,仅此而已。
您可以先通过在“永久链接”设置屏幕中选择“帖子名称”,然后在撰写文章时手动编辑每个帖子的标签来优化SEO的标签。
永久链接,Slug和UX
使用漂亮的永久链接和使用简短而令人难忘的子弹也会为您带来UX好处。
根据Jacob Nielsen在1999年发布的文章,一个可用的网站要求:
- 一个易于记忆且易于拼写的域名。
- 短网址。
- 易于输入的网址。
- 可视化网站结构的URL。
- URL是“可入侵的”,允许用户通过砍掉URL的末尾来转移到更高级别的信息体系结构。
- 永久不变的网址。
URL永远不应更改,因为它可以通过多种方式存储和共享。这就是我们称其为永久链接的原因。此外,从对非专业用户立即直观的意义上来说,URL应该是语义的。
因此,虽然可以在发布后更改帖子的永久链接,但这不是一个好主意。这是因为原始永久链接可能已经共享。如果您需要更改它,请确保遵循WordPress重定向最佳做法。
如何在WordPress中更改固定链接设置
在WordPress中,您可以通过多种方式更改永久链接:
- 您可以编辑“永久链接”设置屏幕以打开漂亮的永久链接-在设置网站后应立即执行的操作。
- 您可以在“永久链接”屏幕中编辑标签和类别的永久链接结构。
- 您可以在创建和编辑单个帖子时编辑它们。
- 注册自定义帖子类型时,可以指定其链接的结构,选择使用默认值或替代默认值。
- 您可以编写一个插件来修改永久链接的结构方式。
- 您可以使用重定向获取指向新链接的过期永久链接。
让我们来看看这些。
使用WordPress,我们的流量增长了1,187%。
我们将向您展示如何。
加入20,000多个其他人,他们每周都会收到有关WordPress内部技巧的新闻!
现在订阅
成功!感谢您的订阅
您将在一周内收到下一期的Kinsta新闻通讯。
订阅Kinsta新闻通讯
订阅
我同意条款和条件以及隐私政策
编辑整体固定链接设置
永久链接设置屏幕是配置永久链接的第一个地方。通过设置>永久链接访问它。
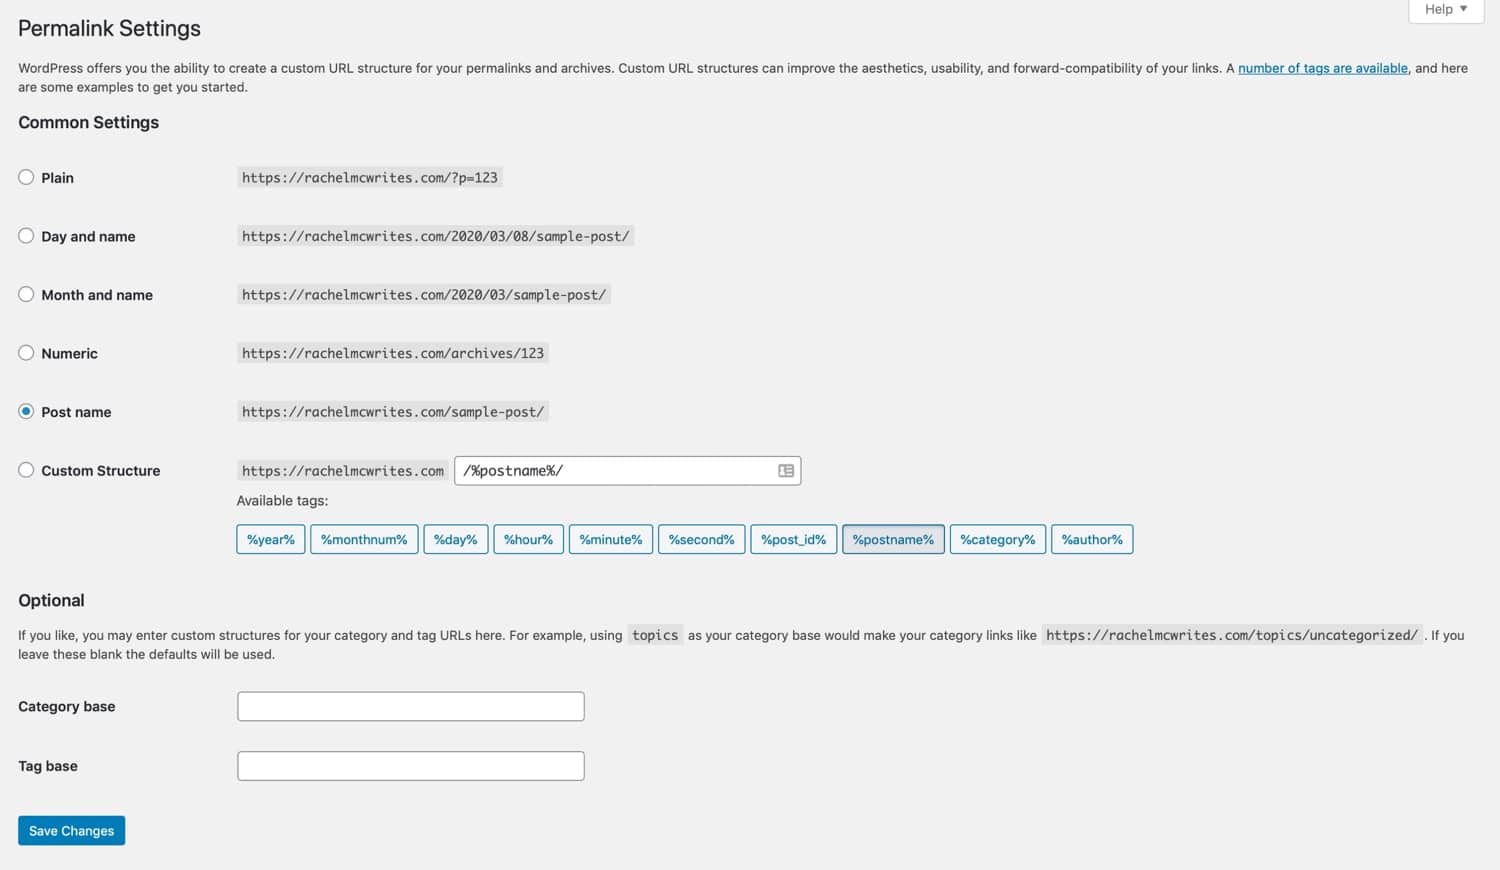
固定链接设置屏幕
常用设定
第一部分介绍单个帖子的设置。选项包括:
- 普通:将帖子ID用于链接。这对浏览器有意义,但对人类或搜索引擎而言意义不大。看起来像这样:example.com/?p=123。
- 日期和名称:包括发布日期的完整日期及其名称(或更准确地说,其子句)。看起来像这样:example.com/2020/06/01/my-post/。
- 月和名称:这是日期和名称的缩写,仅包含年份和年份,而不是日期:example.com/2020/06/my-post/。
- 数字:与普通选项一样,它使用帖子ID,并且对用户不太友好。 example.com/archives/123。
- 帖子名称:此选项不包含任何日期或帖子ID,而仅使用以下代码:example.com/my-post/。
- 自定义结构:您可以在此处创建自己的自定义结构。使用标签可根据帖子数据获取信息,并使用静态文本添加帖子之间不会更改的内容。
这些标签是包装在%字符中的特定关键字。 WordPress提供以下标签:
- %year%–发布后的年份(四位数)。
- %monthnum%–发布的月份(两位数字)。
- %day%–发布日期(两位数)。
- %hour%–发布的小时数(两位数)。
- %minute%–发布的分钟数(两位数字)。
- %second%–发布的秒数(两位数)。
- %post_id%–帖子唯一ID(整数)。
- %postname%-帖子标题(即表示帖子标题的经过净化处理的字符串)。
- %category%–类别标签。
- %author%–作者。
尝试检查“自定义结构”单选按钮,并将以下字符串之一添加到文本字段中:
- /%author%/%postname%/
- /%year%/%postname%/
- /%category%/%postname%/
这些字符串中的任何一个都会生成具有特定语义值的不同的漂亮永久链接,如下所示:
example.com/rachelmccollin/wordpress-permalinks/
example.com/2020/wordpress-permalinks/
example.com/CMS/wordpress-permalinks/
在第一个示例中,结果URL突出显示了帖子的作者。其他两种格式分别告诉我们出版的年份和职位的类别。选择最适合您的格式由您决定。
选择所需选项后,请转到“可选”部分,或单击“保存更改”以保存设置。
可选的永久链接设置
除了单个帖子的设置,“永久链接设置”屏幕还允许您为类别和标签档案设置自定义结构。
如果您不这样做,则默认为在永久链接的末尾包含/ category / category-slug /。因此,如果您的类别为“精选”,则其存档页面将位于yoursite.com/category/featured。
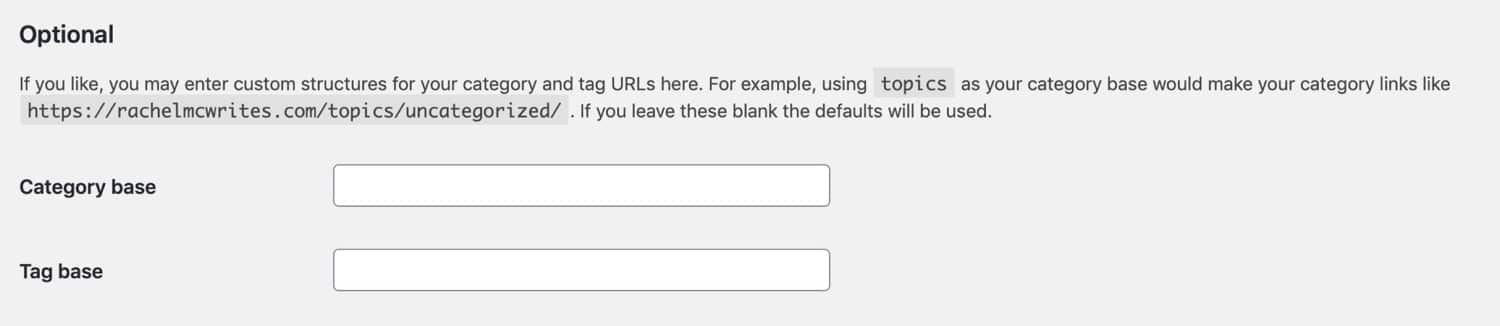
可选的永久链接设置
您可以在“永久链接”设置页的“可选”部分中对此进行修改。因此,如果您希望将yoursite.com/blog/featured/作为该类别存档的永久链接,则可以在“类别”基础字段中输入博客。您不必插入反斜杠或使用标签。
如何更改单个帖子和页面的永久链接和标签
在WordPress网站上激活漂亮的永久链接后,就该对单个帖子和页面进行优化了。
最好在创建内容时执行此操作。如果您更改帖子的内容,则将更改其使用的URL,并且您或您的访客过去共享的任何链接将不再起作用。
要编辑信息,请在该信息的信息编辑屏幕中进行。转到帖子,然后选择要编辑的帖子。 (如果您正在创建帖子,则已经在右侧屏幕上。)
在帖子编辑屏幕中,选择右侧的“文档”窗格,然后转到“永久链接”部分。如果尚未打开,请单击其右侧的箭头。

在帖子编辑屏幕中进行永久链接编辑
自动生成的Slug将显示在URL Slug字段中。您可以对其进行编辑,以使子弹更短,更集中。
在编辑它之前,请将旧的块复制到某个地方,以便以后需要设置重定向时可以使用它(这仅适用于以前发布的帖子)。
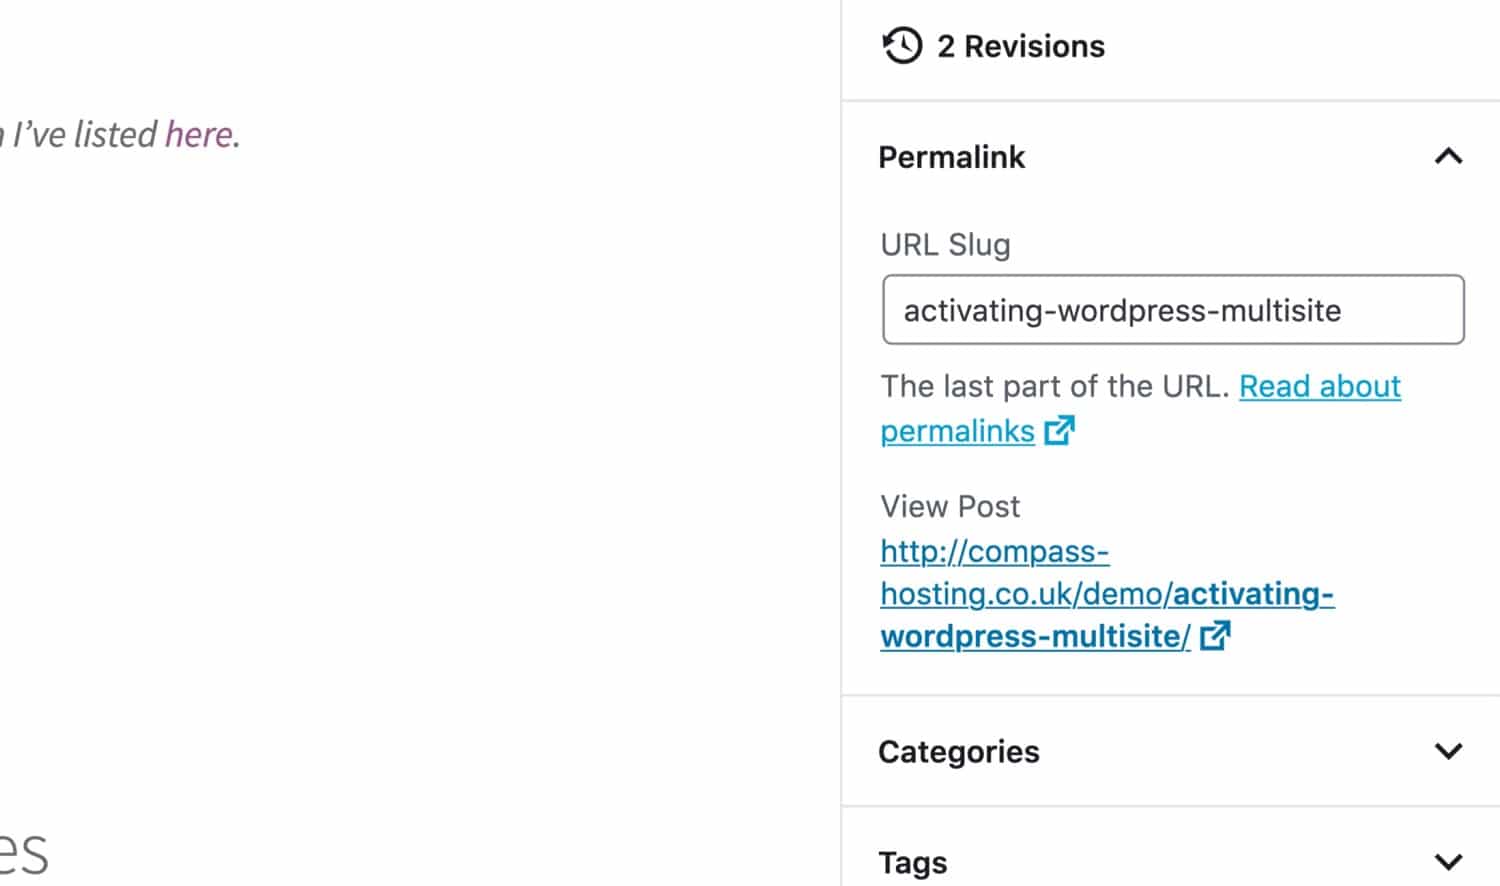
子弹头
现在,单击“发布”或“更新”按钮以保存更改。
别忘了:如果您为现有帖子编辑了标签,则可能会对拥有原始链接并应使用重定向的用户造成麻烦。
如何更改存档页面的永久链接设置
要更改单个存档页面的永久链接设置,您可以在“永久链接”设置屏幕中编辑“类别”或“标签”库的设置。您还可以更改单个类别,标签或自定义分类法的标记。
让我们看一下您的操作方法,然后继续编辑自定义分类法的永久链接,并在注册时输入文章类型。
更改类别和标签的子弹
为此,请转到帖子>类别(或帖子>标签)。
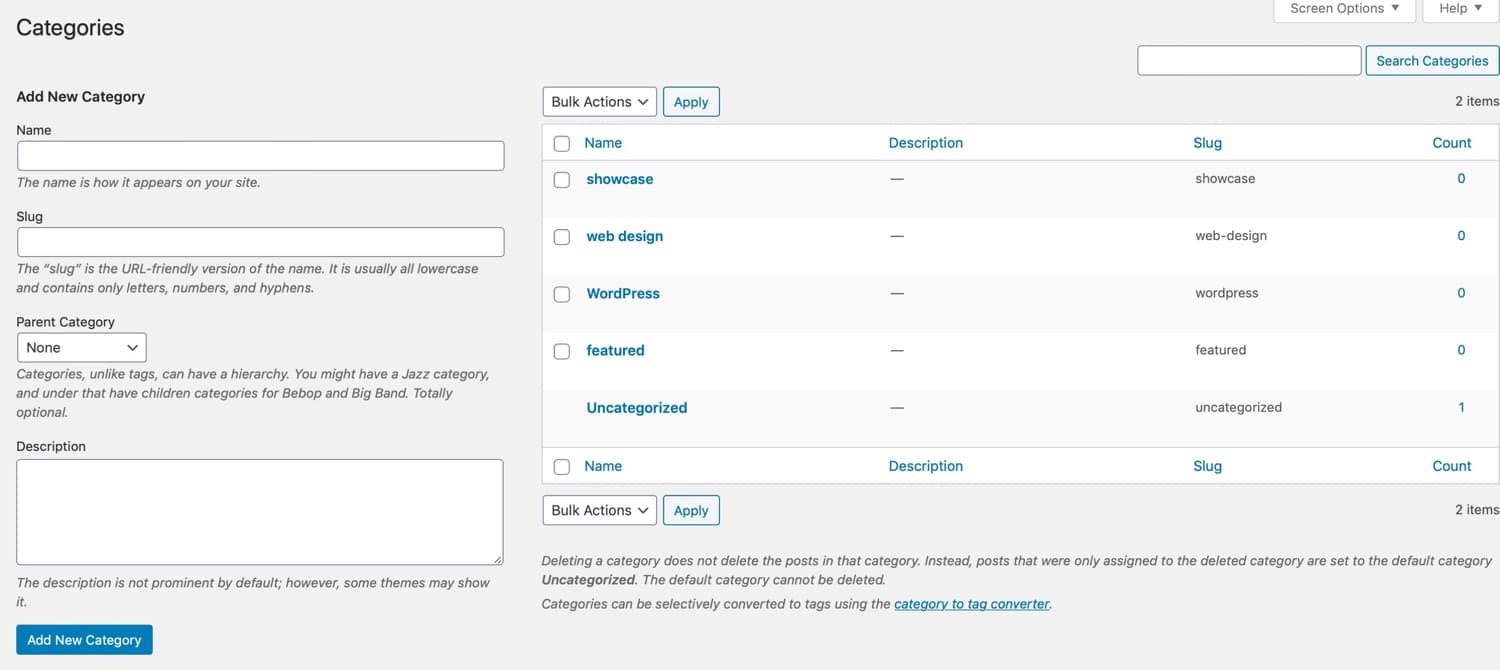
类别编辑画面
找到您要编辑其类别的类别或标签,然后单击其名称。
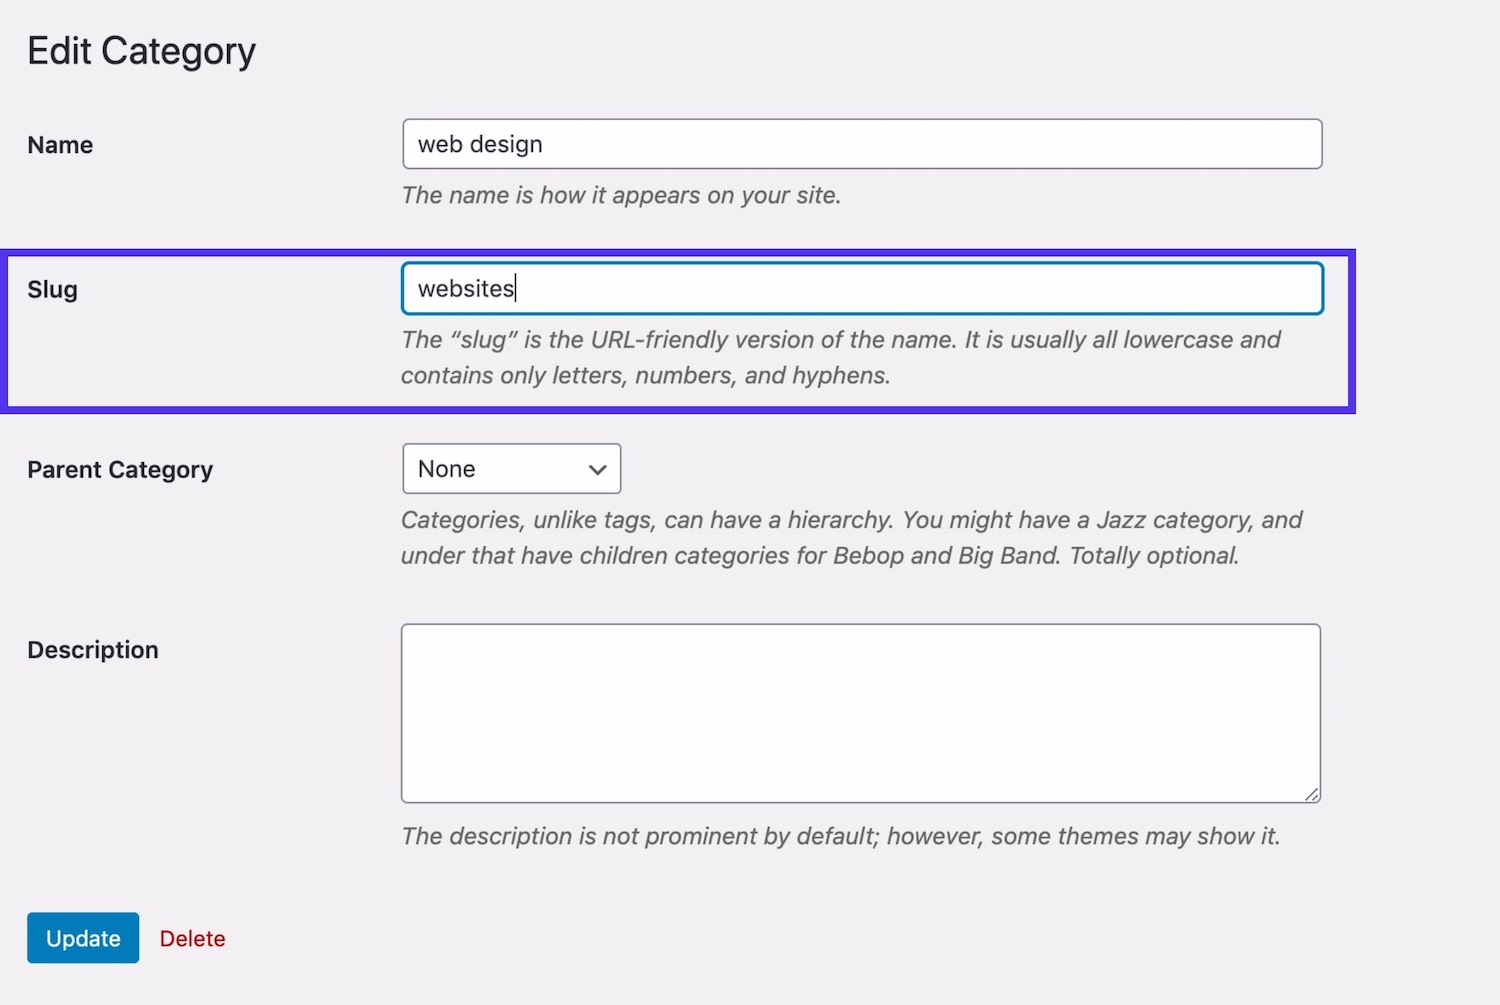
编辑类别标签
然后,您可以输入类别或标签的标签。 WordPress会根据类别或标签的名称自动生成一个,但您不必保留它。与帖子一样,在设置类别或标签时也可以这样做。如果以后再做,则需要设置重定向。
如果您设置了一种自定义分类法,或者是由插件创建的,则可以按照完全相同的方式来编辑该分类法中各个术语的标签。但是,如果您要为分类法本身编辑子弹,则需要编辑一些代码。
更改自定义分类法的子弹
当您注册定制分类法时,该分类法的存档页面将自动具有yoursite.com/taxonomy/term的URL,其中分类法是分类法ID,术语是术语slug。
假设您为ID为kinsta_language的语言注册了自定义分类法,该分类法使用前缀来确保与其他插件注册的任何其他分类法不同。然后,您可能会用法语创建一个术语。
该分类术语的存档的URL为yoursite.com/kinsta_language/french。
但是,如果您想更改它以使其不包含该前缀并且更加用户友好,该怎么办?注册分类法时,可以使用rewrite参数执行此操作。
这是用于注册分类法的代码,包括rewrite参数。
函数kinsta_register_taxonomy(){
//语言
$ labels =数组(
‘name’=> __(’Languages’),
‘singular_name’=> __(’Language’),
‘search_items’=> __(’Search Languages’),
‘all_items’=> __(’All Languages’),
‘edit_item’=> __(’Edit Languages’),
‘update_item’=> __(’更新语言’),
‘add_new_item’=> __(’添加新语言’),
‘new_item_name’=> __(’新语言名称’),
‘menu_name’=> __(’Languages’),
);
$ args =数组(
‘标签’=> $ labels,
‘hierarchical’=>是,
‘sort’=>是,
‘args’=> array(’orderby’=>’term_order’),
‘rewrite’=> array(’slug’=>’language’),
‘show_admin_column’=>是,
‘show_in_rest’=>是
);
register_taxonomy(’kinsta_language’,array(’post’,’attachment’),$ args);
}
add_action(’init’,’kinsta_register_taxonomy’);
该代码中的重要一行是这一行:
‘rewrite’=> array(’slug’=>’language’),
这会将该段从kinsta_language(ID)重写为语言(新值)。因此,您的新URL为yoursite.com/language/french。更人性化!
如何更改自定义帖子类型的子弹
自定义帖子类型的注册方式与自定义分类法相同,因此它们的URL包含自定义帖子类型的ID。
想象一下,您注册了一个名为kinsta_book的自定义帖子类型,并创建了一个名为“Huckleberry Finn”的帖子类型,其中包含一束huckleberry-finn。
该网址为yoursite.com/kinsta_book/huckleberry-finn。帖子类型存档的条目将是yoursite.com/kinsta_book。
同样,您可以在注册自定义帖子类型时使用rewrite参数更改此设置。同样,这是包含该参数的代码:
函数kinsta_register_post_type(){
//书籍
$ labels =数组(
‘名称’=> __(’书籍’),
‘singular_name’=> __(’Book’),
‘add_new’=> __(’New Book’),
‘add_new_item’=> __(’添加新书’),
‘edit_item’=> __(’Edit Book’),
‘new_item’=> __(’New Book’),
‘view_item’=> __(’View Book’),
‘search_items’=> __(’Search Books’),
‘not_found’=> __(’No Books Found’),
‘not_found_in_trash’=> __(’在垃圾箱中没有找到书’),
);
$ args =数组(
‘标签’=> $ labels,
‘has_archive’=>是,
‘public’=>是,
‘hierarchical’=>否,
‘支持’=>数组(
‘标题’,
‘编辑’,
‘摘抄’,
“自定义字段”,
“缩略图”,
“页面属性”
),
‘taxonomies’=> array(’kinsta_language’,’category’),
‘rewrite’=>数组(’slug’=>’book’)
);
register_post_type(’kinsta_book’,$ args);
}
add_action(’init’,’kinsta_register_post_type’);
子弹的重要一行是这一行:
‘rewrite’=>数组(’slug’=>’book’)
因此,现在一本单独的书的URL将是yoursite.com/book/huckleberry-finn,而该档案库的URL将是yoursite.com/book。
信息
谈论书籍……您是否已经检查过Kinsta的电子书部分?它们是免费下载的,并且包含所有可行的提示!
使用自定义字段编辑永久链接
除了公共和私有查询变量外,WordPress还允许开发人员和高级用户定义自己的自定义查询变量。一旦注册,这些变量就可以像公共查询变量一样添加到查询字符串中,并且它们的值也可以用于影响查询。
以下是利用自定义查询变量创建自定义元查询(即通过自定义字段检索帖子的查询)的方法。
为了实现此目标,我们将开发一个插件,通过该插件我们可以注册自定义变量,获取它们的值并相应地更改查询。
就是这样…
在wp-content / plugins目录中创建一个插件。添加一个函数来注册查询变量:
/ **
*注册自定义查询变量
*
* @param array $ vars可用查询变量的数组
* /
函数myplugin_register_query_vars($ vars){
$ vars[] =’城市’;
返回$ vars;
}
add_filter(’query_vars’,’myplugin_register_query_vars’);
使用query_vars过滤器,您可以在执行查询之前添加,删除或更改公共查询var。示例中的回调函数将可用变量的数组存储为参数,以添加新变量并返回相同的数组。
接下来,添加此函数,该函数使用变量的值来更改查询:
/ **
*建立自定义查询
*
* @param $ query obj WP_Query实例(通过引用传递)
*
* /
函数myplugin_pre_get_posts($ query){
//检查用户是否正在请求管理页面
//或当前查询不是主要查询
如果(is_admin()||!$ query-> is_main_query()){
返回;
}
$ city = get_query_var(’city’);
//添加meta_query元素
if(!empty($ city)){
$ query-> set(’meta_key’,’city’);
$ query-> set(’meta_value’,$ city);
$ query-> set(’meta_compare’,’LIKE’);
}
}
add_action(’pre_get_posts’,’myplugin_pre_get_posts’,1);
在创建查询之后但在执行查询之前,会触发pre_get_posts操作挂钩。因此,我们可以将回调函数连接到该操作,以在查询运行之前对其进行更改。就是这样:
- 回调函数保留$ query对象的实例,该实例通过引用而不是通过值传递。这意味着对查询对象的任何更改都会影响原始查询,而不是原始副本。因此,我们必须确定要执行哪个查询(主查询)。
- 稍后,借助get_query_var函数,我们可以从当前查询字符串中获取城市值。
- 最后,如果$ city不为空,我们可以设置元查询元素meta_key,meta_value和meta_compare。后者是私有查询变量,不适用于公共请求。它们的值只能在脚本中设置。
现在激活插件,将城市自定义字段添加到许多帖子中。转到“设置”>“永久链接”以刷新永久链接,实际上您无需执行任何操作;只需访问屏幕就足够了。
现在检查如下URL:
https://example.com/?city=伦敦
响应此请求,WordPress将返回城市字段值为伦敦的所有帖子。
我们的最后一个任务是以漂亮的永久链接结构转换上面示例的丑陋URL。让我们在插件中添加以下功能:
/ **
*添加重写标签和规则
* /
函数myplugin_rewrite_tag_rule(){
add_rewrite_tag(’%city%’,’([^&]+)’);
add_rewrite_rule(’^ city /([^/]*)/?’,’index.php?city = $ matches[1]’,’最佳’ );
}
add_action(’init’,’myplugin_rewrite_tag_rule’,10,0);
add_rewrite_tag和add_rewrite_rule函数是重写API的一部分。 add_rewrite_tag使WordPress知道城市查询变量,而add_rewrite_rule指定新的重写规则。这两个函数都应该与init操作挂钩。由于有了新的标记和规则,我们可以使用以下URL:
https://example.com/city/伦敦/
WordPress将返回帖子的档案,其中城市自定义字段值为伦敦。
注意:每当添加新的重写规则时,都必须从“设置”管理菜单下的“永久链接”屏幕刷新WordPress永久链接。
如何在WooCommerce中更改永久链接
WooCommerce创建自己的自定义帖子类型和分类,所有这些都有由插件定义的默认永久链接。
您可以为所有这些编辑永久链接设置和段。
更改产品类别,标签和属性永久链接
编辑产品类别,标签和属性的永久链接有两个方面:结构和弹头。它们的工作方式与常规类别和标签类似。
要编辑永久链接结构,请转到“设置”>“永久链接”,然后找到“可选”部分,WooCommerce将在其中添加一些其他字段。
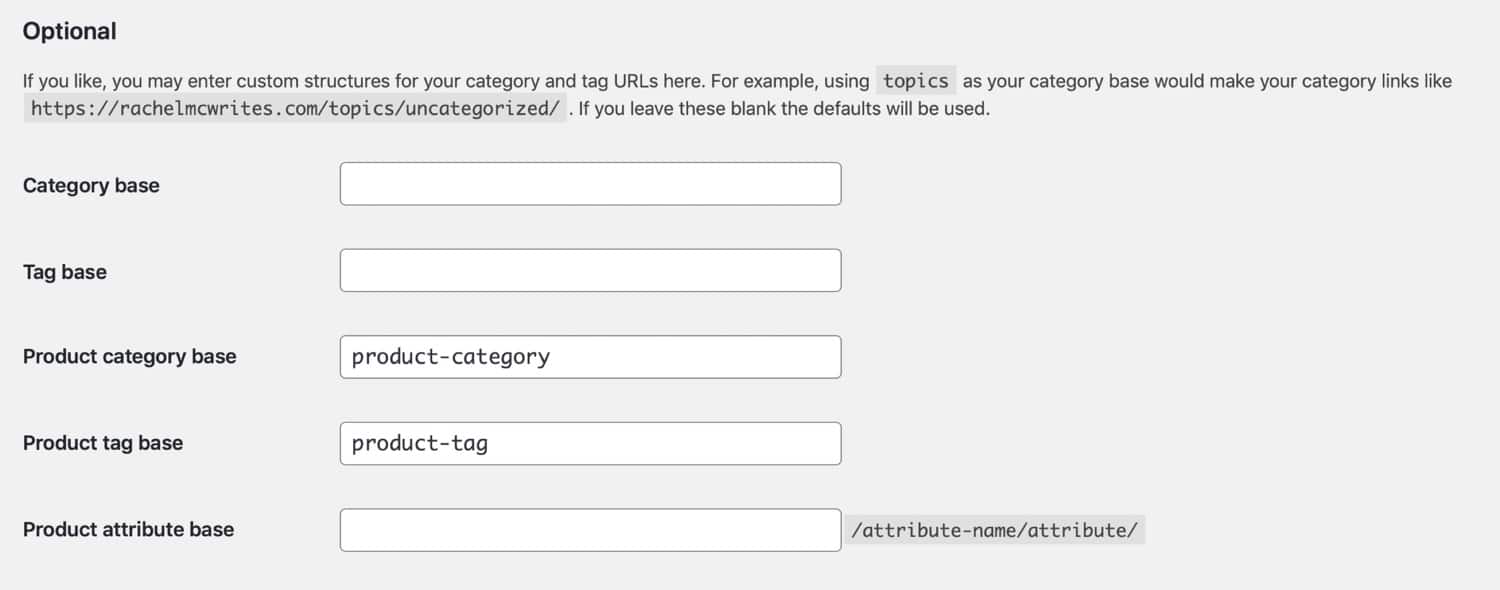
安装了WooCommerce的可选永久链接设置
在这里,您可以编辑WooCommerce添加的三个自定义分类法的永久链接设置:
- 产品类别:默认为/ product-category /,但是如果您在商店中使用其他术语,则可以对其进行修改。确保所做的更改不会与常规类别的设置冲突,因为常规类别的设置不是同一回事。
- 产品标签:默认为/ product-tag /,您可以根据需要进行更改。确保避免与常规帖子标签发生冲突。
- 产品属性:它们的工作方式不同于其他两个分类法,并且具有不同的结构。无论您在此处添加的内容如何,都将始终跟随各个属性名称(例如大小)和属性本身(例如术语“大”)的标记。
如果要编辑单个类别或标签的段,请转到“产品”>“类别”(或“产品”>“标签”),然后以与发布标签和类别相同的方式进行编辑。

产品类别标签编辑
编辑属性是不同的,因为您不仅具有属性本身,而且具有属性术语。
首先转到产品>属性。
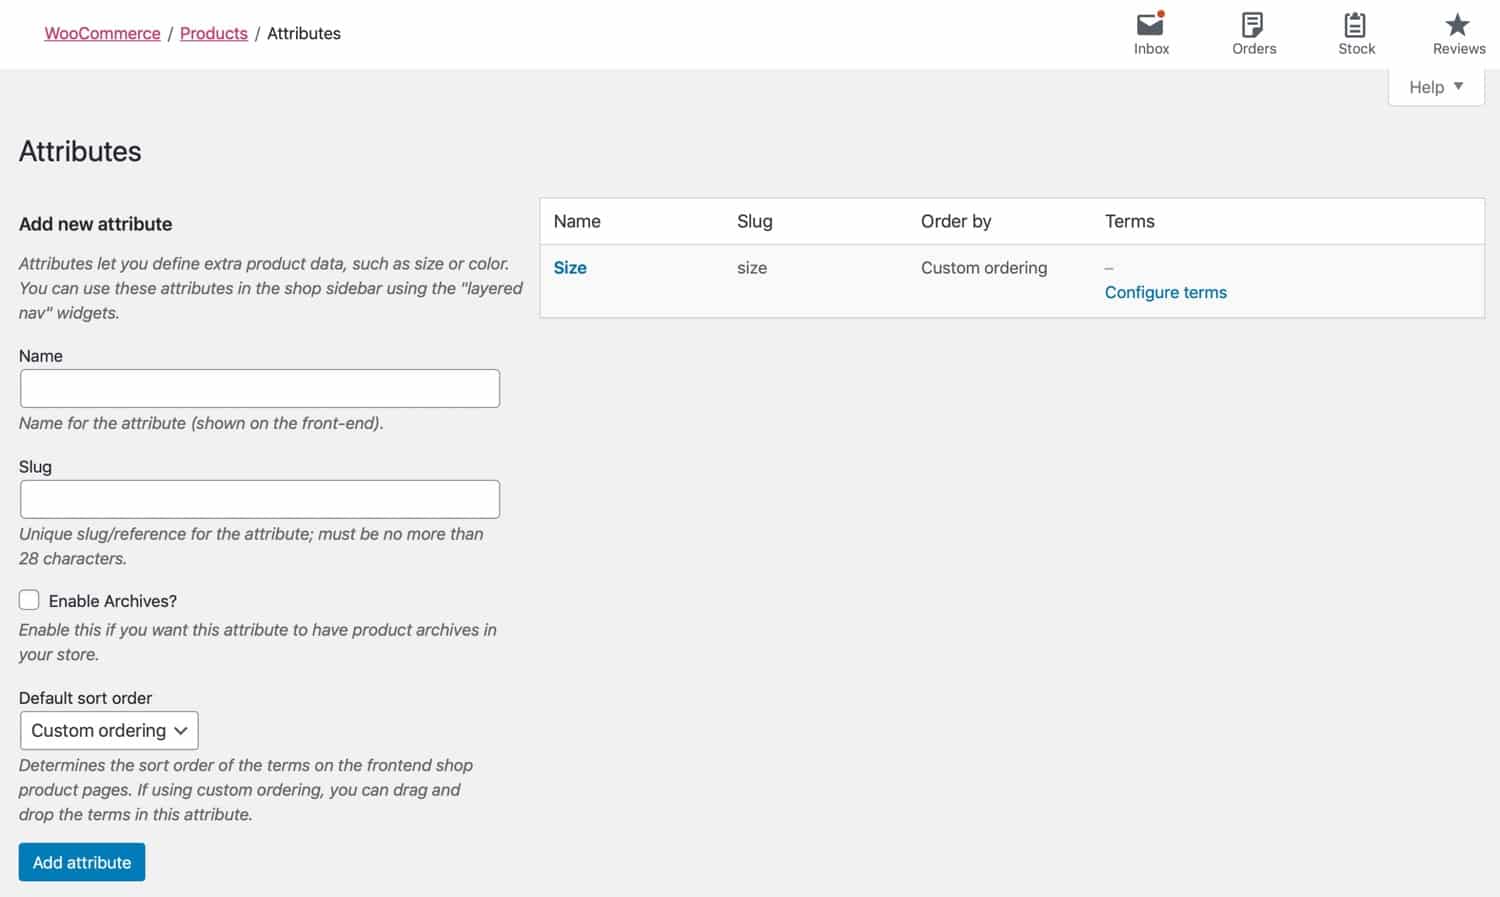
产品属性屏幕
创建新属性时,可以使用“子弹”字段以与标记或类别相同的方式设置子弹。或者,要编辑现有属性的段,请在右侧列表中单击该属性下方的“编辑”链接。
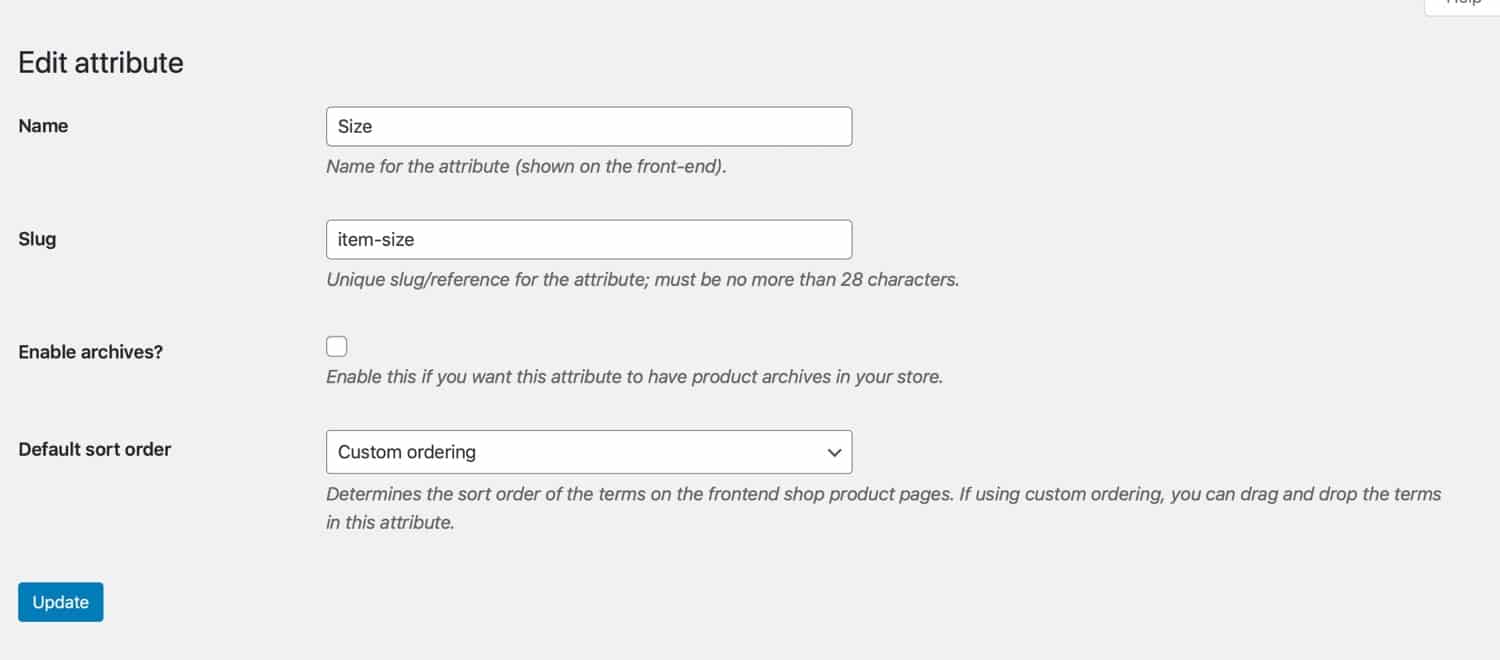
编辑产品属性段
单击更新以保存您的更改。
要编辑属性词条,请转到属性屏幕,然后单击属性旁边的“配置条件”链接。这将带您到该属性的术语列表。
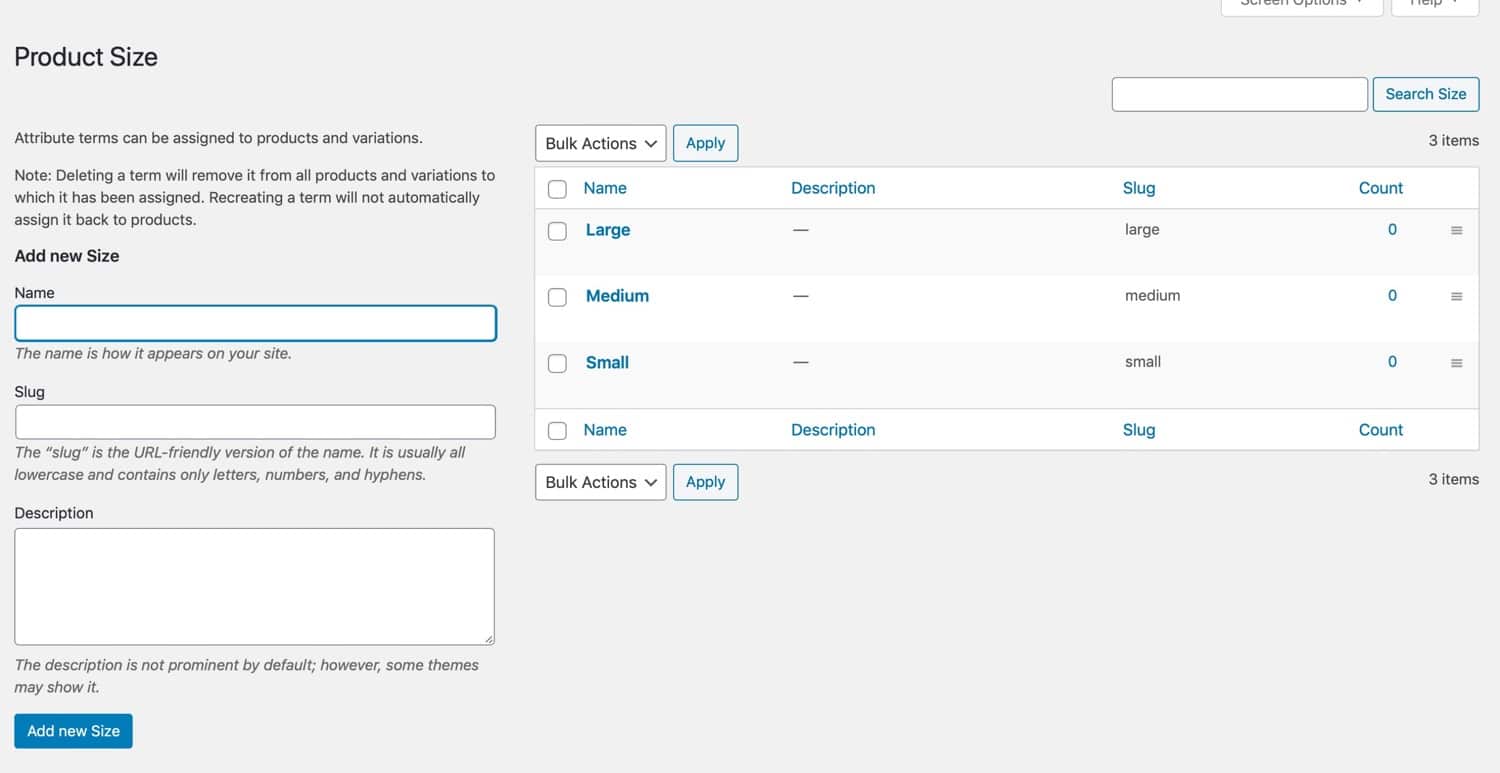
产品属性条款列表
现在,就像编辑类别或标签一样,编辑该词条。然后,将其添加到具有该术语的产品的存档URL中。
是否需要为您的新网站提供快速,可靠且完全安全的托管服务? Kinsta提供了所有这些以及WordPress专家提供的24/7世界一流的支持。查看我们的计划
更改产品永久链接
您可以通过“设置”>“永久链接”来编辑产品永久链接。向下滚动到产品永久链接部分。

产品永久链接设置
在这里,您可以从产品的四个永久链接设置中进行选择:
- 默认值:如果您已经激活了漂亮的永久链接,则将每个产品的标签与/ product /一起使用。
- 店铺:您的商店将使用/ shop /,而不是使用/ product /。
- 带有类别的商店:将当前产品的类别插入URL。如果您的产品类别反映了这些关键字,则可能会添加您要定位的关键字,但由于它会创建长网址,因此对用户体验没有帮助。
- 自定义基础:使用适用于您商店的字词创建您自己的URL结构。您无法完全移除底座,必须使用某些物品。
Once you’ve chosen the option you want, click the Save Changes button to save your choice.
You can also edit the slug for an individual product in the product editing screen, in exactly the same way you would for a post or page.
How to Change WordPress Permalinks With a Plugin
You can use a third party plugin to make amendments to your permalink settings over and above what the default WordPress Permalinks settings screen lets you do.
Custom Permalinks WordPres plugin
- The Custom Permalinks plugin lets you set the URL of any post category or tag to whatever you want. It also sets up redirects so the old URLs will still work.
- The Permalink Manager Lite plugin supports custom post types as well as custom taxonomies in the pro version. It also includes redirects and works with third-party plugins such as WooCommerce and Yoast.
How to Change WordPress Permalinks in phpMyAdmin
If you know what you’re doing and are sure you won’t break anything, you can also edit permalinks in phpMyAdmin.
This is something you might need to do if you can’t access the Permalinks settings screen for any reason.
Start by backing up your database. You’re going to be directly editing it so it’s important to back up in case you make a mistake.
Access phpMyAdmin.
If you’re a Kinsta customer, you do this by logging in to MyKinsta and then selecting the site you want to work with.
Scroll down in the Info screen and click the Open phpMyAdmin button.
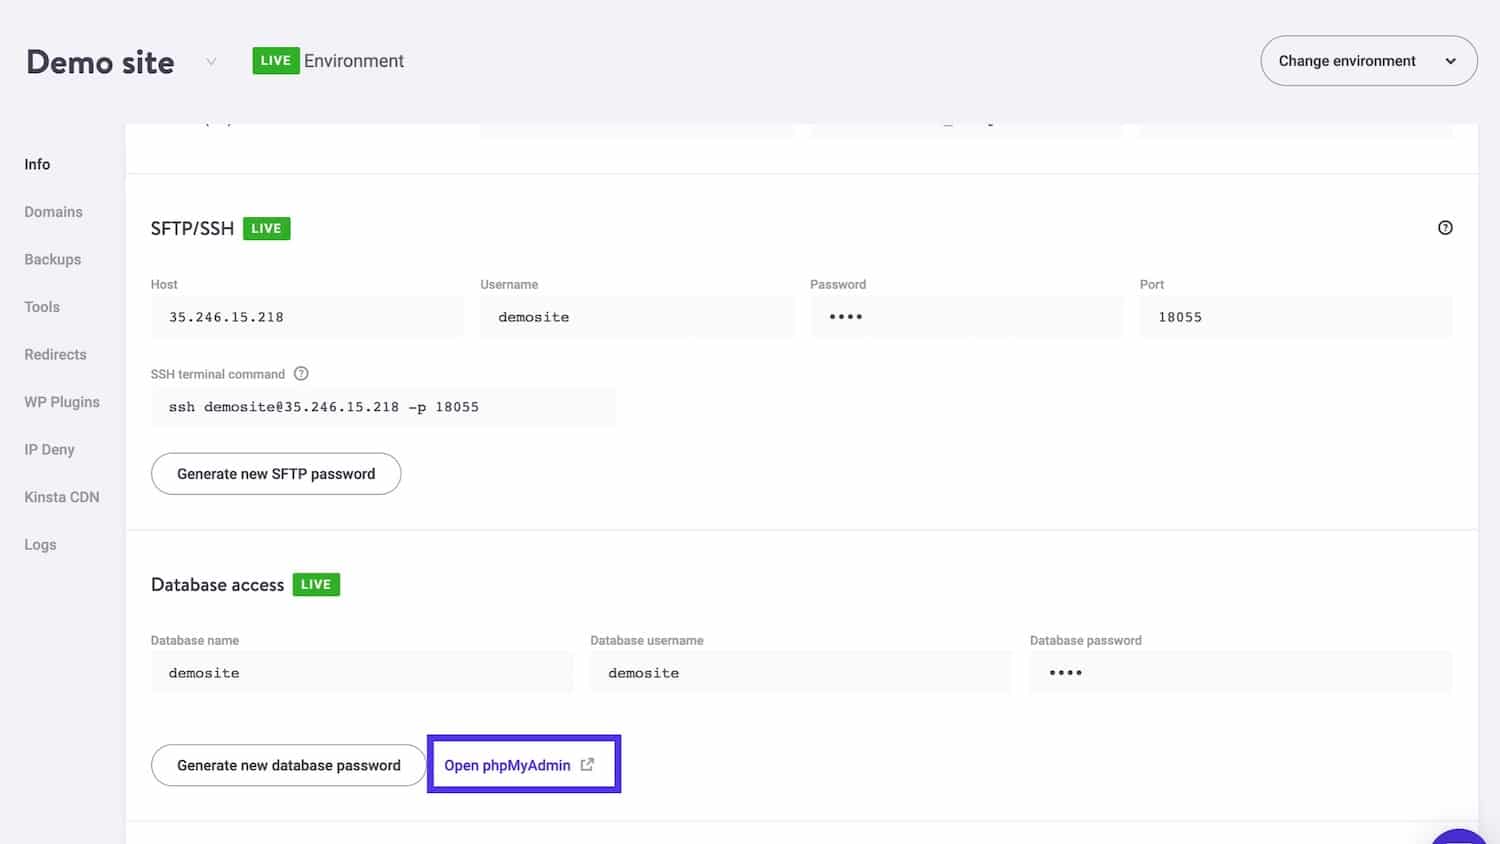
Open phpMyAdmin in MyKinsta
Type in your database username and password to access phpMyAdmin. You can retrieve these from the Info screen.
Click on the Databases tab at the top and then select the database you want to work with.

Database structure in phpMyAdmin
Select the wp_options table and find the permalink_structure entry in the option_name column. You might need to navigate beyond the first page of entries.
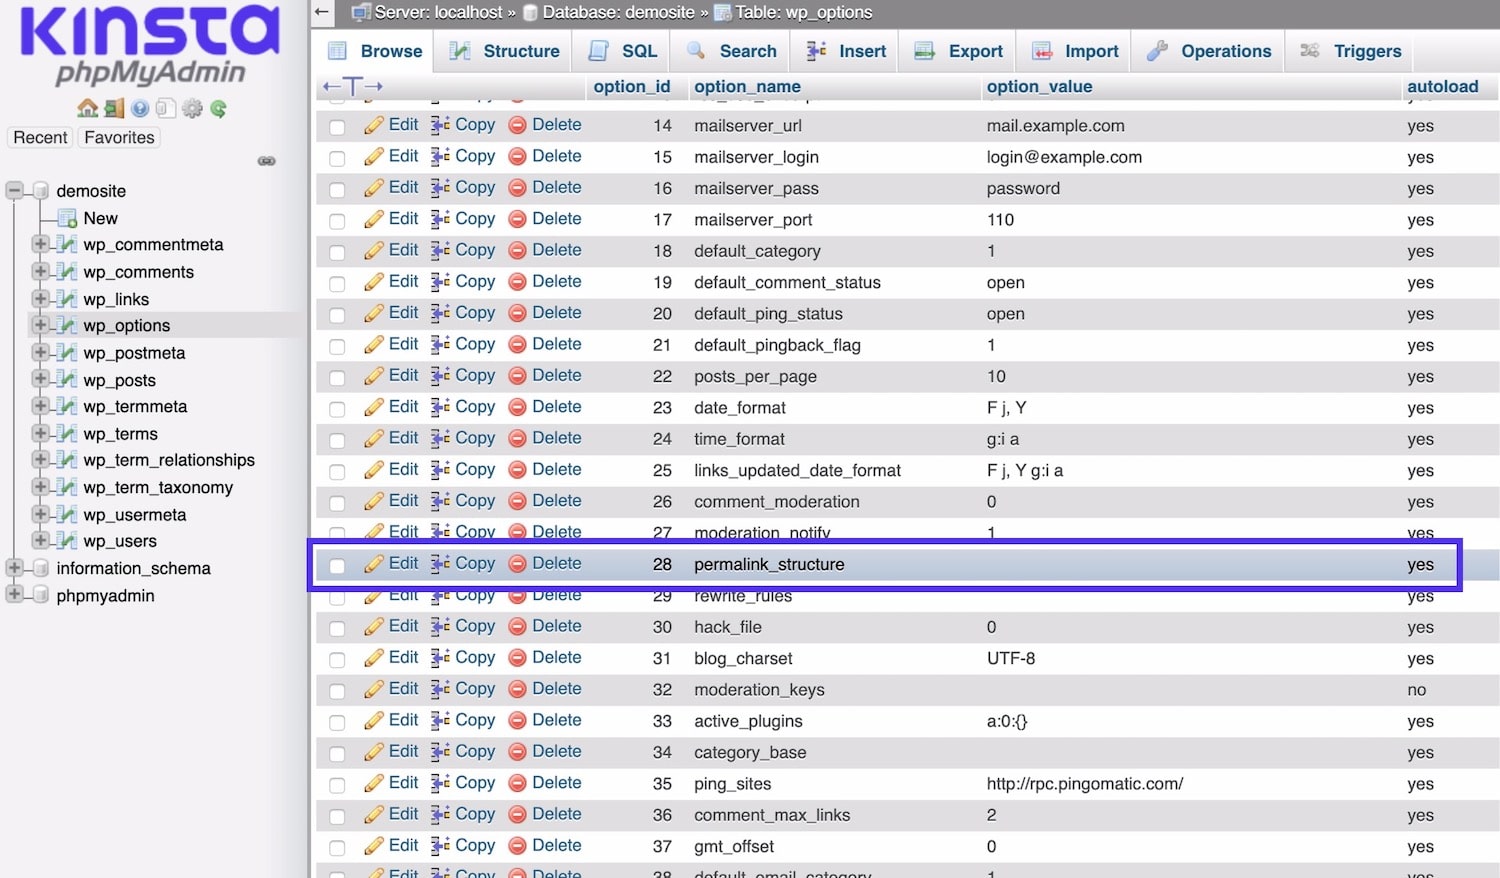
Finding the permalink_structure entry
Click the Edit link on the left for that entry then under the option_value field, add the permalink structure that you want to use. Use the tags that we identified earlier for use in the Permalinks settings screen.
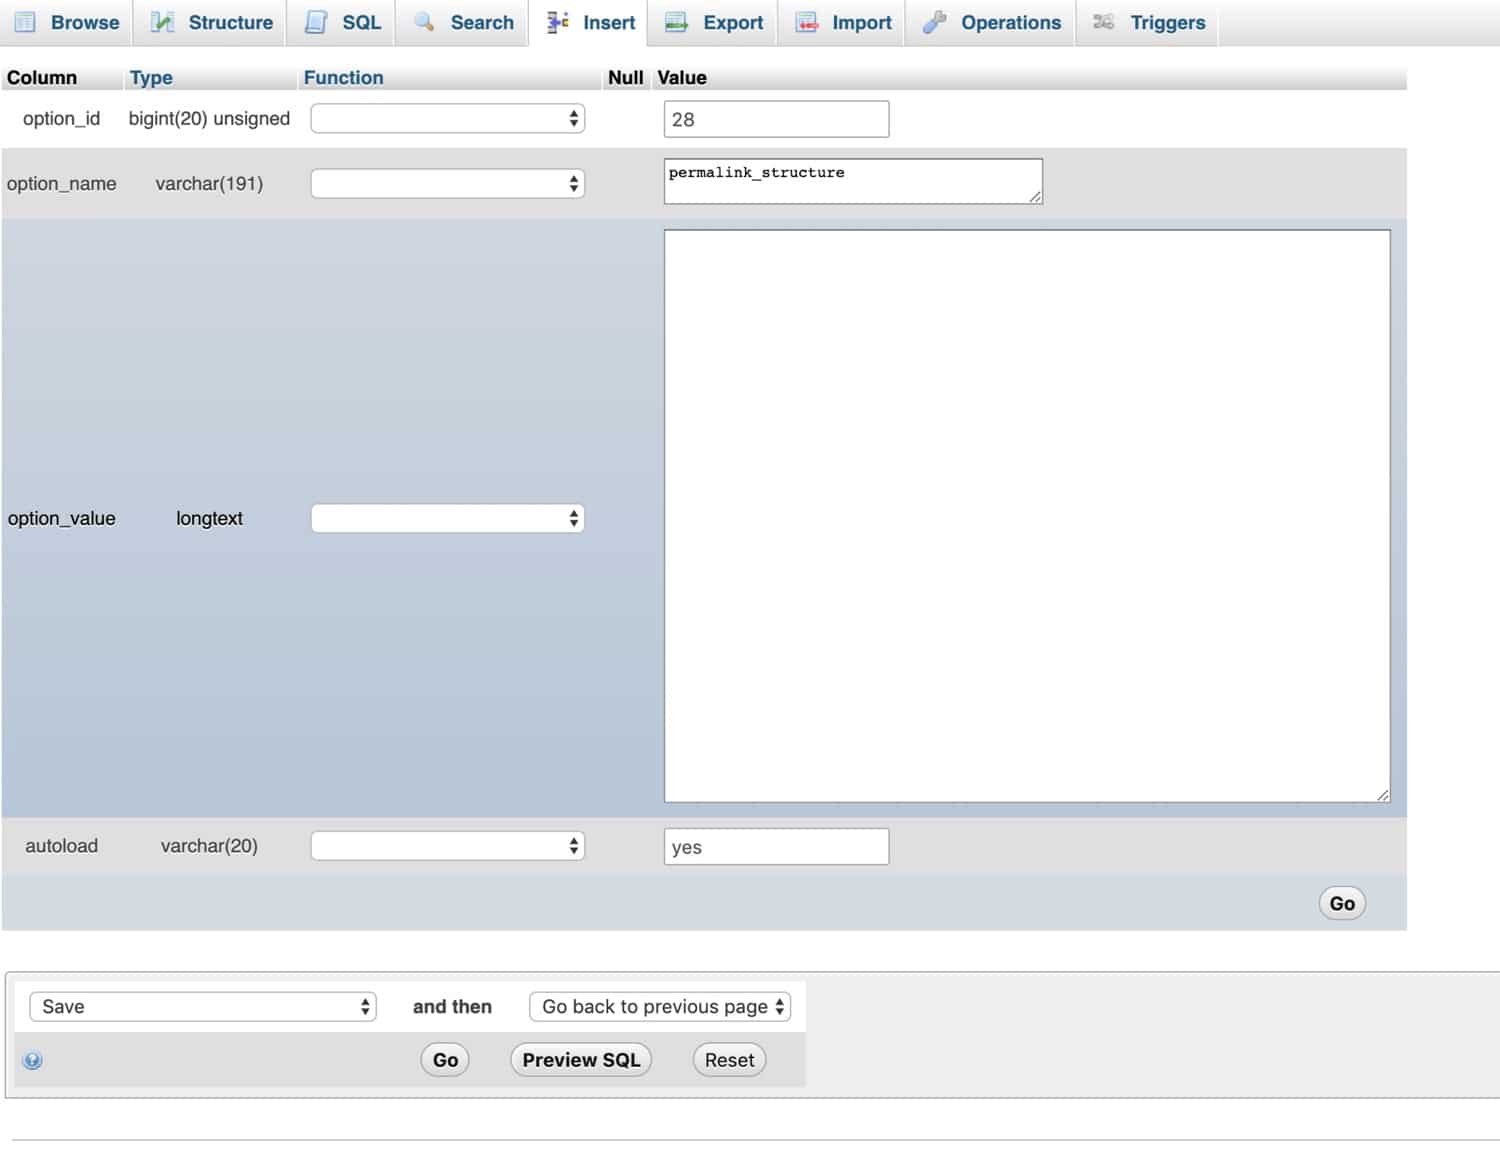
Editing the permalink structure
Click Go. Now your permalinks will be updated.
Working with Image Permalinks
Images have permalinks all of their own, and each image or media file you upload to your site will have a number of links created for it:
- The link to the image you uploaded – the original image.
- Links for the new images that are generated using the media sizes you set via Settings > Media.
The Link to the Original Image
When you upload an image, a unique link will be created to the file where it is stored on your server. This will include the path to where it is kept, which is wp-content/uploads.
It will also include the date in which you uploaded the image. This means that if you upload another image with the same file name next month (or next year), the images won’t be confused as they’ll have unique file paths.
If you upload an image called funnycat.jpg on 1 April 2020, its link will be yoursite.com/wp-content/uploads/04/funnycat.jpg. The 04 indicates that the file was uploaded in April. WordPress creates a numbered folder in the uploads directory for each month.
If you uploaded a file that wasn’t an image, the URL would work in the same way: yoursite.com/wp-content/uploads/04/document.pdf.
If you upload more than one file with the same name in a given month, WordPress will append a number to the end of the file name. So if I upload another image called funnycat.jpg, it will call it funnycat-1.jpg.
If you ever need to link to the original image or find it to check it’s working correctly, this is how you find the link.
You can also find the link to the attachment file by going to Media > Library and clicking on the file. The editing screen will be displayed for that file and you can find its URL in the File URL field on the right-hand side.
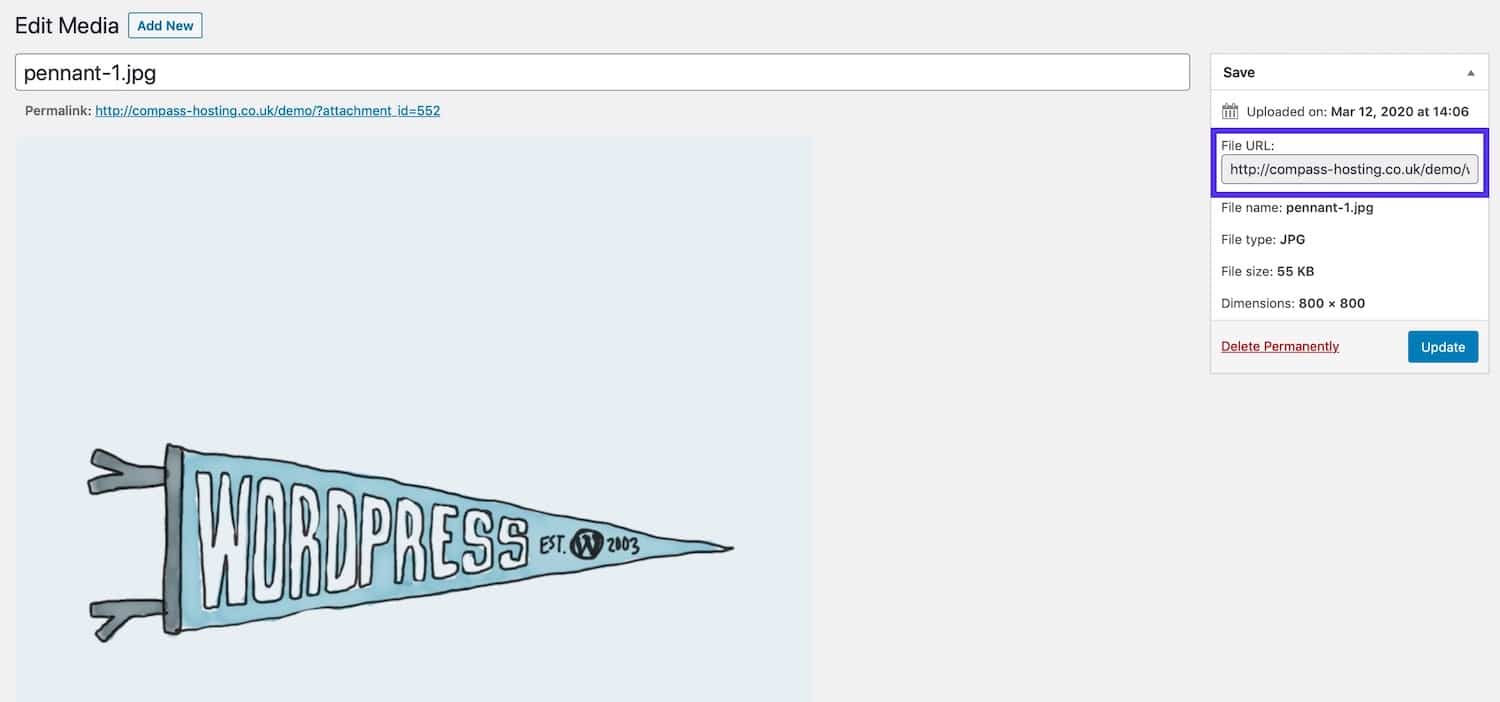
Original image link
You can also link to the file using the wp_get_attachment_image() function provided by WordPress. This is a better practice as it means the link won’t change if the attachment is moved in the future. This is a function you would use in a plugin or a theme template file, and it uses the unique ID of the attachment file.
In the case of my funnycat.jpg image, the ID is 4995. I can get this by going to the image editing screen and clicking on the URL for this screen at the top of the browser window. The final digits will be the ID.
To fetch this image in a template file or plugin, I would use this code:
This would fetch the full-size image. If I wanted to output it I would add echo:
Permalinks to Different Sized Images
WordPress will also create images using the file size settings that have been configured for your site. You do this by going to Settings > Media.
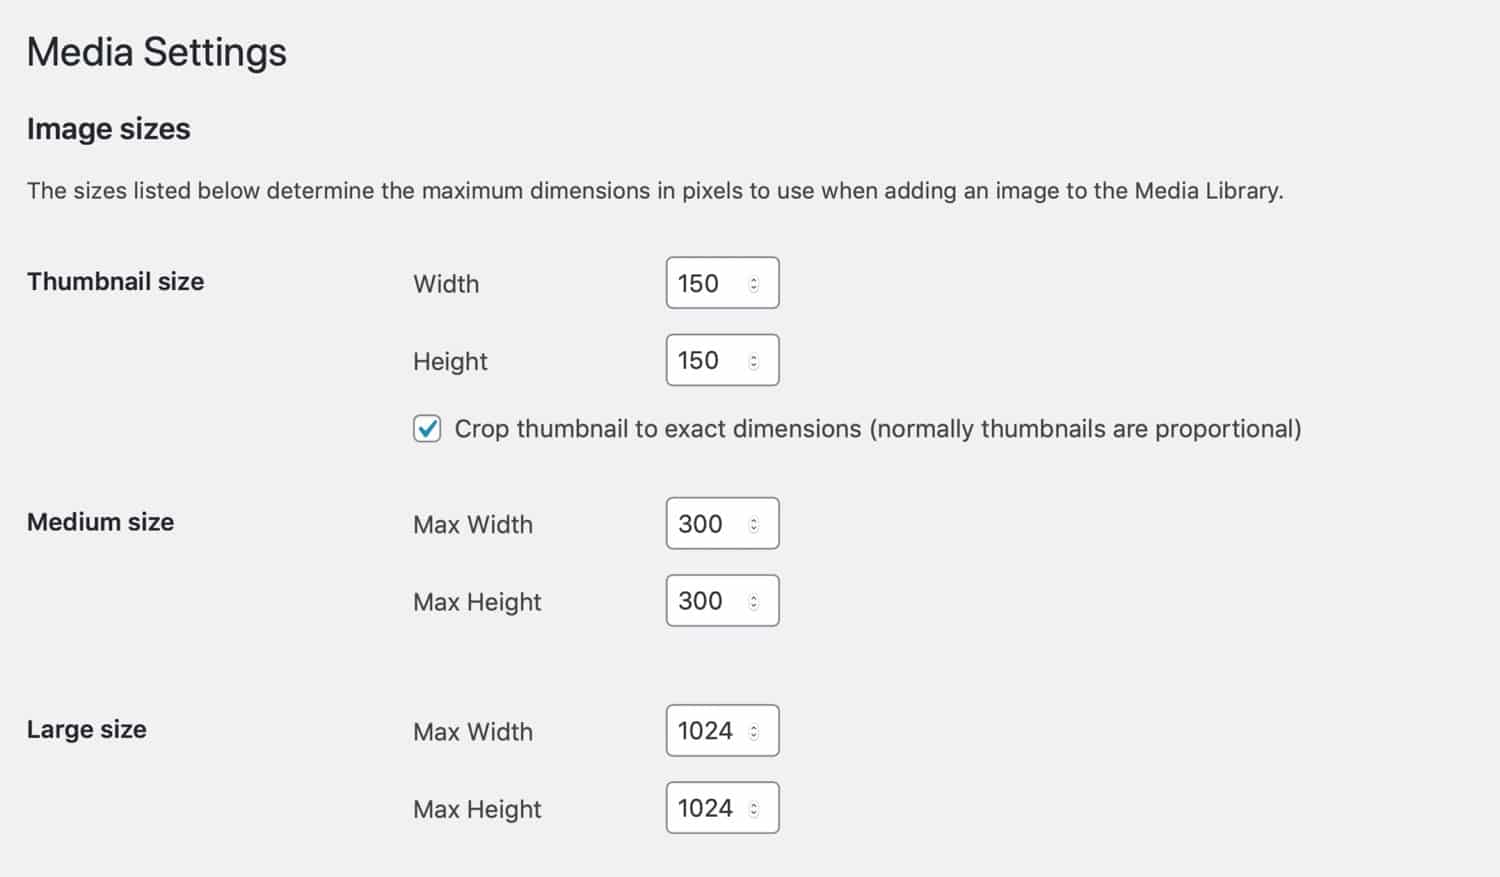
Media settings screen
So if your image is already bigger than the large setting, it will create three images – large, medium, and thumbnail.
It doesn’t name them using these conventions because you might change the setting for those in the future. Instead, it uses the dimensions of the file within the filename and saves them to the same place as the original image, in the month folder in wp-content/uploads.
The easiest way to find the links is to look at your FTP client and find all of the images uploaded in a given month.
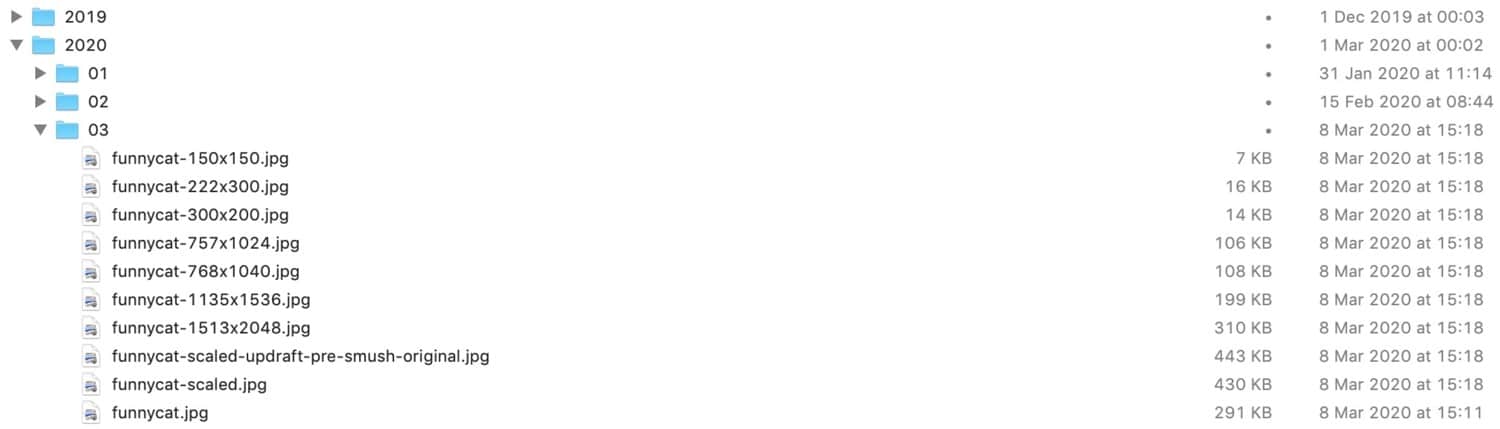
Uploaded images in FTP client
Let’s take the image I’ve uploaded to my site called funnycat.jpg. You can see it in the screenshot above.
WordPress has also created extra files using the file size settings for my site:
- funnycat-150×150.jpg
- funnycat-222×300.jpg
- funnycat-300×200.jpg
- funnycat-757×1024.jpg
- funnycat-768×1040.jpg
- funnycat-1135×1536.jpg
- funnycat-1513×2048.jpg
There are more than the standard ones there because I’m using plugins that make use of extra image sizes and have set an additional custom size for one of my page templates in the theme. But you could use the link to any of these as a hard link if you wanted to.
However a better option if you wanted to link to the image, would be to use the wp_get_attachment_image() function we’ve already looked at, and add an extra parameter for the image size.
So to output the medium-sized image, you would use this:
That’s a much more robust way of fetching the image than creating a hard link in your code.
How to Redirect Permalinks for Different Content Types
Editing the slug for an existing post, or changing the permalink settings overall, might cause a problem if you’ve previously shared posts using the old links. If someone then clicks on those links, they’ll be taken to a 404 page.
You can fix this by creating redirects from the old links to the new ones.
Redirecting Individual Posts and Pages
To redirect the old slug from a post to the new one, you’ll need to set up a redirect rule for those two URLs.
If you’re with Kinsta, you can create redirect rules in the MyKinsta dashboard.
Find your site, and then click the Redirects option in the menu.
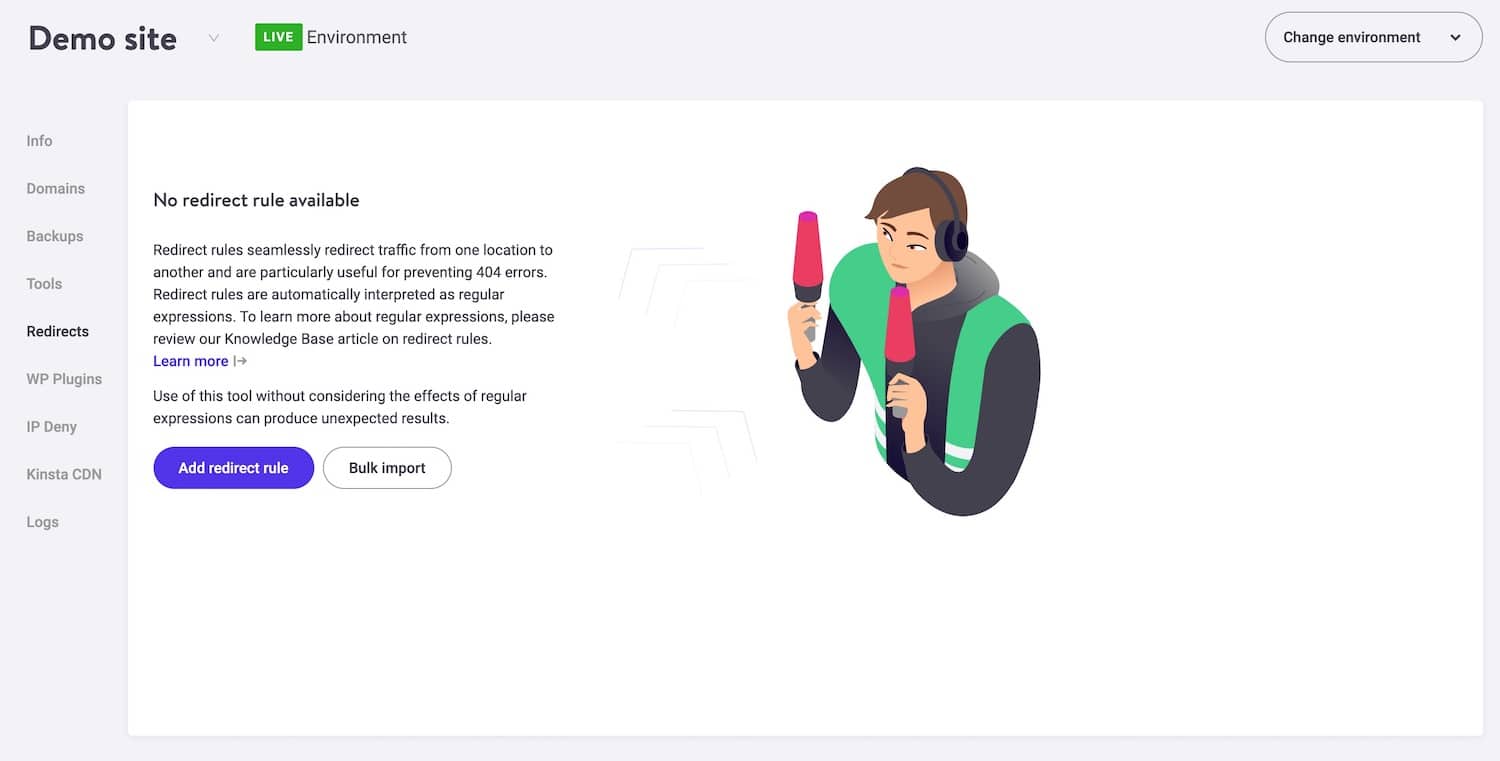
Redirects in MyKinsta
Click the Add redirect rule button to open the redirect rules popup.
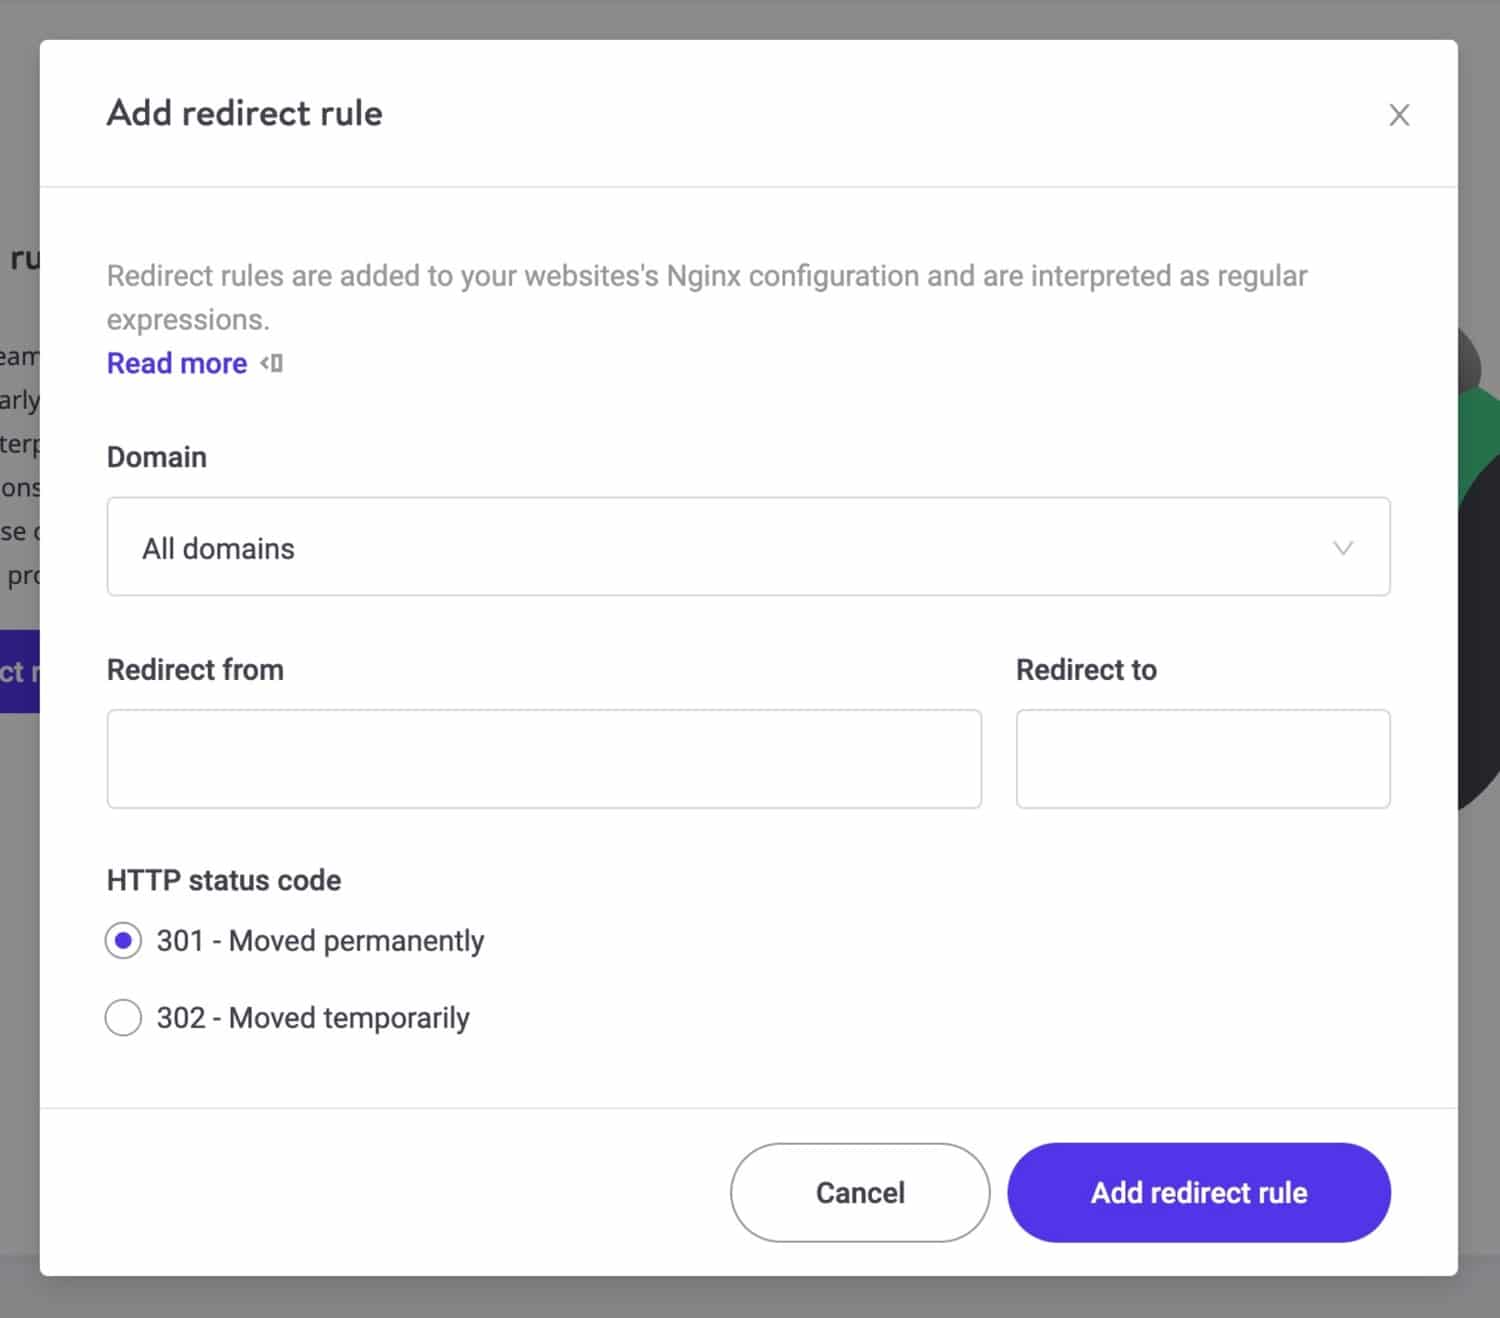
MyKinsta add redirect rule
To add your redirect, select 301 redirect, then type in the old slug as the Redirect from value and the new slug as the Redirect to value.
Click the Add redirect rule button and your redirect will be set up.
If you aren’t with Kinsta, you can use a redirection plugin to set up redirects. The Redirection plugin is the most popular. It will let you set up redirects manually and it will also monitor changes to your slugs and automatically set up redirects for you.
Below you can see that I’ve changed the slug for one of my posts and the plugin has caught it and set up a redirect rule.
Redirection plugin redirect rule set up
Redirecting Archive Pages
If you change the structure of your archive pages using the Optional section in the Permalinks settings page, anyone using the old link to a category archive will be taken to your 404 page. So you’ll need to set up a wildcard redirect.
In MyKinsta, create a redirect rule that uses the base structure you were using before and the one you’re using now, with an asterisk to denote a wildcard after it.
In the Redirect from field, type the old path to categories, with a wildcard. It needs to take the form /oldslug/(.*)$. The entry for Redirect to needs to take the form /newslug/$1.
So if you’ve changed your category URL structure to use blog before the category name instead of the default category, you would enter /category/(.*)$ in the Redirect from field and /blog/$1 in the Redirect to field.
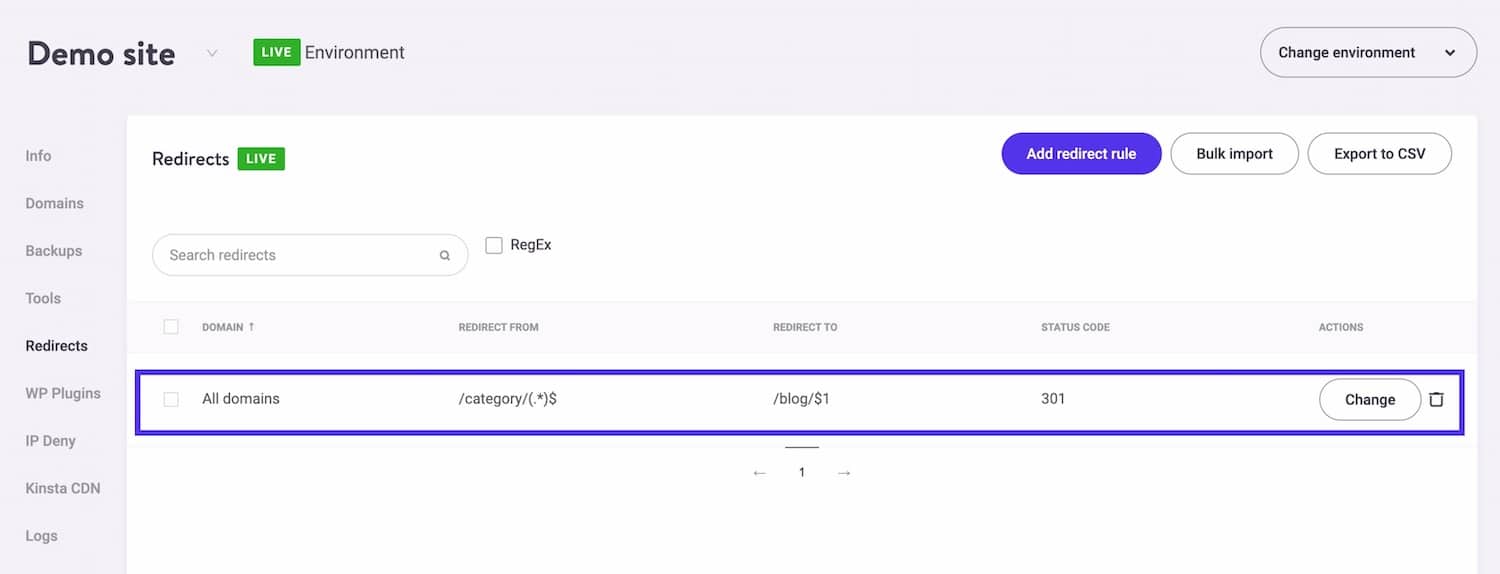
Adding a wildcard redirect in MyKinsta
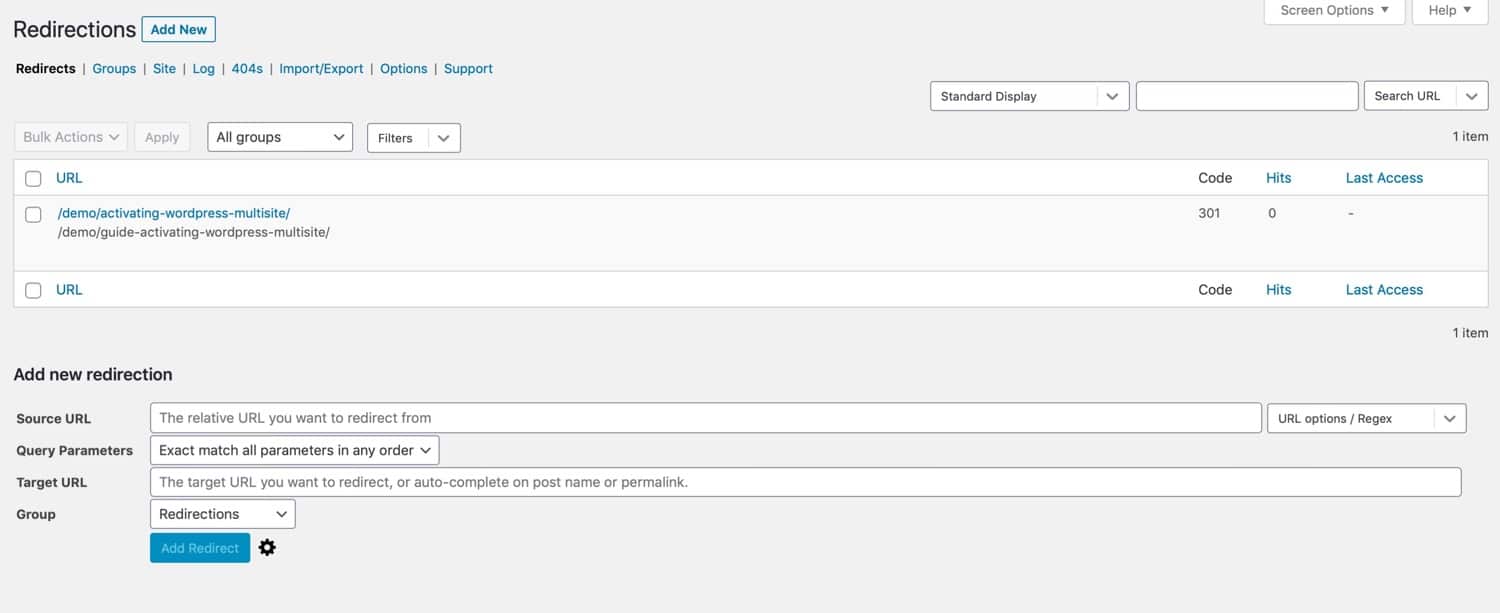
If you’re using the Redirection plugin, you’ll need to enable Regex functions first, as the wildcard asterisk is a regex function.
Go to Tools > Redirection and go to Add new redirection section of the screen.

Creating a new redirect rule with the redirection plugin
Click on the URL Options/Regex drop down and check the Regex box.

Setting up a wildcard redirect with the Redirection plugin
In the Source URL field, type the old path to categories, with a wildcard. It needs to take the form /oldslug/(.*)$. The entry for Target URL needs to take the source /newslug/$1. This works in exactly the same way as in MyKinsta.
Troubleshooting WordPress Permalinks
Occasionally you might find that permalinks don’t work as you expect them to. Here’s what to do if that happens.
Permalinks Not Working After Registering a Post Type
Sometimes you register a new post type or taxonomy and the links to the relevant archive pages or to posts of the post type don’t worry.
Don’t panic! This is simply because WordPress doesn’t know that the custom post type or taxonomy means a change to permalink settings. Simply go to Settlings > Permalinks to refresh settings. You don’t even need to make any changes or click the Save Changes button – just opening the screen will be enough.
Permalinks Not Behaving the Way You Want Them To
If your permalinks aren’t working the way you expect and it isn’t because you just registered a custom post type or taxonomy, try these tips.
- Check that you typed in the URL correctly in the browser.
- Go to Settings > Permalinks and check the setup. Are the tags correct? Make sure you haven’t missed anything or used the wrong syntax.
- Clear your website’s cache if you’re using a caching plugin. Caching can interfere with changes to links.
- If you’ve changed permalinks settings, you might have links in the body of your website content that are now out of date. Edit them or set up redirects.
- Check if you have manually changed the slug for any posts and if these need editing.
- Check whether you have a redirection plugin installed or a plugin that includes redirection. If so, check what redirects you’ve added to the settings.
- If you have any plugins that affect post types or links, try deactivating them and seeing if that fixes the problem.
- If you can’t access the Permalinks settings screen, use the method detailed earlier to edit permalinks via phpMyAdmin.
Follow these tips and you should be able to get your permalinks working as they should.
Permalinks are the building blocks of any WordPress site. Learn what they are, how they work, and how to optimize them for better SEO traffic ?
Click to Tweet
摘要
Permalinks are an incredibly useful feature of WordPress. You can use them to enhance user experience and boost your search engine rankings.
If you follow the guide above, you’ll have permalinks that are optimized. You’ll be able to configure them to work in exactly the way you need them to, for all post types, taxonomies, and custom slugs.
Now, it’s your turn: how do you manage your permalinks? Did we forget to cover anything about WordPress permalinks?在下面的评论中让我们知道!
If you enjoyed this article, then you’ll love Kinsta’s WordPress hosting platform. Turbocharge your website and get 24/7 support from our veteran WordPress team. Our Google Cloud powered infrastructure focuses on auto-scaling, performance, and security. Let us show you the Kinsta difference! Check out our plans