
[ad_1]
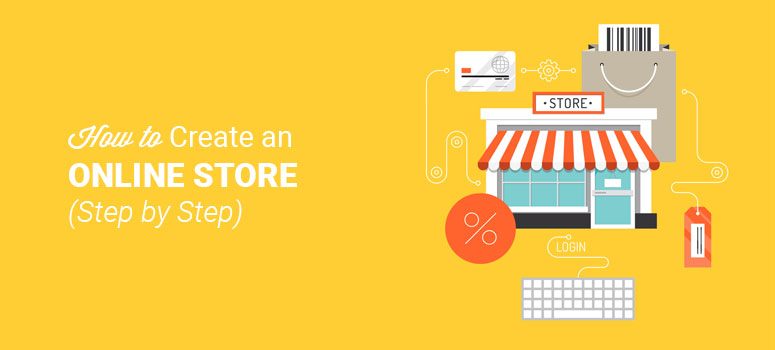
您想创建一个在线商店吗?我们并不感到惊讶。如何创建电子商务商店是我们受众最需要的教程之一。
电子商务行业蓬勃发展,目前的零售趋势显示,51%的美国人更喜欢网上购物。这是将您的脚趾融入电子商务业务的最佳时机。如果您想知道如何开设在线商店,那么本指南适合您。
下面,我们已经创建了一个有关如何启动可用于创建自己的商店的在线商店的分步演练。你不必是一个技术娴熟的人。我们承诺,您可以在不编写任何代码的情况下构建在线商店。
为了帮助您轻松遵循本指南,我们将其分为10个不同的部分:
目录
- 第1章:决定卖什么
- 第2章:设定正确的期望
- 第3章:选择电子商务平台
- 第4章:创建在线商店 – 技术指南(逐步)
- 第5章:在线商店入门
- 第6章:扩展您的在线商店
- 第7章:添加您的第一个产品
- 第8章:启动前检查表
- 第9章:促进和发展您的在线商店
- 第10章:常见问题解答
第1章:决定卖什么

在开始建立在线商店之前,您需要决定要销售什么。选择合适的产品对您的在线商店的成功至关重要。
总的来说,您需要销售在线购物者想要购买的产品。为了帮助您确定在线商店的销售渠道,您需要了解一些因素,包括:
- 市场需求 – 市场需求描述了某种产品的需求以及谁想要购买它。因此,如果市场对产品的需求很高,那么人们更有可能从您的在线商店购买该产品,并为此付出更多。您可以使用免费工具来研究市场需求 Google的关键字规划工具。输入产品的关键字,例如“有机面部保湿剂”。如果这些关键字的搜索量很高,则会显示有很多在线购物者在搜索该产品。
- 竞争 – 对产品的需求可能很高,但如果竞争太激烈,您的网上商店可能无法脱颖而出。因此,研究您的竞争对手很重要。对您的产品关键字进行简单的Google搜索,然后查看显示在搜索结果顶部的公司。确定您与他们的不同之处,以说服购物者从您的在线商店购买。
- 什么是趋势 – 如果您可以开始在您的在线商店销售趋势产品,您将能够在竞争之前捕获在线购物者。所以,要紧紧抓住趋势。您可以查看亚马逊,eBay和Etsy等网站,浏览他们的“热门”和“最希望的”列表,找到最新,最想要的产品。
请记住,无论您选择在网上商店销售什么产品,都应该是您热衷的事情。创办网上商店是为了赚钱,但选择出售你不感兴趣或知识渊博的东西,不会给你带来成功。您对产品的热情应该在您的网站上发挥作用。如果您真正喜欢并相信您所销售的产品,在线购物者将更有可能向您购买。
为了帮助您弄清楚在线商店的销售情况,请继续阅读。
1.1。数字与实体商品
首先,您需要决定是否要销售数字产品或实体商品。长期以来,实体产品一直是在线销售和购买的热门选择,但数字产品也变得越来越受欢迎和有价值。
让我们来看看数字产品与实际产品的差异。
什么是物理产品?
实体产品是您可以销售并运送给客户的可触摸,有形产品。服装,家具,食品,美容产品,油画等都是实物产品。
销售实体产品的流行在线商店的一些例子包括亚马逊,沃尔玛,Target,American Apparel和百思买。
优点和缺点:数字与物理产品
销售数字和实体产品有利有弊,你必须权衡利弊,以决定你应该在你的网上商店销售什么类型的产品。
那么,让我们回顾一下每个人的利弊。
物理产品
优点:
- 明确的价值 – 展示实物产品的价值非常容易。物理产品的目的通常是清晰易懂的。
- 更高的感知价值 – 由于实物产品是有形的,购物者通常会将它们与更高的感知价值联系起来。
- 易于使用 – 对于实体产品,通常不会涉及很多解释,培训或后续工作。只需出售,发货,客户即可立即使用。
缺点:
- 运输成本 – 由于您必须运送实物产品,因此您必须考虑运输和处理的成本。
- 更多时间 – 将物理产品运送到全国各地的客户需要时间。
- 存储 – 如果您销售实体产品,大多数情况下您需要大量空间来存储产品。
数码产品
优点:
- 无库存 – 使用数字产品,您没有任何库存。这意味着您不必处理订购一定数量的单位并存储它们。
- 没有运输成本或时间 – 您不必运送数字产品。客户可以直接将数字产品下载到他们的设备上,这意味着他们可以立即获得产品,您也可以免费发送产品。
- 易于扩展 – 由于您可以反复销售相同的数字产品而无需处理库存或存储,因此扩展和发展业务要容易得多。
- 整体更简单 – 出于上述所有原因,数字产品总体上更易于销售和管理。
缺点:
- 更难以展示价值 – 使用数字产品,更难以展示价值。要让客户相信您的数字产品值得购买需要更多的工作。
- 较低的感知价值 – 因为数字产品不是客户可以持有的东西,它们与较低的感知价值相关联。
- 很多竞争 – 由于数字产品很容易在网上销售,现在很多人都在这么做。所以,你可能会有很多竞争对手。但也有与销售实体产品的竞争。
如您所见,销售数字和实体产品有利有弊。销售数字产品的数量正在增加,因为它很容易开始在线销售数字产品。你不需要花很多钱就可以开始,你可以一遍又一遍地销售同样的产品。但消费者也在寻找实体产品。因此,权衡利弊,并确定哪种方案最适合您。
1.2。创建自己的产品与销售已有产品
接下来,您需要决定是要创建自己的产品还是销售已建立的产品。
如果您想创建自己的产品,那么您必须了解它会占用您的大量时间。例如,如果您要销售手工编织围巾,您必须花时间提前创建大量库存,或者每次有人订购时都要花费数周时间创建新商品,这将导致客户不得不等待更长时间才能收到他们的项目。
除了手工制作的产品,创建自己的实体产品,如下一个最好的真空吸尘器将花费大量的时间,有时几年,你将不得不花很多钱,这可能不是你的最佳途径。
另一方面,创建自己的数字产品要容易得多。例如,如果您决定销售模板,则可以在几个小时内创建模板并一次又一次地出售 – 更容易。
销售成熟的产品是最简单的方法,因为您不必花费任何时间来构建或创建产品。此外,对于某些现有产品,大部分营销也是为您完成的。购物者已经熟悉产品及其价值,因此,购买的决定将更容易。
1.3。亚马逊联盟商店
您可以创建的另一种在线商店是亚马逊联盟商店。通过亚马逊联盟商店,您可以在亚马逊携带的网站上销售产品。因此,您不必担心创建自己的产品或处理存储库存,运输和处理,跟踪库存等问题。
亚马逊联盟商店通过 亚马逊协会 程序,允许您通过您的网站在每个亚马逊产品上获得促销和销售的百分比。
 如何使用WordPress创建亚马逊联盟商店。
1.4。定期销售与订阅模式
在制作在线商店时,您还必须决定是使用常规销售模式还是使用订阅模式。
常规销售,也称为一次性销售,是指客户购买产品并将其交付给他们一次。如果他们想要订购其他产品,他们必须在您的网站上再次购买,然后该商品将再次发送给他们。
但订阅模式是指客户定期支付经常性价格以访问产品或服务。
例如, 你好新鲜 使用订阅模型。客户支付经常性费用,每周都会向他们提供餐具。

其他一些遵循订阅模式的流行在线商店包括BarkBox,FabFitFun和Netflix。
您也可以通过订阅模式销售数字产品。许多软件和插件公司每月向客户收取使用该产品的费用。
当您向客户出售一次产品时,您必须努力让他们再次购买。但是,通过订阅模式,您可以获得可依赖的每月经常性收入。
第2章:设定正确的期望

在开始在线商店之前,您还需要设定正确的期望。如果您是电子商务的新手,您可能不会意识到新电子商务网站常犯的错误。避免这些初学者错误将有助于您的在线商店走上成功之路。那么,让我们来看看一些最常见的电子商务错误。
不切实际的销售期望
显然,大多数人都希望建立一个网上商店来赚钱。有些人希望他们所需要做的就是建立他们的网站,在线添加他们的产品,并且大笔资金将开始流入。但是,成为一个拥有大量收入的成功在线商店需要时间和工作。因此,您必须为在线商店设定切合实际的目标。设置收入目标并跟踪它们将有助于您了解您的在线商店的运作情况以及您使在线商店成为完全成熟的业务的距离。
设定现实目标:
- 每日销售
- 每月销售额
- 年销售额
有了这些目标,您还必须考虑运行在线商店的成本。只有当您的销售额超过您的成本时,您的商店才会盈利。随着您的在线商店的增长,您可以调整您的目标和期望以匹配。
没有目标受众
不是每个人都会成为您的客户。如果您尝试成为每个人的一切,您的在线商店将无法成功。您需要确定目标受众是谁,并且您需要设计和营销您的在线商店,并考虑到这些人。此外,您需要让您的观众有理由与您一起购物,而不是像亚马逊或沃尔玛这样的大型网站。
为您的理想客户创建客户档案,其中包括:
- 受众特征 – 目标受众的基本人口统计信息,如年龄,性别,地点,职业,生活方式等。
- 兴趣 – 您的观众对此感兴趣?烹饪,露营,时尚,运动等
- 价值观和信念 – 决定对观众重要的是什么?道德吗?诚实?
- 痛点 – 您的目标受众面临哪些问题?您的在线商店如何帮助解决这个问题?
定义目标受众将有助于您的业务与购物者建立联系并获得更多销售。
糟糕的网站设计
许多新的在线商店所有者未能意识到良好网站设计的重要性。您的网站通常是客户看到的第一件事。如果您的在线商店的设计混乱,不专业且难以浏览,购物者将不想向您购买。
因此,请确保您的在线商店具有现代主题,易于浏览,并且在移动设备上看起来也很棒。您可以在电子商务网站上显示的专业徽标也有助于促进购物者和您的网站之间的信任。
差的客户服务
良好的客户服务是拥有成功的在线商店最重要的部分之一。客户即使在购买之前也希望知道您提供良好的客户服务。您可以通过向您的网站添加退货政策向他们证明这一点,提供支持联系信息,如电子邮件或电话号码,甚至在您的网站上添加实时聊天。
如果您不提供快速,高效的客户服务,您将面临失去客户的风险。
我们将在本文后面介绍一些可以避免这些错误的步骤。但首先,您需要选择合适的电子商务平台并开始构建您的网站。
第3章:选择电子商务平台
选择合适的电子商务平台对您的业务至关重要,因为如果您的决定被证明是错误的,很难退出。事实上,60%的中大型店主同意在选择电子商务平台之前应该进行更好的尽职调查。
我们推荐的3种最受欢迎的电子商务平台 Shopify, 的Bigcommerce和WordPress + WooCommerce。
让我们快速浏览一下这些流行的电子商务平台。
3.1。最佳电子商务平台摊牌

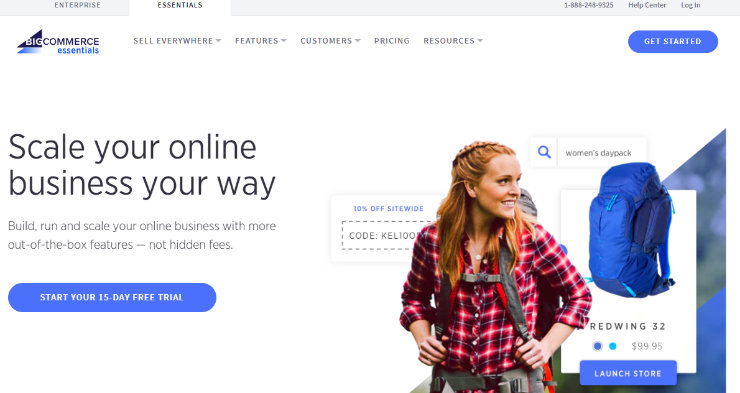
Shopify是一个完全托管的电子商务解决方案,起价为每月29美元。 Shopify使得无需安装任何软件或维护网络托管服务器即可轻松启动商店。
虽然它允许您自定义商店的设计,但与自托管电子商务平台相比,自定义选项受到限制。除月费外,您还必须支付每笔订单的交易费用。这意味着您的实际成本将高于每月29美元,并随着您的商店增长而增加。
优点:
- 用户友好且易于学习。
- Shopify为您管理您的在线商店。
- 扩展您的网站既简单又实惠。
缺点:
- 您无法完全控制您的网站。
- 你必须支付交易费用。
- 由于无法选择您想要的功能,因此定制有限。
BigCommerce是另一个完全托管的电子商务解决方案。这意味着您可以快速创建在线商店,而无需管理任何技术方面。只需使用BigCommerce创建一个帐户,使用他们众多时尚的电子商务模板中的一个,即时设计您的在线商店,添加您的产品,然后开始销售。
您可以以每月29.95美元的价格开始使用BigCommerce,其中包括无限制的产品,文件存储和带宽。此外,与Shopify不同,使用领先的支付网关时,使用BigCommerce没有交易费用。
优点:
- 用户友好,易于启动网站。
- 没有交易费用。
- 它是一个完全托管的解决方案,您不必担心管理您的网站。
缺点:
- 您无法完全控制您的网站。
- 您网站的自定义有限,只有少数免费主题可供选择。
- 年度在线销售限制,如果超出限制,则必须升级您的计划。
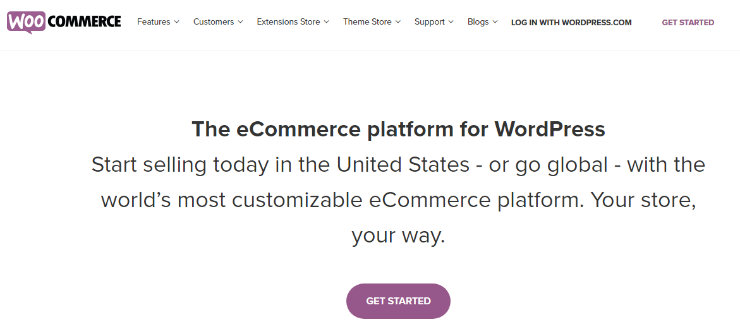 WooCommerce,您将完全控制您的在线商店。 WooCommerce是近28%的在线商店的首选平台。最重要的是,它作为免费插件在WordPress之上运行,所以如果您熟悉WordPress,那么您可以使用WooCommerce轻松管理商店。此外,如果您已经拥有WordPress网站或博客,则可以使用WooCommerce轻松将其转换为在线商店。
WooCommerce附带了许多内置功能,如运输,支付处理,库存管理,优惠券,报告等。您还可以购买WooCommerce扩展程序,为您的在线商店添加更多电量或使用多个第三方免费和付费 WooCommerce插件 帮助您增加销售额。
此外,由于WooCommerce是一个开源平台和WordPress电子商务插件,因此可以从WordPress.org存储库免费下载。要开始使用WooCommerce,您只需要一个域名,SSL证书和网络托管帐户。有了一些最好的网络托管公司,你可以以每月3-5美元的价格获得所有这些,这使得WooCommerce成为创建在线商店的最低成本方式。
优点:
- 完全控制您的网站。
- WooCommerce是一个开源软件,定制无穷无尽的插件。
- 比其他电子商务平台更实惠。
- 更实惠的托管Web托管选项,特定于WooCommerce。
- 没有交易费用。
缺点:
- 您必须管理自己的站点,包括安全性,更新,备份等。
- 无限的功能可以使学习有点压倒性。
- 扩展您的在线商店更加困难,因为您必须自己管理您的网站或为托管网络托管支付更多费用。
重要的是要注意,要使用WooCommerce WordPress插件,您需要使用WordPress.org而不是WordPress.com构建您的网站。查看我们的文章 WordPress.com与WordPress.org 了解更多关于2的区别。
3.2。为什么我们推荐WooCommerce
虽然Shopify和BigCommerce等电子商务平台使用起来比较容易,而且开箱即用,可以轻松设置在线商店,但WooCommerce的起始成本较低,您可以更好地控制您的网站。
使用WooCommerce,您可以完全控制在线商店的外观和执行方式。正如我们建议使用WordPress创建一个网站,因为无限的自定义选项,与使用WooCommerce制作在线商店同样如此。使用WooCommerce的在线商店允许您使用众多WordPress插件为您的在线商店添加更多功能。
此外,您还可以获得惊人的数量 WooCommerce主题 为您的商店提供您想要的外观。它还带有集成,支付方式,插件等。
由于WooCommerce和WordPress社区规模如此之大,如果您遇到网上商店的问题,可以通过大量的在线社区和论坛来帮助您。
使用WooCommerce创建在线商店,您可以创建所需的电子商务网站,而无需花费大部分预算。
3.3。在线商店的先决条件(域名,托管,SSL等)
正如我们前面提到的,当您使用WooCommerce创建在线商店时,在开始之前您需要做一些事情。由于WooCommerce是一个WordPress插件,你需要一个自托管的WordPress网站以及这三件事:域名,SSL证书和网络托管。让我们回顾一下这些先决条件是什么以及为什么需要它们。
域名
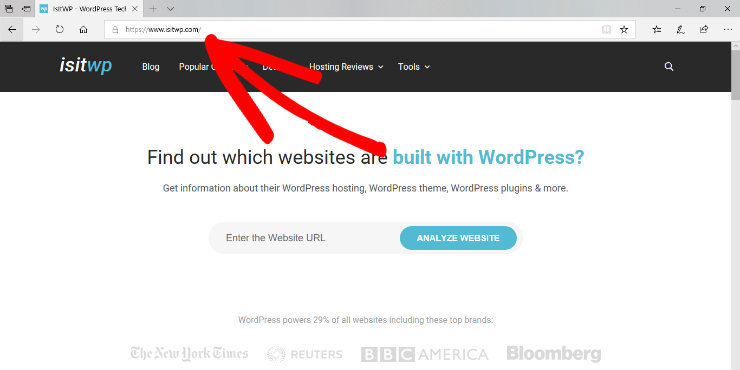
域名是您网站的地址。用户可以在浏览器的地址栏中键入您的域名,并访问您的网站。例如,您可能熟悉的一些热门域名包括www.IsItWP.com,www.Amazon.com,www.Facebook.com和www.WPBeginner.com。
如果没有域名,用户将无法通过自己的计算机访问您的电子商务网站。因此,如果您要创建在线商店,则需要购买与您的在线商店的品牌名称相匹配的域名。
有关更详细的说明,请查看我们的文章: 什么是域名以及它如何运作?
SSL证书
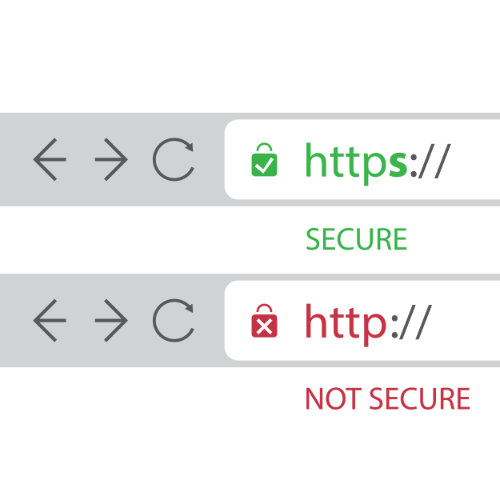
SSL证书(安全套接字层),也称为数字证书,可在网站和访问者的浏览器之间创建安全链接。这可确保您的购物者和网站之间传递的所有数据安全可靠。任何将接受信用卡信息的网站都需要SSL证书。
 死亡愿望咖啡 – 世界上最强的咖啡
如果您在提出品牌名称时遇到问题,您也可以免费使用 域名生成器 帮助你想出一些很棒的东西。
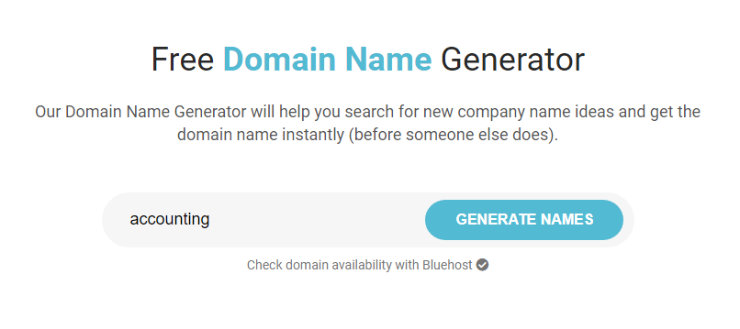
只需键入1或2个关键字,该工具将为您提供许多品牌名称的想法。该工具还会检查域名可用性,因此您不必担心选择其他人已经使用的名称。
在找到完美的品牌名称后,就可以选择网络托管并购买域名。
3.5。如何选择虚拟主机
选择最好的网络托管是制作在线商店的另一个重要步骤。您需要选择一个高性能的网络托管解决方案,以便为您的客户提供快速便捷的购物体验。如果您的电子商务网站速度很慢,即使只有1秒的延迟,也可能会使您的销售额减少7%。如您所见,选择具有一流速度和性能的Web托管非常重要。
在选择最佳电子商务网站托管时,您还应考虑其他一些因素,包括:
- 1-Click安装 – 您选择的网络托管应提供一键式,轻松安装您首选的电子商务应用程序,如WooCommerce。
- SSL证书 – 如前所述,您需要SSL证书来保护您的在线商店。这应该由您选择的网络托管公司提供。
- PCI合规性 – 您还需要选择PCI兼容主机以安全地接受信用卡付款。
- 支持和备份 – 选择可在您需要时提供出色支持,更新和备份的Web托管。
有许多伟大的电子商务托管公司可供选择。我们的一些最佳建议是 SiteGround Cloud, 的Bigcommerce, Shopify,和 WP引擎。
但是,由于我们建议您使用WordPress和WooCommerce构建您的在线商店,我们建议您选择 Bluehost WooCommerce。
") 免费域名,免费SSL,以及他们的托管计划50%的折扣。
免费域名,免费SSL,以及他们的托管计划50%的折扣。
注意:我们相信完全透明。如果您使用我们的推荐链接购买主机,那么我们将免费获得一笔小额佣金。您实际上可以获得托管+免费域名+免费SSL的折扣。我们可以从任何托管公司获得佣金,但我们只推荐我们真正相信会给我们的读者带来价值的产品。
第4章:创建在线商店 – 技术指南(逐步)
仅仅因为这一部分被称为“技术指南”并不意味着你必须精通技术。如果您可以点击,那么您可以按照本教程操作,立即启动并运行您的在线商店。
我们来看看如何使用WooCommerce在WordPress中设置在线商店。
4.1。购买域名和WooCommerce托管帐户
要开始您的WooCommerce商店,请前往 Bluehost网站 然后单击立即开始按钮。

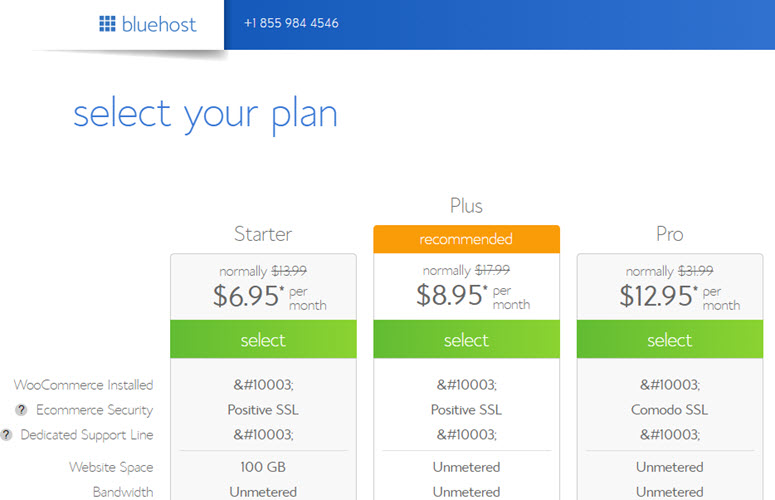
在下一页,您将被要求选择一个计划。每个计划都预装了WordPress上的WooCommerce以及一个 免费的SSL证书。
SSL certificate adds a special security layer on your website, so you can accept sensitive information such as credit card numbers and other personal information. This is required for you to run an online store and accept credit card payments.
Since you’re just getting started, you can choose the starter plan.
You can either choose to use an existing domain that you have or get a free new domain. We recommend registering a new domain since it’s free.
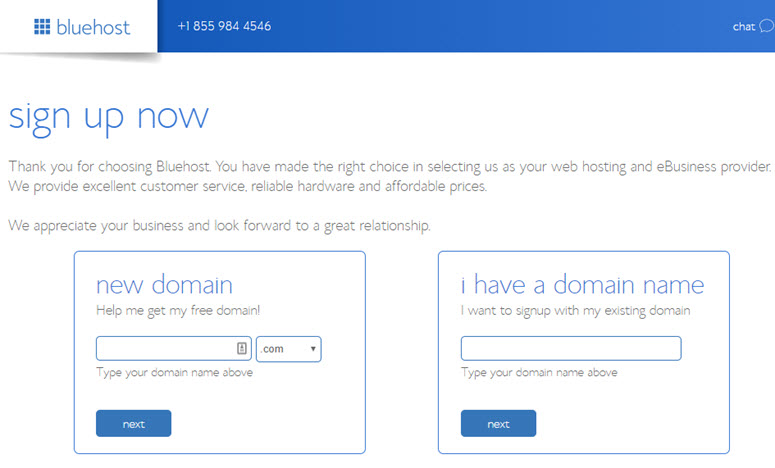
You’ll now be prompted to enter your account information. For easy registration, you can sign in with your Google info with just a couple of clicks.

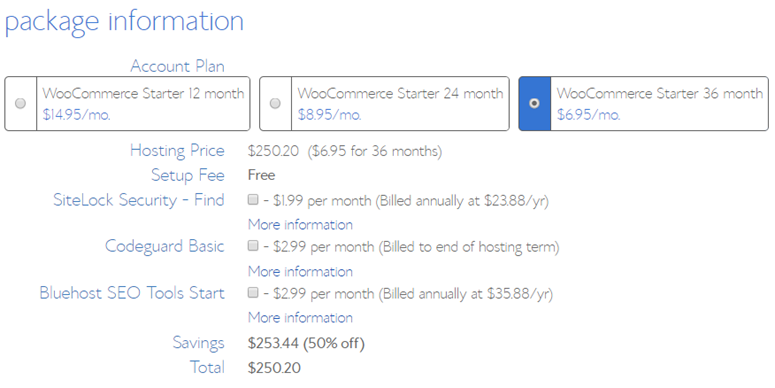
After entering your details, scroll down the page until you find the package information box. You can select the starter plan for 12 months, 24 months, or 36 months. You will also see that a few addons are preselected which are increasing your total price. We recommend that you uncheck these boxes because you can always add them later should you decide that you need these services.
Next, you need to scroll down the page further to enter your payment details. You will also be asked to Agree to their Terms of Service, and then click Submit.
而已!
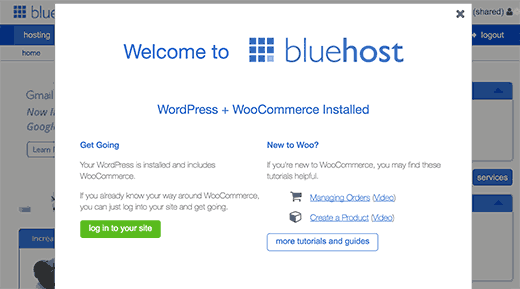
You’ve successfully subscribed to a WooCommerce hosting plan. You’ll now receive an email with details on how to log in to your web hosting control panel (cPanel) where you can manage everything from hosting files to emails and support.
Go ahead and log into your cPanel. You’ll be greeted with a popup informing you that WordPress, along with WooCommerce, has been pre-installed. You can now click log into your site and start managing your online store.
Now let’s take a look at how to launch your online store with WooCommerce.
4.2。 Configure WooCommerce
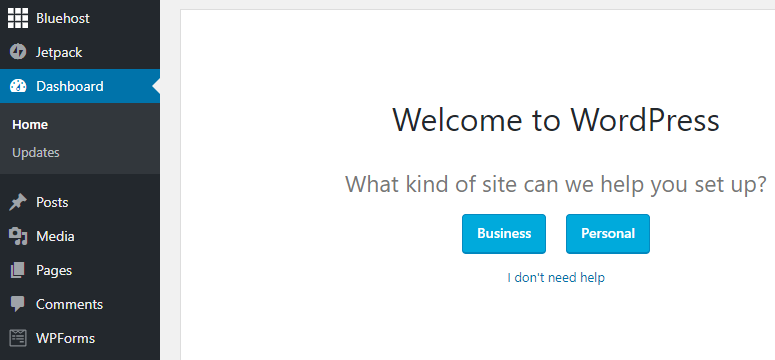
Using the login credentials from your email, you need to login to your WordPress dashboard where you’ll see a welcome message. Go ahead and click the I don’t need help link. Don’t worry, we’ll walk you through every step of the process.
The first step is to make sure that you specify the name and tagline of your site. To do this, you need to visit Settings » General page and insert your WordPress site title and description.
Your WordPress hosting package came with a free SSL Certificate. This certificate is pre-installed for your domain name. However, your WordPress site needs to be configured, so it loads as https vs http. You’ll also need to change your WordPress Address and Site Address to use https instead of http.
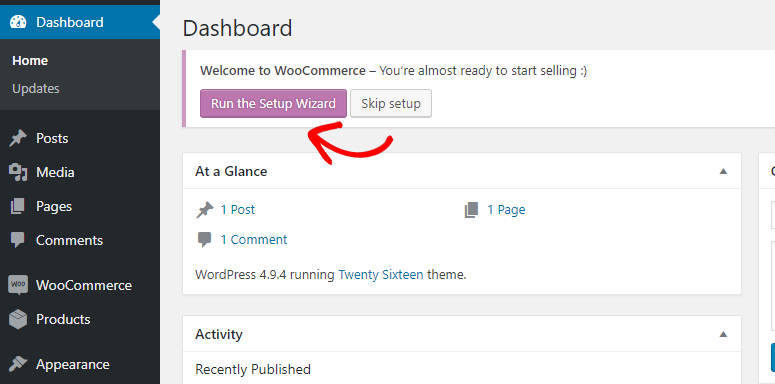
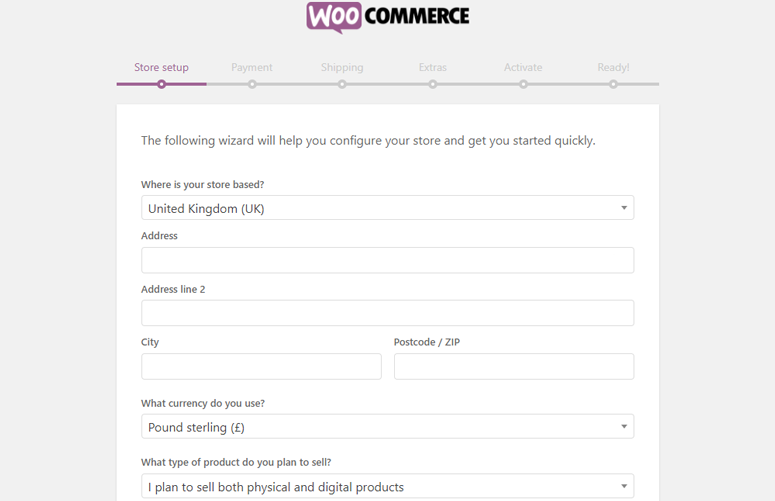
Next, you need to run the WooCommerce setup wizard. Simply click the Run the Setup Wizard button. The setup wizard will walk you through the basic configuration of WooCommerce storefront.
In the first step, you’ll be asked to specify your store’s location. You’ll also be prompted to select the currency you’d like to use. After completing the first step, you can proceed to the Payment step.
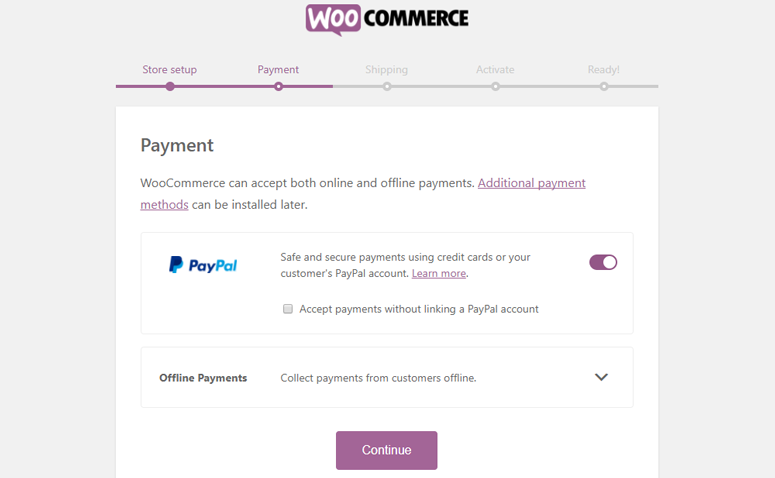
By default, WooCommerce only allows you to accept payments via PayPal. You can simply enter your PayPal email in this step without linking your PayPal account. If you want to add additional payment methods, then you’ll need to install respective addons (which you can do later).
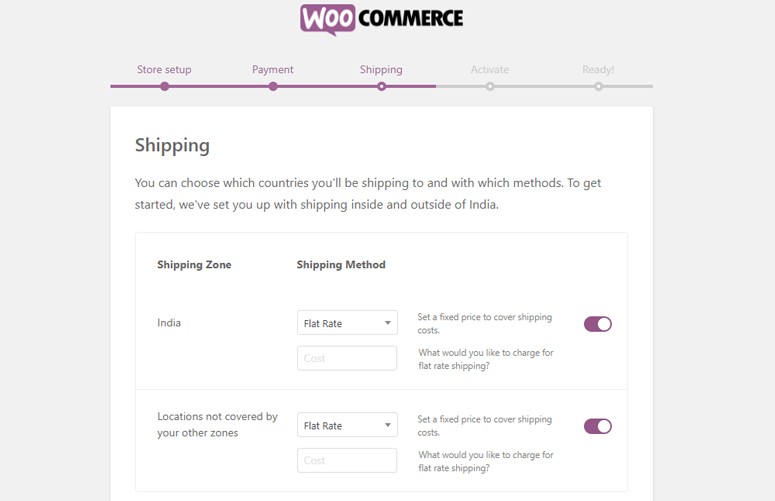
If you choose to sell physical goods on your WooCommerce store, then you’ll be asked to setup shipping methods and shipping fees for both national and international shipping.
After setting up the shipping options, WooCommerce will persuade you to connect your site with Jetpack. Setting up Jetpack is not a necessary step for building a WooCommerce store, so you can skip it. You can find the Skip this step option at the bottom of the page.

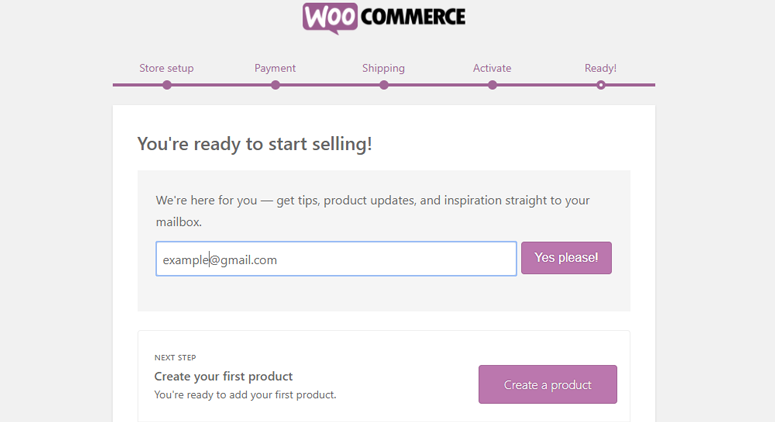
You’re done with the setup wizard.
4.3. Change Your WordPress Theme
WordPress themes control the visual appearance of your website. To give a unique design to your website, all you have to do is find and install the right theme on it. With WordPress, you can customize an existing theme or even install a custom-built theme per your unique requirements.
By default, your WooCommerce store comes preinstalled with the Storefront theme。 Storefront is a free WordPress theme offering deep integration with WooCommerce.
If you want to customize your Storefront theme without touching a single line of code, then you can get the Storefront Extensions Bundle that helps you delight your customers with a unique look.
Alternatively, you can easily find another WooCommerce-compatible theme in the free plugin repository. Before you choose a random theme from the official directory, it’s in your best interest to take a look at some WooCommerce compatible theme reviews, and decide which one would be a perfect choice for your needs.
A premium theme has to be downloaded from the theme vendor’s site and manually uploaded to your WordPress.
If you decide to go with a free WordPress theme from the official theme repository, then you can search and install it directly from your WordPress dashboard without having to download it to your computer.
To install a free theme, navigate to Appearance » Themes in your WordPress dashboard. Then click the Add New Theme box. You can now find some featured themes in your dashboard.
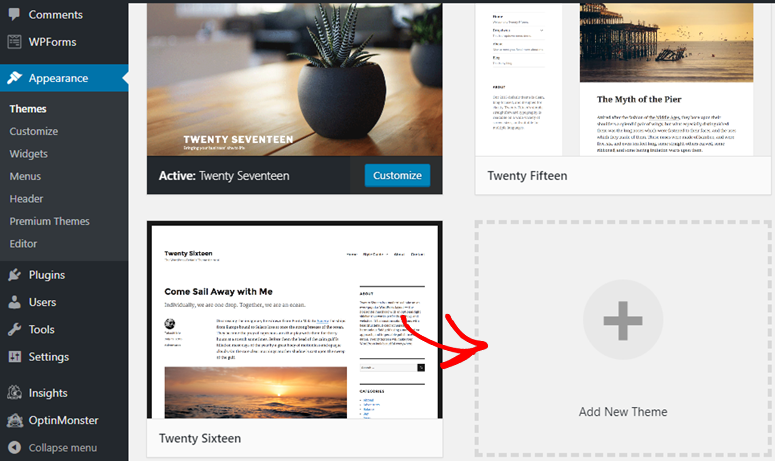
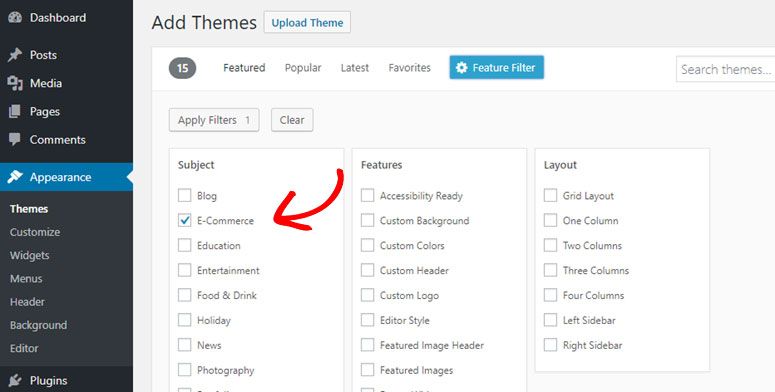
Before installing, you can preview your theme by clicking on the thumbnails displayed. You can also filter themes based on layouts, features, and niches by clicking on the Feature Filterbutton.
Since you are looking for an eCommerce theme, you can simply check the E-commerce option in the subject column. This way it’ll only show you eCommerce-compatible themes.
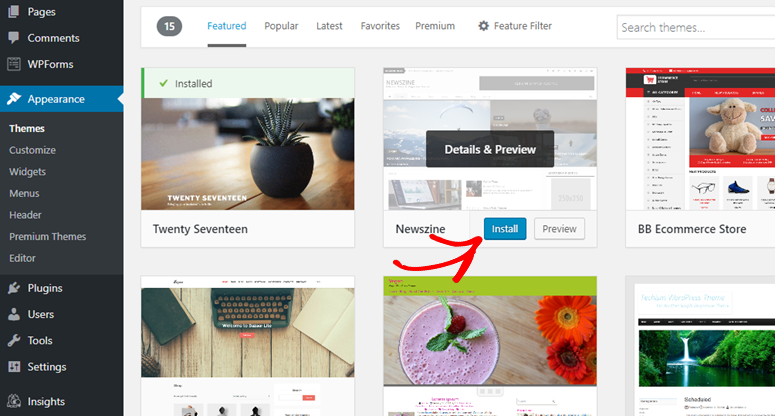
In the right-hand corner, type the theme name in the search bar. Once you’ve found the right theme, hover on its image and click the Install button. Then click Activate to change your website’s appearance.
4.4。 Extend Your Online Store With Plugins
WooCommerce supports tons of different addon plugins that let you enhance your online store without writing code or hiring a developer.
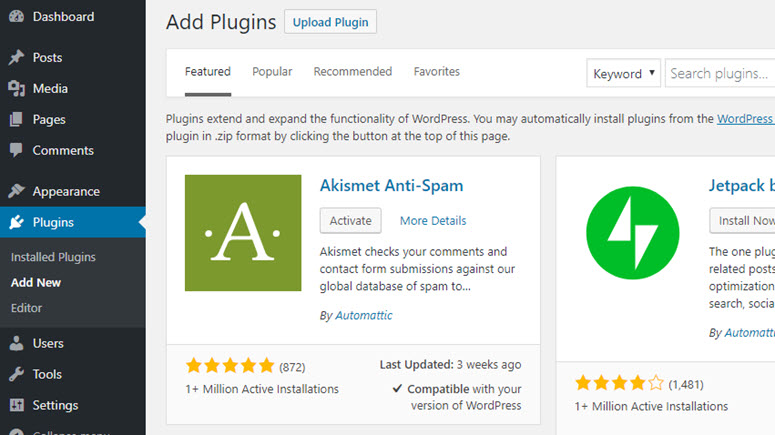
Just like WordPress themes, you can easily find and install free plugins from the WordPress plugin repository within your WordPress dashboard.
All you have to do is visit Plugins » Add New. Use the search box in the right corner to find a plugin and click the Install Now button. And then, click Activate.
Chapter 5: Getting Started with Your Online Store

WordPress is a fully-featured website builder solution that gives you endless possibilities to customize your site the way you want. Unlike other popular eCommerce solutions, WordPress makes it easy to integrate a blog with your online store and create standalone web pages.
If you’ve never used WordPress before, then we’ll walk you through how to kick start a fully-featured website along with your online store. Below are the things we’ll cover:
- Add a blog to your online store
- Create standalone pages
- Add a navigation menu
- Add a widget
- Setup a static homepage
5.1。 Add a Blog to Your Online Store
Do you want to help your eCommerce customers stay connected with your brand? Want to attract more website visitors, generate more sales and revenue? Then, you need to integrate a blog with your online store.
Every eCommerce business needs a blog. By integrating a blog with your store, you can update your brand’s news and stay connected with your customers. Keeping a regular blog is one of the best ways to drive organic traffic to your site as well.
Let’s take a look at how to create and publish a blog post in your WordPress website.
In the left-hand menu of your WordPress dashboard, you’ll find two similar options that may confuse you as a new user: Posts and Pages.
Choose Posts if you want to create a website post that appears in reverse chronological order (newest first) on your WordPress website. Posts are also organized into categories and tags. You can read the difference between categories and tags for more information.
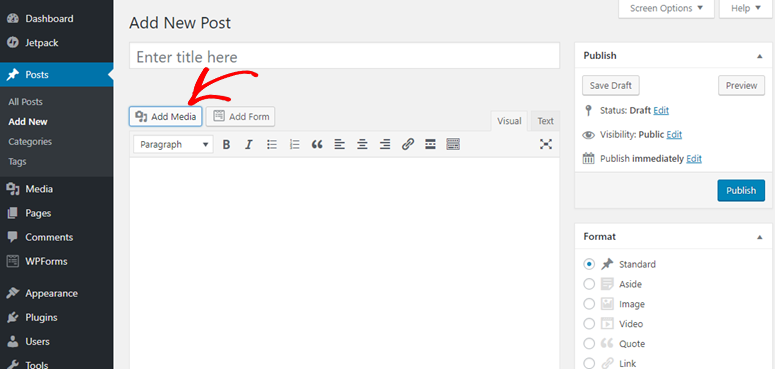
To create your first blog post, head over to your post editor by going to Posts » Add New. You need to start by adding a title for your blog post. After that, you can start writing your blog post content in the post editor. To upload images to your website, all you have to do is drag and drop your images to the text editor from your computer. Alternatively, you can use the Add Media button to upload your images and videos.
5.2。 Create Standalone Pages
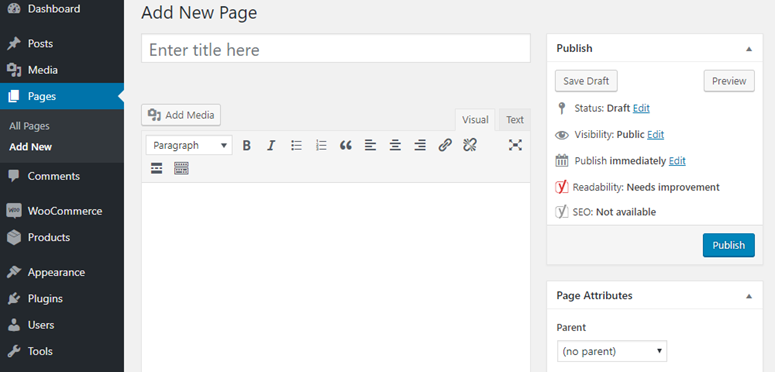
Just like a blog, you’ll also need to add standalone pages to your site such as an About us page, Contact page, Terms of Service page, etc.
Adding a page is almost similar to adding a blog post. The only difference is that you’ll need to visit Pages » Add New to create a new page. Once you’re done, click the Publish button to publish the page.
5.3。 Add a Navigation Menu
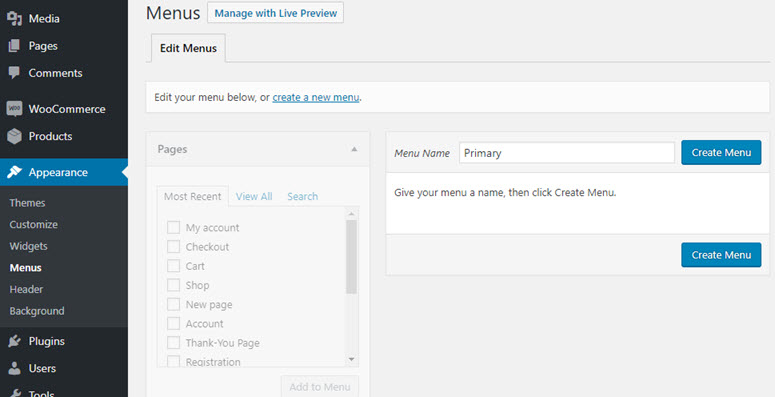
Your navigation menu sticks to the top of your website, so your visitors can easily find the most important pages and links.
To add a navigation menu, go to Appearance » Menus. You need to start by specifying a menu name in the Menu Name field and click Create Menu.
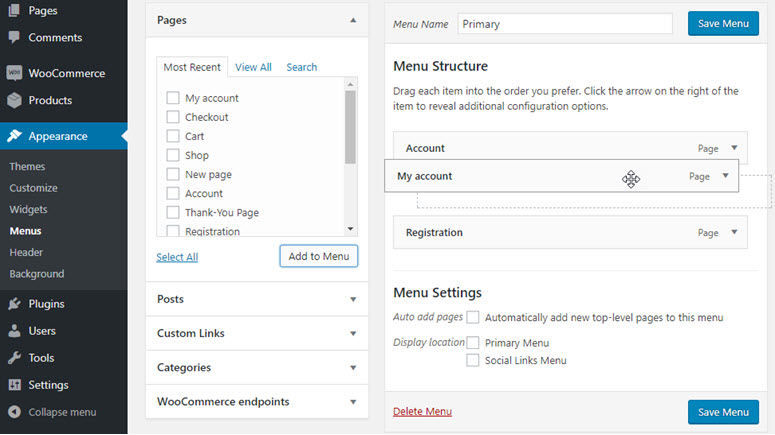
You can now choose from your existing pages, posts, custom links, and categories. After selecting, click Add to Menu. With drag and drop, you can position the menu’s structure. You can also use drag and drop to make nested dropdown menus. Once you’re done, select the display location and click Save Menu.
5.4. Add and Customize Your Widgets
Within your WordPress website, you can easily add the right sidebar widgets per your preference.
Adding a widget is helpful if you want to display dynamic content in your sidebar such as social media buttons, facebook feeds, testimonials, etc. If your WordPress theme has support for footer widgets, then you can use it to add copyright notices, links, and more.
Go to Appearance » Widgets and select from the available widgets. Next, you need drag your choices to the widgetized area of your WordPress site.
5.5. Set Up a Static Homepage
By default, WordPress shows your blog’s latest posts as your homepage instead of a static page. If you want to set a custom static page as your homepage, then simply follow the steps below.
After creating a page, go to Settings » Reading. In the Your Homepage displays section, you’ll need to choose A static page and then select the page you want to display as your front page in the dropdown menu. Once you are done, click Save Changes.
Chapter 6: Extend Your Online Store

Expanding the core features of your WooCommerce store is as easy as installing plugins (apps). While every online store is unique in terms of the product lines, target audience, etc., there are some recommended plugins that almost every store will have to use, such as a contact form plugin, Google Analytics plugin, SEO plugin, and more.
Below are some recommended WordPress plugins that you’ll find useful for your online store:
- Build contact forms with WPForms – 临 | 自由
- Connect your site with Google Analytics using MonsterInsights – 临 | 自由
- Improve your SEO with Yoast SEO – 临 | 自由
- Add an extra layer of security with Sucuri
- Take a regular backup with Updraft Plus – 临 | 自由
- Improve WordPress performance with W3 Total Cache
- Prevent spam comments with Akismet – 临 | 自由
- Grow your subscribers and sales with OptinMonster
Since a detailed explanation about all the plugins would be overwhelming, we’ll explain just the four most important:
- Enable customer tracking with MonterInsights
- Add online forms to your site with WPForms
- Improve your store’s SEO with Yoast
- Reduce shopping cart abandonment with OptinMonster
6.1。 Enable Customer Tracking with MonsterInsights
Want to know how your customers interact with your site? Want to track the sales and revenue of your store?
Then, you need to enable eCommerce tracking with Google Analytics on your store. Google Analytics is the most comprehensive tracking tool for your website. It gives you detailed insights into how your visitors find your site and interact with your pages. Best of all, Google Analytics is absolutely free to use.
The default Google Analytics setup doesn’t allow you to track complex user interactions like eCommerce transactions, form submissions, file downloads, etc. This is where the MonsterInsights plugin come in. MonsterInsights makes Google Analytics easy for your website. With just a few clicks, you can track complex user activities, including eCommerce transactions.
Read the complete MonsterInsights review。
Let’s take a look at how to enable Google Analytics tracking on your site.
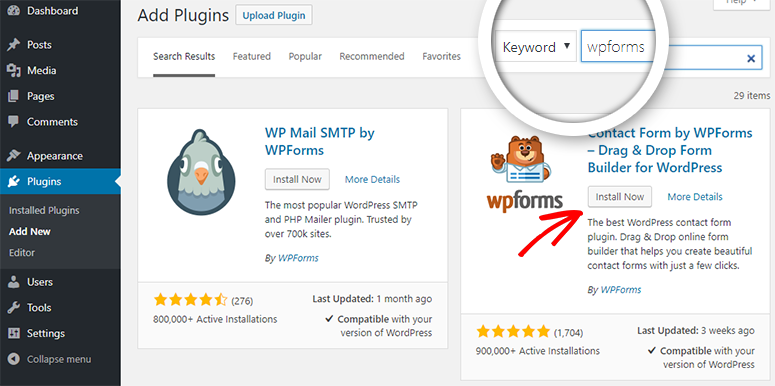
Head over to Plugins » Add New. Search for MonsterInsights and, when the plugin shows up, click Install Now and then, Activate.
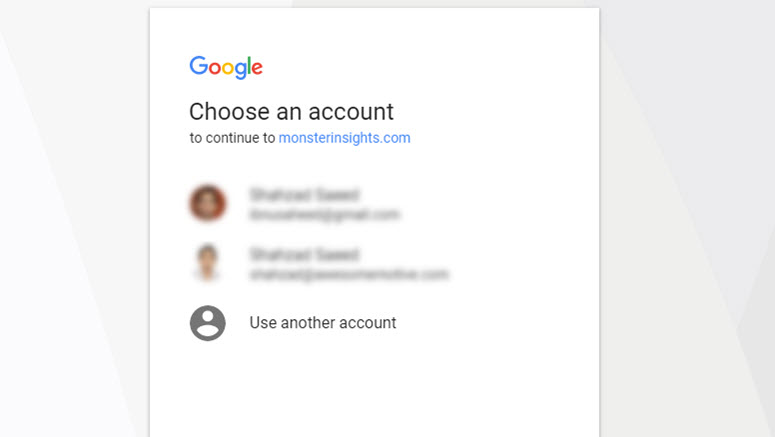
Head over to Insights » Settings to authenticate your site with Google Analytics. Click Authenticate with your Google account.
On the next screen, select your Google account.
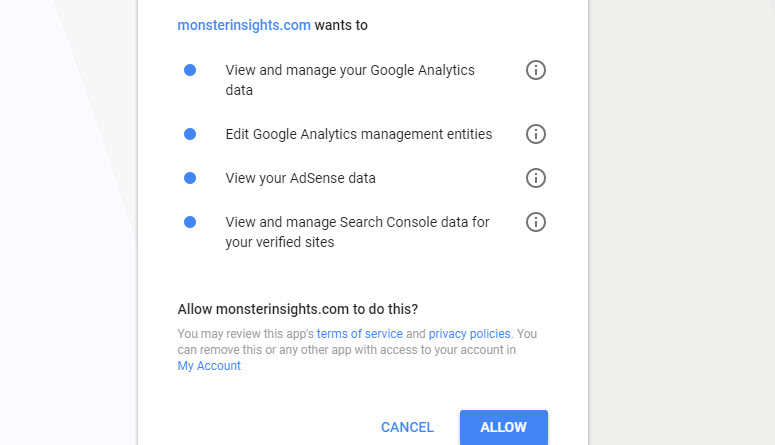
Next, allow MonsterInsights to manage your account.
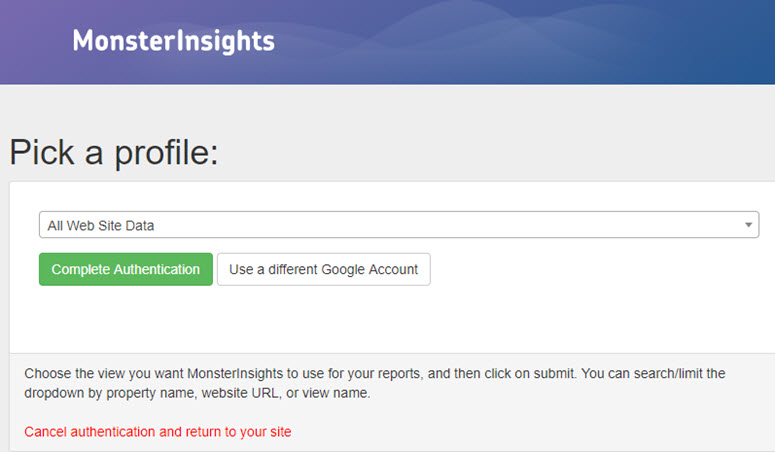
Finally, select the correct website profile for your site and click Complete Authentication.
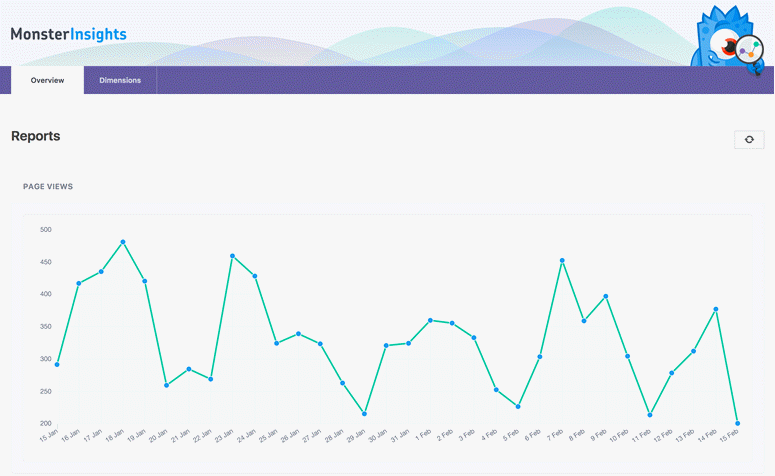
After authentication, you can easily find how your website is doing by visiting Insights » Reports.
eCommerce tracking is a pro feature of MonsterInsights. You’ll have to upgrade to MonsterInsights Pro 至 enable eCommerce tracking。
Get started with MonsterInsights today to easily set up Google Analytics on your site.
Want to start with the free version instead? Try MonsterInsights Lite。
6.2.Add Online Forms with WPForms
When you run an online store, you’ll need to build a lot of different online forms, such as contact forms, customer support forms, product review forms, survey forms, registration forms, custom login forms, etc.
The best way to create all the different type of forms for your site is by installing the WPForms plugin. WPForms makes it easy to create any type of forms on your site with its powerful drag and drop builder. Besides the ease of use, below are a few reasons why WPForms is the best WordPress form builder:
- Tons of built-in form templates: The plugin is bundled with tons of useful pre-made form templates, so you don’t have to create every form from scratch. With their Templates Pack addon, you get a huge variety of pre-built templates for every niche and industry.
- Integrations with your favorite apps: WPForms seamlessly integrate with your email marketing services and other third-party apps you use.
- Custom registration and login forms: Have a consistent branding throughout your site including your registration and login forms.
- And a lot more…
Read the complete WPForms review。
To create a form on your blog, first off, you’ll have to install WPForms by navigating to Plugins » Add New. Search for the WPForms plugin and, when it shows up, click Install Now, and then Activate.
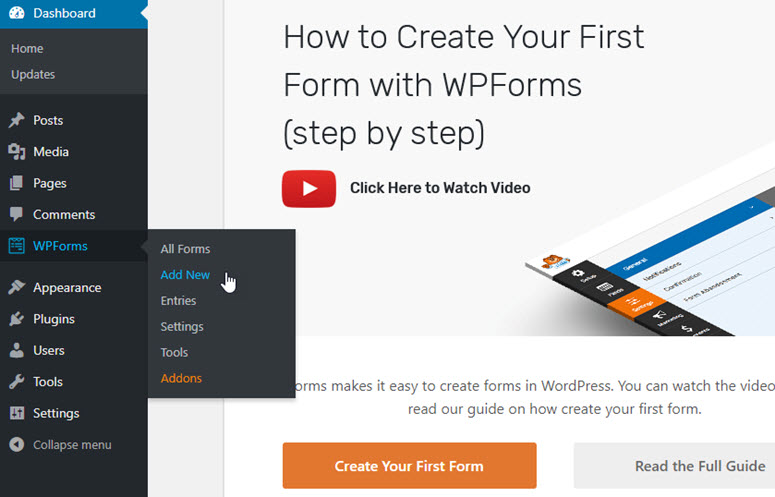
You’ll now be directed to the beautiful welcome page of WPForms. You can either click the Create Your First Form button or click WPForms » Add New to create your first form.
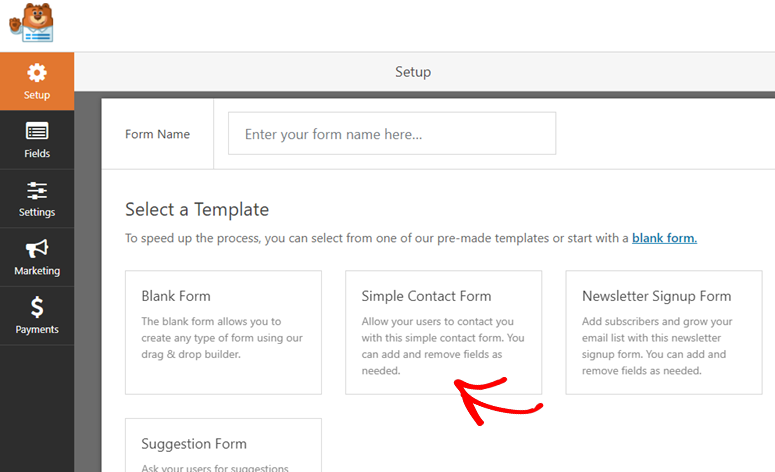
Next, you’ll be prompted to choose a template. You can select one of the premade templates or start with a blank form. If you want, you can give a custom name to your first contact form.
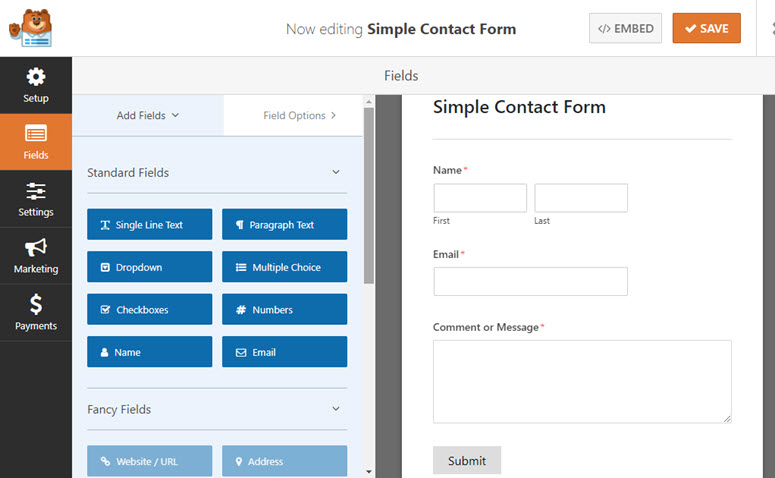
WPForms makes it easy to build a form with drag and drop. Click on the appropriate form fields in the left panel to add them to your form. You can also easily re-arrange them and even remove any unnecessary fields with ease. After making the necessary changes click Save.
To add a form on your site, simply go to your post or page editor and click the Add Form button above the text editor.
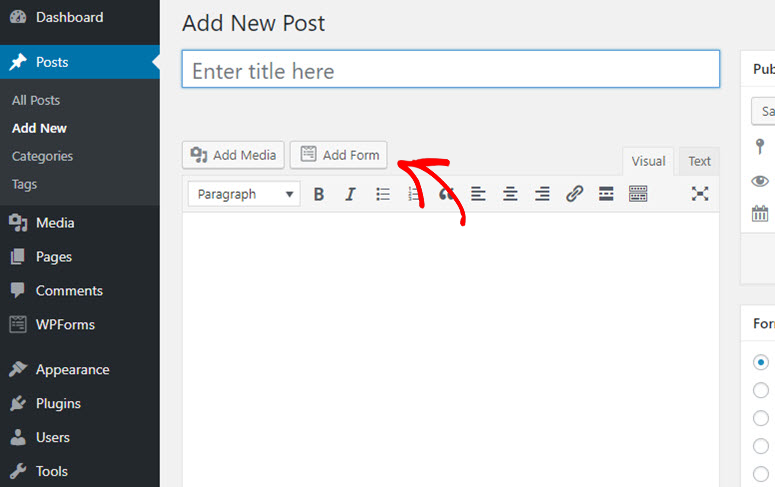
Select the right form you want to publish and then click Add Form and then, click Publish.
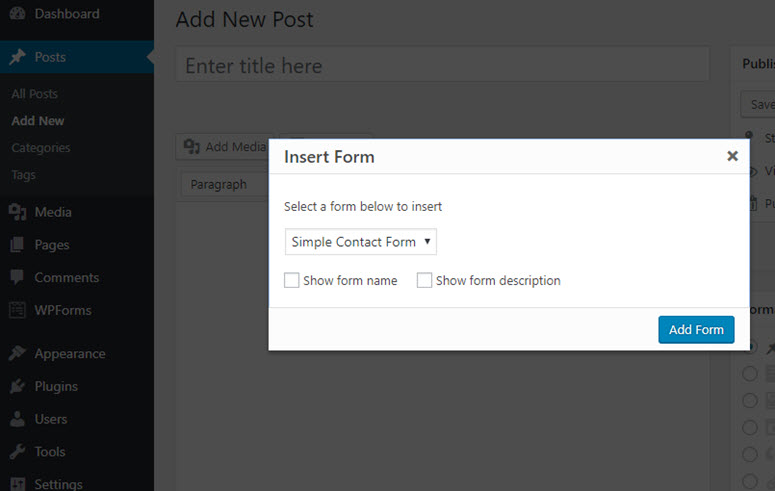
而已! You’ve now successfully published a contact form.
Want to create a contact form the easy way?然后, get started with WPForms today。
Want to start with the free version instead? Try WPForms Lite。
6.3。 Improve Your Store’s SEO with Yoast
Do you want to expand the reach of your products? Do you want to drive more targeted traffic from search engines that are likely to purchase your products?
Then you’ll essentially need to improve your SEO. The best way to improve the SEO of your online store is installing an SEO plugin like Yoast SEO.
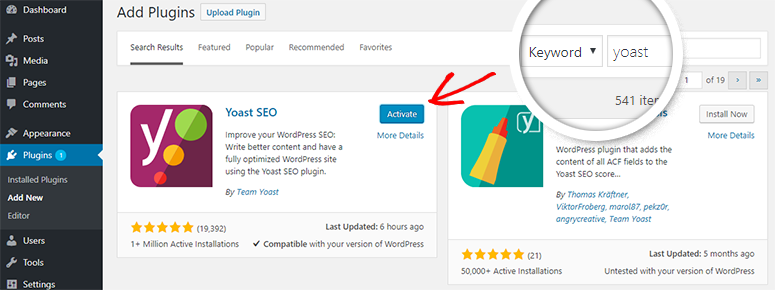
In your WordPress dashboard, go to Plugins » Add New. Search for Yoast in the search bar that you can find in the top right-hand corner. The Yoast SEO plugin will now have appeared on your page. Click Install and then Activate.
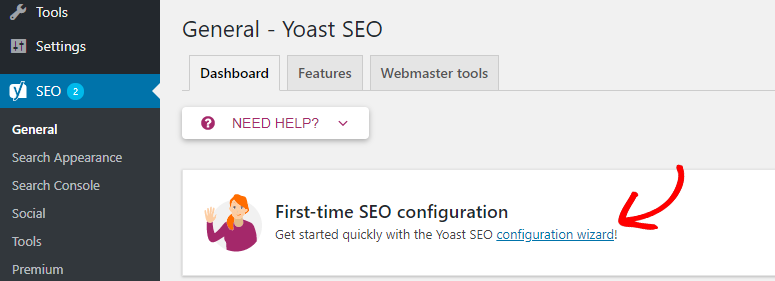
In your WordPress dashboard, you can now find the SEO menu in the left-hand menu. Simply click on it.
If the plugin detects any SEO errors, then you can fix them by following the suggestions provided.
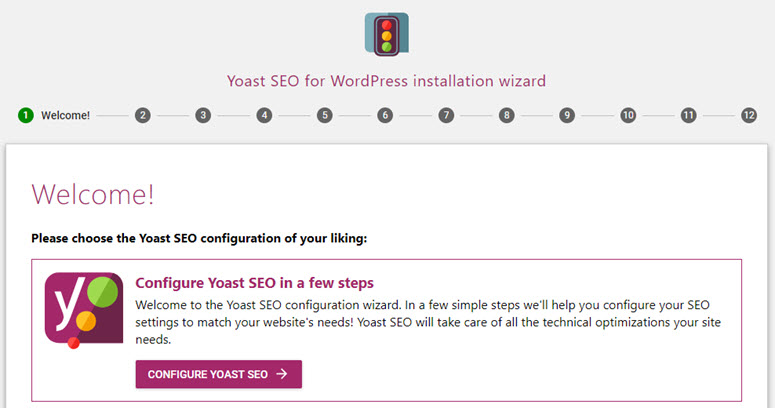
Setting up Yoast SEO is easy using the configuration wizard. Simply click on the configuration wizard to get started.
In the first step, you’ll be asked whether you want to configure Yoast SEO yourself or hire an expert to do it for you. Select CONFIGURE YOAST SEO to do it yourself.
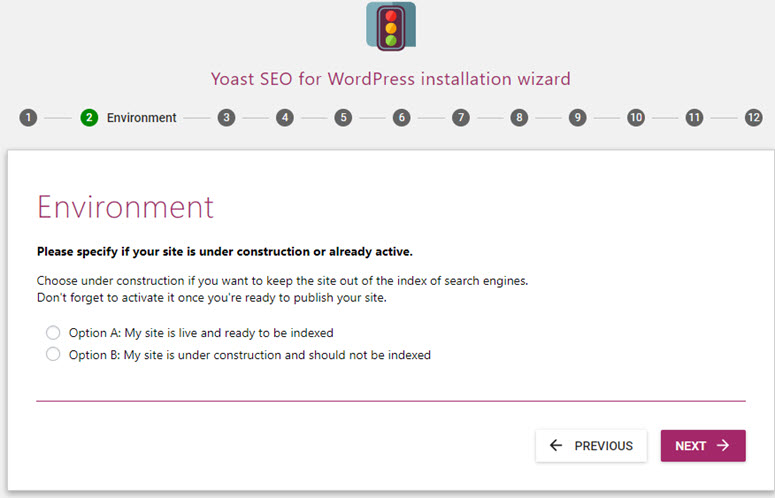
In the next step, you’ll be asked whether your site is ready to be indexed. You can choose option A. Then, click Next.
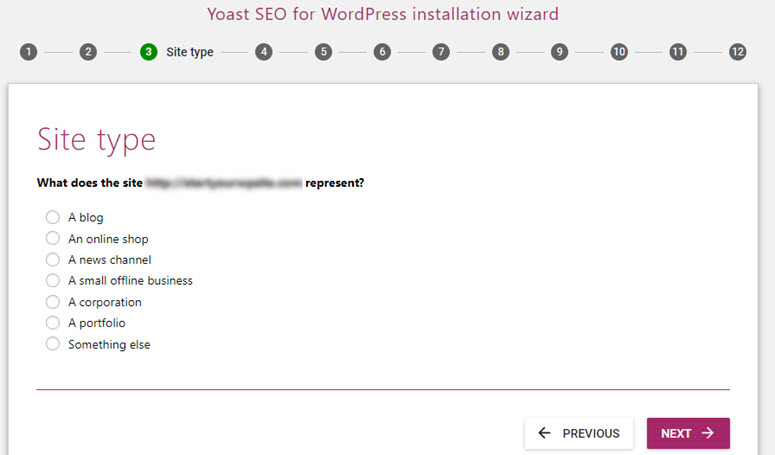
Next, you need to choose your website type. In this case, you want to select – An online shop. Then, click Next.
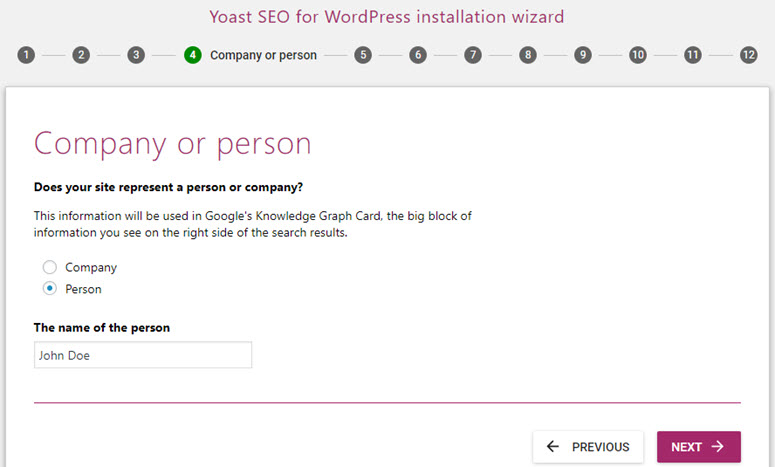
For Google’s knowledge graph card, you’ll be asked whether the website is run by a person or a brand. If Person is selected, then you’ll have to specify the name of the person. If Company is selected, then you’ll have to add the logo as well. Then, click Next.
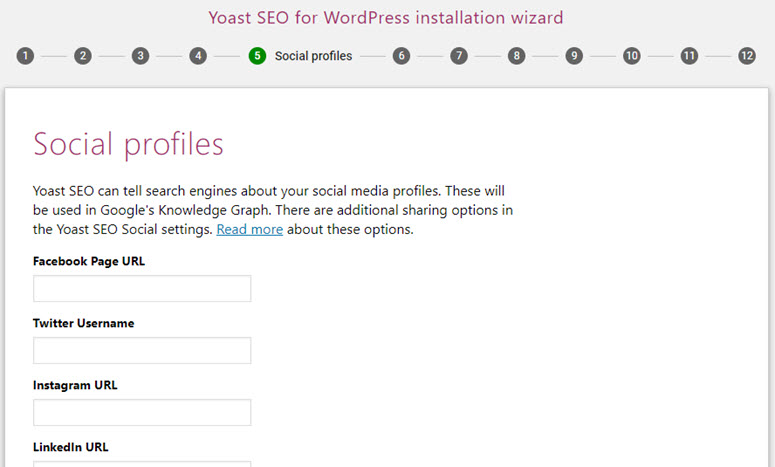
You can now enter your social media profile URLs in their appropriate fields. Then, click Next.
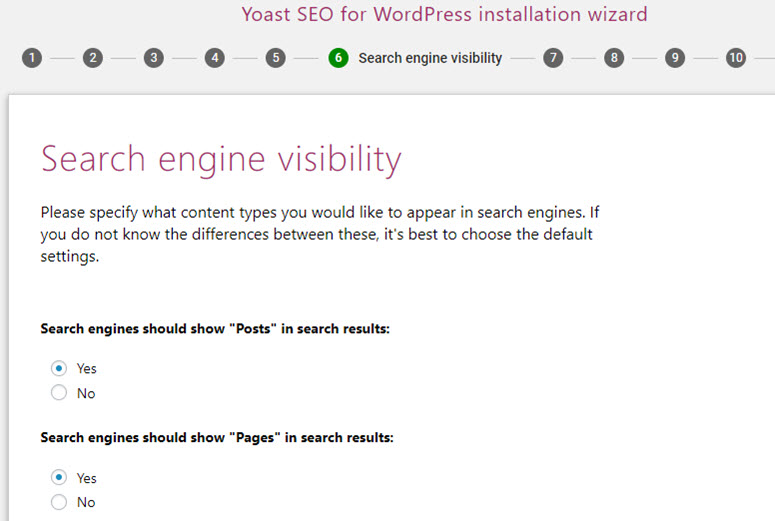
In the Search engine visibility step, you don’t have to change the default settings because they’re set up to index your posts and pages. Simply click Next.
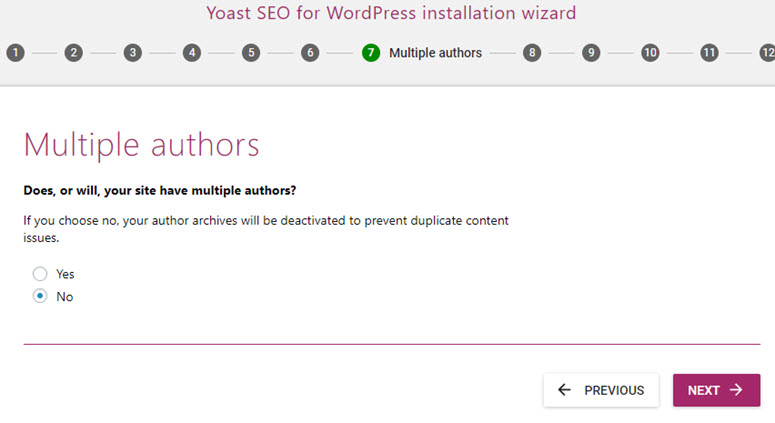
Author archives might create duplicate content issue for search engines. To prevent it, you can disable it if your blog doesn’t have multiple authors.
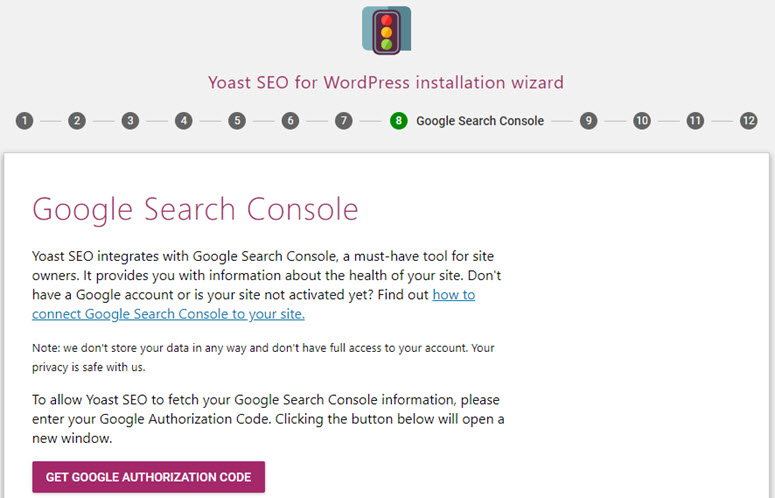
Next, you’ll be prompted to connect your website to Google Search Console, which is a free tool that gives you detailed insights into how your blog content is being perceived by Google.
Next, you can set up the title for your blog, and then, click Next.

You can now exit the configuration wizard because the other steps were created for promotional purposes such as signing up for Yoast’s newsletter.
Get started with Yoast SEO today to improve your store’s SEO.
Want to start with the free version instead? Try the free Yoast SEO。
6.4. Reduce Shopping Cart Abandonment with OptinMonster
Did you know the average online shopping cart abandonment rate is around 70%? That means only 3 out of 10 customers are completing the checkout.
Evidently, shopping cart abandonment is the single largest obstacle for eCommerce business to overcome. But, you can reduce shopping cart abandonment with a plugin like OptinMonster。
OptinMonster is a popular lead generation tool that allows you to display targeted popups that convert abandoning visitors into subscribers.
For instance, when a customer is about to leave your site before completing the checkout, you can prompt them to complete it with a targeted popup campaign. You can use OptinMonster’s exit intent technology to display a targeted campaign.
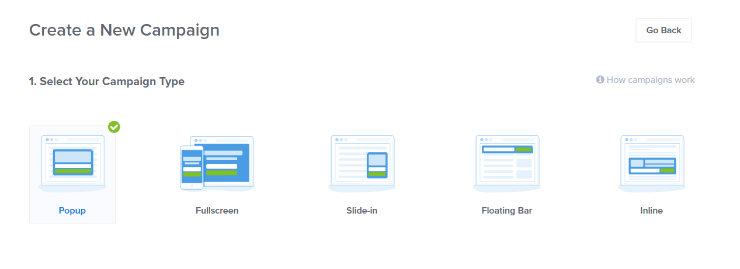
To create a targeted exit-intent popup campaign, first create an account with OptinMonster on their official website. Once you’ve signed up for an account, you can start creating your first exit-intent popup campaign to reduce cart abandonment. First, click on the green Create Campaign.

Next, choose the campaign type by clicking on Popup.
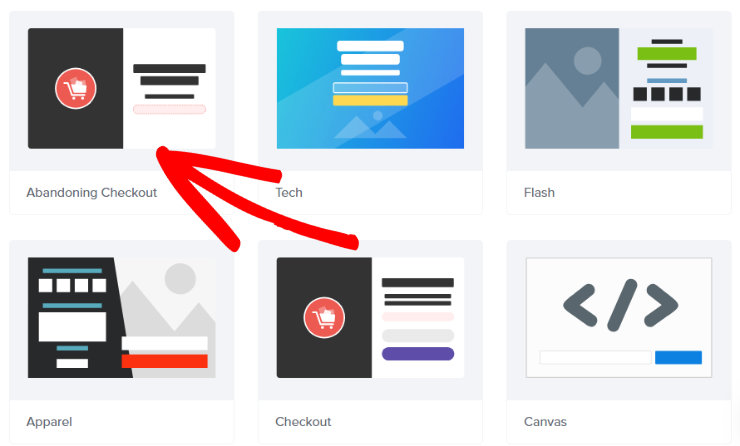
After that, you’ll be prompted to choose a pre-designed template for your campaign. OptinMonster has a pre-built template specifically for shopping cart abandonment, so let’s choose that one, titled Abandoning Checkout. Hover over the template and click the Use Template button.
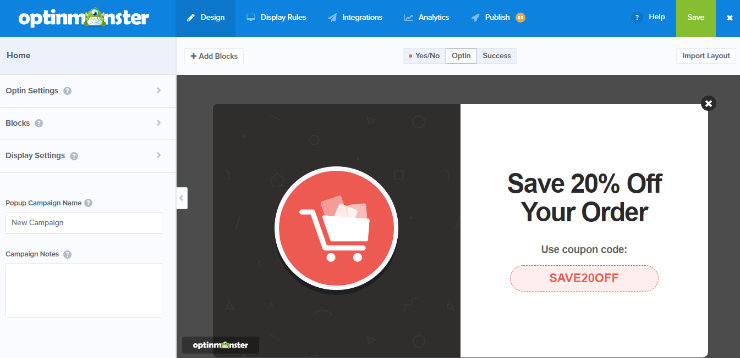
After clicking the Use Template button, you’ll be prompted to name your campaign and choose which website your popup will go on. Then, click the Start Building button to continue.
You’ll then be taken to the Campaign Builder. In this area, you can begin customizing your campaign to make it your own. You can change the colors, add your own image and text, and more.
You can also add other rules such as only showing the popup to users who have visited your checkout page as well. Play around with the rules to see what works best for you.
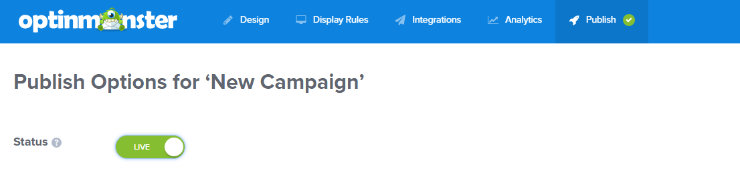
After designing your campaign, setting the display rules and making sure your campaign is connected to your email marketing service, hit the green Save button, then click on Publish.
From here, toggle your campaign to Live in the Status section.
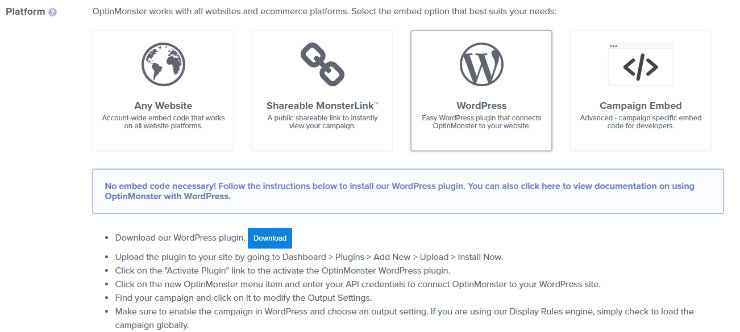
In the platform section, select WordPress, and follow the simple instructions to embed the campaign on your website.
Now instead of losing precious sales, you’ll be able to convert those abandoning visitors into happy customers.
Some other ways to reduce shopping cart abandonment include adding security badges to your site and offering guest checkout. Adding a security badge helps instill confidence in your customers and guest checkout makes it easy for your customers to complete an order, so they don’t have to create an account.
Chapter 7: Adding Your First Products
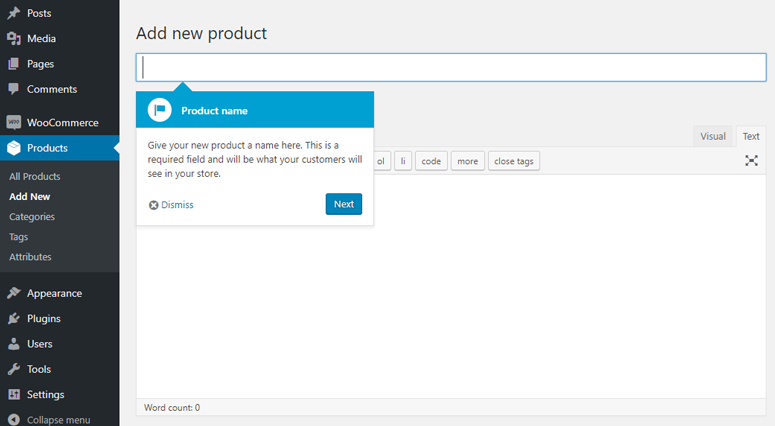
You can now start listing your products in your store by clicking the Create a Product button. This will direct you to the Products editor in your dashboard. Adding a product in your WooCommerce store is easy.
Just like creating a page or post, you’ll need to add product details like title, product description, product categories, product tags, product image and gallery by navigating to Products » Add New.
Just below the text editor, you can find a product data box where you can specify the product specific details like:
- Regular and sale price
- Manage inventory
- Shipping details like weight and dimensions
- Product upselling and cross selling details
- And more…
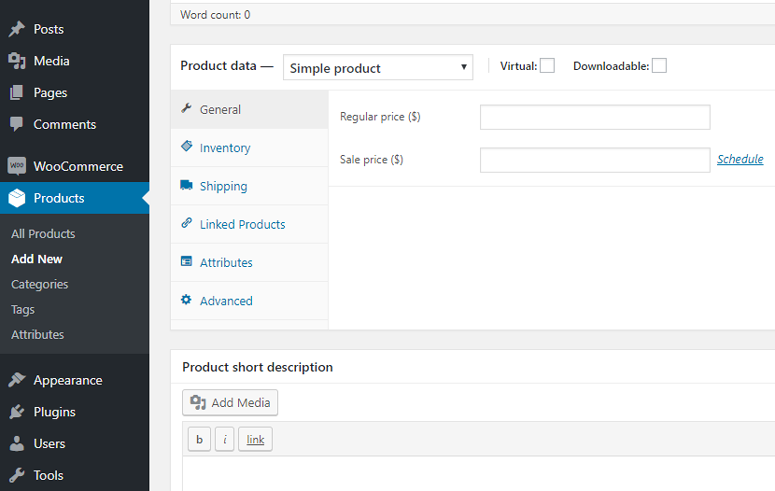
You will also find a short description box which is used when there are multiple products on a page.
Chapter 8: Before-Launch Checklist

Now that your online store is nearly completed, before you go live, you need to make sure you have everything in order. Launching your online store before it’s ready can cause problems for you and can even drive away your potential customers.
So, here’s a before-launch checklist that includes every step you should cross off your to-do list. Be sure to complete each of these steps before launching your online store to the world.
- Build Your Online Store – Build your online store and make sure everything looks perfect for your future customers. Be sure you have all the pages you need such as product pages, about page, contact page. As an online store you also need a shopping cart and checkout page.
- Prep with a Coming Soon Page – Get your audience excited about your online store before it’s even launched by adding a coming soon page to your site. You can easily do this using a plugin like SeedProd。
- Add Your Products – Add all of your products to your online store. This includes high-quality images, product descriptions, prices, etc.
- Optimize Your Images – Online stores are image-heavy which can slow down your site. Be sure to optimize your images using an image optimization plugin like reSmush.it。
- Adjust Your Tax and Shipping Settings – Double check your tax and shipping settings to make sure you’re charging the right price for the products you’re selling.
- Test for Mobile – Many consumers do their online shopping from their mobile devices, so make sure your online store is mobile-friendly.
- Test the Performance of Your Site – Test the speed and performance of your online store to make sure it’s optimized for shoppers. You can use our free Website Speed Test Tool to test your site and get suggestions for improvements.
- Install Analytics – Create a Google Analytics account and use MonsterInsights to track your website data. Test to make sure it’s tracking accurately before launching your online store.
- Optimize Your Site for SEO – Install a plugin like Yoast SEO in order to optimize your website for SEO.
- Set up Email Marketing – You’ll need to email your customers and vice versa, so make sure to set up your email marketing. You should also start growing your email list with a lead generation tool like OptinMonster.
- Place a Test Order – Make sure your shoppers can buy products from your store successfully by placing a test order using your payment gateway. You can refund the order right after confirming it works.
- Market Your Online Store – Start marketing your online store to drive more shoppers to your eCommerce website. For instance, start promoting your online store on social media and start blogging.
Chapter 9: Promote and Grow Your Online Store

If you’re an eCommerce merchant, your ultimate goal should be to grow your sales and revenue. There are many different ways to generate more sales on your online store. Let’s take a look at a few of them below:
- Drive targeted traffic.
- Turn your visitors into leads and customers by building an email list.
- Resources to learn and master WordPress and WooCommerce.
9.1. Drive targeted traffic
Driving more traffic is the lifeblood of any online business, but keep in mind that more traffic doesn’t always equate to more sales. You need to ensure that you’re attracting targeted traffic who’s interested in your products.
A couple of ways to drive more targeted traffic to your site are:
- SEO: Improve your SEO and help your potential customers discover your products on Google and other search engines.
- Paid ads: SEO can be time consuming, so if you want a quick solution to drive targeted traffic, then you might want to spend your marketing dollars on paid ads.
- Affiliate program: Start an affiliate program and encourage people to promote your products to earn referral revenue.
9.2. Build and Grow Your Email List
One of the reasons you’re not turning your visitors into customers is that you don’t have a relationship with them. Your customers don’t know you, so they’re afraid to make a purchase from your store.
Building an email list is the best way to start and foster relationships with your potential customers.
Building an email list helps you qualify your leads, build a longlasting connection with them, and ultimately, helps you turn your visitors into leads and customers. In fact, 根据一项调查, email has an ROI of around 4,300%, so if you’re not taking your list seriously, then you’ll fall behind quickly.
同 OptinMonster, you can skyrocket your email list by showing targeted list building campaigns by detecting their individual user behavior.
9.3. Learn and Master WordPress and WooCommerce
To be able to run a successful online store, it’s imperative to learn and master WordPress and WooCommerce.
Below are a few resources you’ll find helpful.
- OptinMonster blog: OptinMonster blog is a go-to resource on the web for all things online marketing and conversion rate optimization.
- IsItWP: At IsItWP, we regularly publish WordPress tutorials, WordPress theme and plugin roundups, reviews, WordPress deals and a lot more.
- WPBeginner: WPBeginner is the largest free WordPress resource on the web for WordPress beginners. They regularly publish useful tutorials, videos, coupon codes for WordPress products and a lot more.
- WPForms blog: If you want to read tutorials that help you grow your business using the WordPress platform, you need to follow the WPForms blog. You can also find tips and recommended practices to build any types of online WordPress forms.
- MonsterInsights blog: The MonsterInsights blog is an excellent resource you can follow to get a handle on Google Analytics best practices and recommendations. You can find a lot of WooCommerce specific articles including setting up enhanced eCommerce tracking, individual customer tracking, etc. for WooCommerce.
Chapter 10: FAQs

Having helped many users set up their online stores with WordPress + WooCommerce, we’ve found that people often ask the same sort of questions again and again. This is why we’ve compiled a list of frequently asked questions, so you can easily launch your online store without hassle.
When should a business start creating an online store?
As online sales are rapidly growing, having an online store gives you a huge advantage over your competitors.
If you want to expand your business online and grow your revenue, then you should launch an online store as soon as possible.
How much does it cost to start an online store?
To start an online store powered by WooCommerce, you’ll have to purchase a domain name for $14.99 per year and a hosting account, which costs around $7.99 per month. Altogether, starting a site will cost you as low as $110.87 annually.
Can I start an online store without purchasing a hosting account?
No. Every website needs a hosting account. You can find several eCommerce platforms that allow you to build an online store with a premium subscription which includes hosting as part of it.
Can I start an online store without WordPress/WooCommerce?
Yes, there are a lot of eCommerce platforms that let you build an online store easily. However, the main thing that sets WooCommerce apart from the competition is its ease of use. WooCommerce works on top of WordPress, the world’s most popular website building platform. That means the interface will be familiar if you’ve ever used WordPress before.
Another benefit is that, unlike other self-hosted eCommerce platforms, WooCommerce doesn’t require you to go through a tedious installation process. In fact, most web host providers, including Bluehost supports WooCommerce hosting, so you can quickly get your online store up and running without any software installation or manual setup on your end.
How do I add a blog to my online store?
Adding a blog to your WooCommerce-powered store is easy. All you have to do is to create articles by navigating to Posts » Add New, and publish them by clicking the Publish button.
In addition, make sure to add a link to your blog in your navigation menu so your visitors can easily discover it.
How do I make my products Google searchable?
If you want your potential users to discover your product on Google, then you’ll need to improve your SEO (search engine optimization). SEO is the practice of increasing your website traffic from search engines by getting your web pages to rank higher in search engine results.
How can I learn more about WordPress terminologies?
Refer to this WordPress Glossary Terms for Beginners whenever you’re puzzled by strange WordPress terms or abbreviations.
What payment methods are supported on WooCommerce?
By default, WooCommerce allows you to accept payments via PayPal. To add more payment gateways to your store, simplify the find the right WooCommerce addon and install it on your store. You can use credit cards via Stripe, Authorize.net, Braintree, and several other gateways. You can also accept bank transfers, bitcoins, and more.
How do I manage shipping in WooCommerce?
WooCommerce supports a few shipping options:
- Free Shipping
- Flat Rate Shipping
- 国际航运
- Local Delivery / Local Pickup
If you’re selling a lot of products, then you can install a shipping addon like FedEx Shipping Method. This way you don’t have to worry about shipping the orders your customers’ make, giving you a peace of mind.
How do I drive traffic to my online store?
Some ways to drive traffic to your online store are:
- Search engine optimization
- Drive social media traffic
- Invest in online ads
We hope this article helped you create an online store with WooCommerce.